Certificates & Documents
Introduction
This module relates to the workflow used to define, add, view and maintain certificates and documents relevant to specific parties.
The term Certificates will be used broadly throughout this guideline and includes relevant and associated Documents.
In this guideline, we will focus on the process of adding and maintaining certificates for Employees / Contractors.
The same principles and procedures should be used when defining, adding, viewing and maintaining certificates relevant to other parties - Customers, Suppliers, Financiers, and Legislators.
Before adding certificates & documents relevant to employees, there are a few settings (prerequisites) that need to be in place.
These include;
-
Directory Settings for Employee Document folders
-
Employee Certificate Folder
The directories and folders above should preferrably shared with relevant colleagues, SEMS users and/or management of the company - this could be a shared Local Area Network (LAN) directory or shared cloud based folders (e.g. Dropbox, Google Drive etc.) -
Certificate Definition and Rules
By default the SEMS system lists 3 Certificate Definitions under the Personal Group;- Curriculum Vitae (CV)
- Identity Documnet (ID)
- Passport
In the subsequent step-by-step guidelines, the procedures for adding further Certificate Definitions and associated rules are described.
Once the pre-requisite settings are in place, Certificate records and associated documents can be added for individual employees.
Step-by-step Guideline
Prerequisites - Directory Settings
-
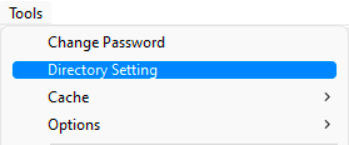
Select the Tools option from the Main Navigation Menu.
-
Then click on Directory Setting.
-
The system will open a screen titled "Directory Setting".
This screen lists all the Directories & Folders relevant to each party.Here we will define the Employee Document & Certificate Folder Directory paths.
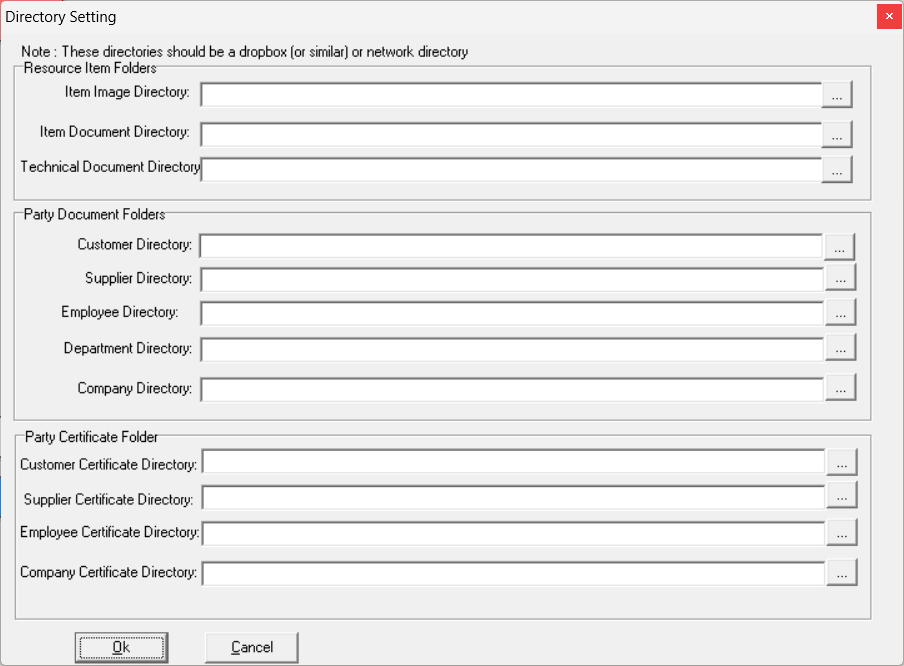
- In the Party Document Folder section, click on the three-dot button in the Employee Directory field.

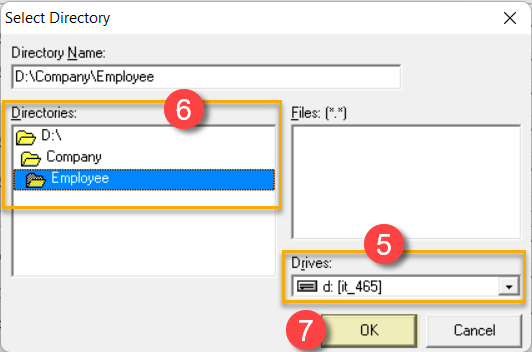
The Select Directory pop-up screen is displayed.
-
Select the shared network Drive (LAN drive or cloud based storage drive).
-
Navigate to the relevant folder in the Directories field, and Double-click the folder of your choice.
In this instance we have selected D:\Company\Employee as displayed in the Directory Name field.
-
Click the OK button.
-
In the Party Certificate Folder section, click on the three-dot button in the Employee Certificate Directory field.

The Select Directory pop-up screen is displayed.

- Repeat Steps 5 - 7 as above.
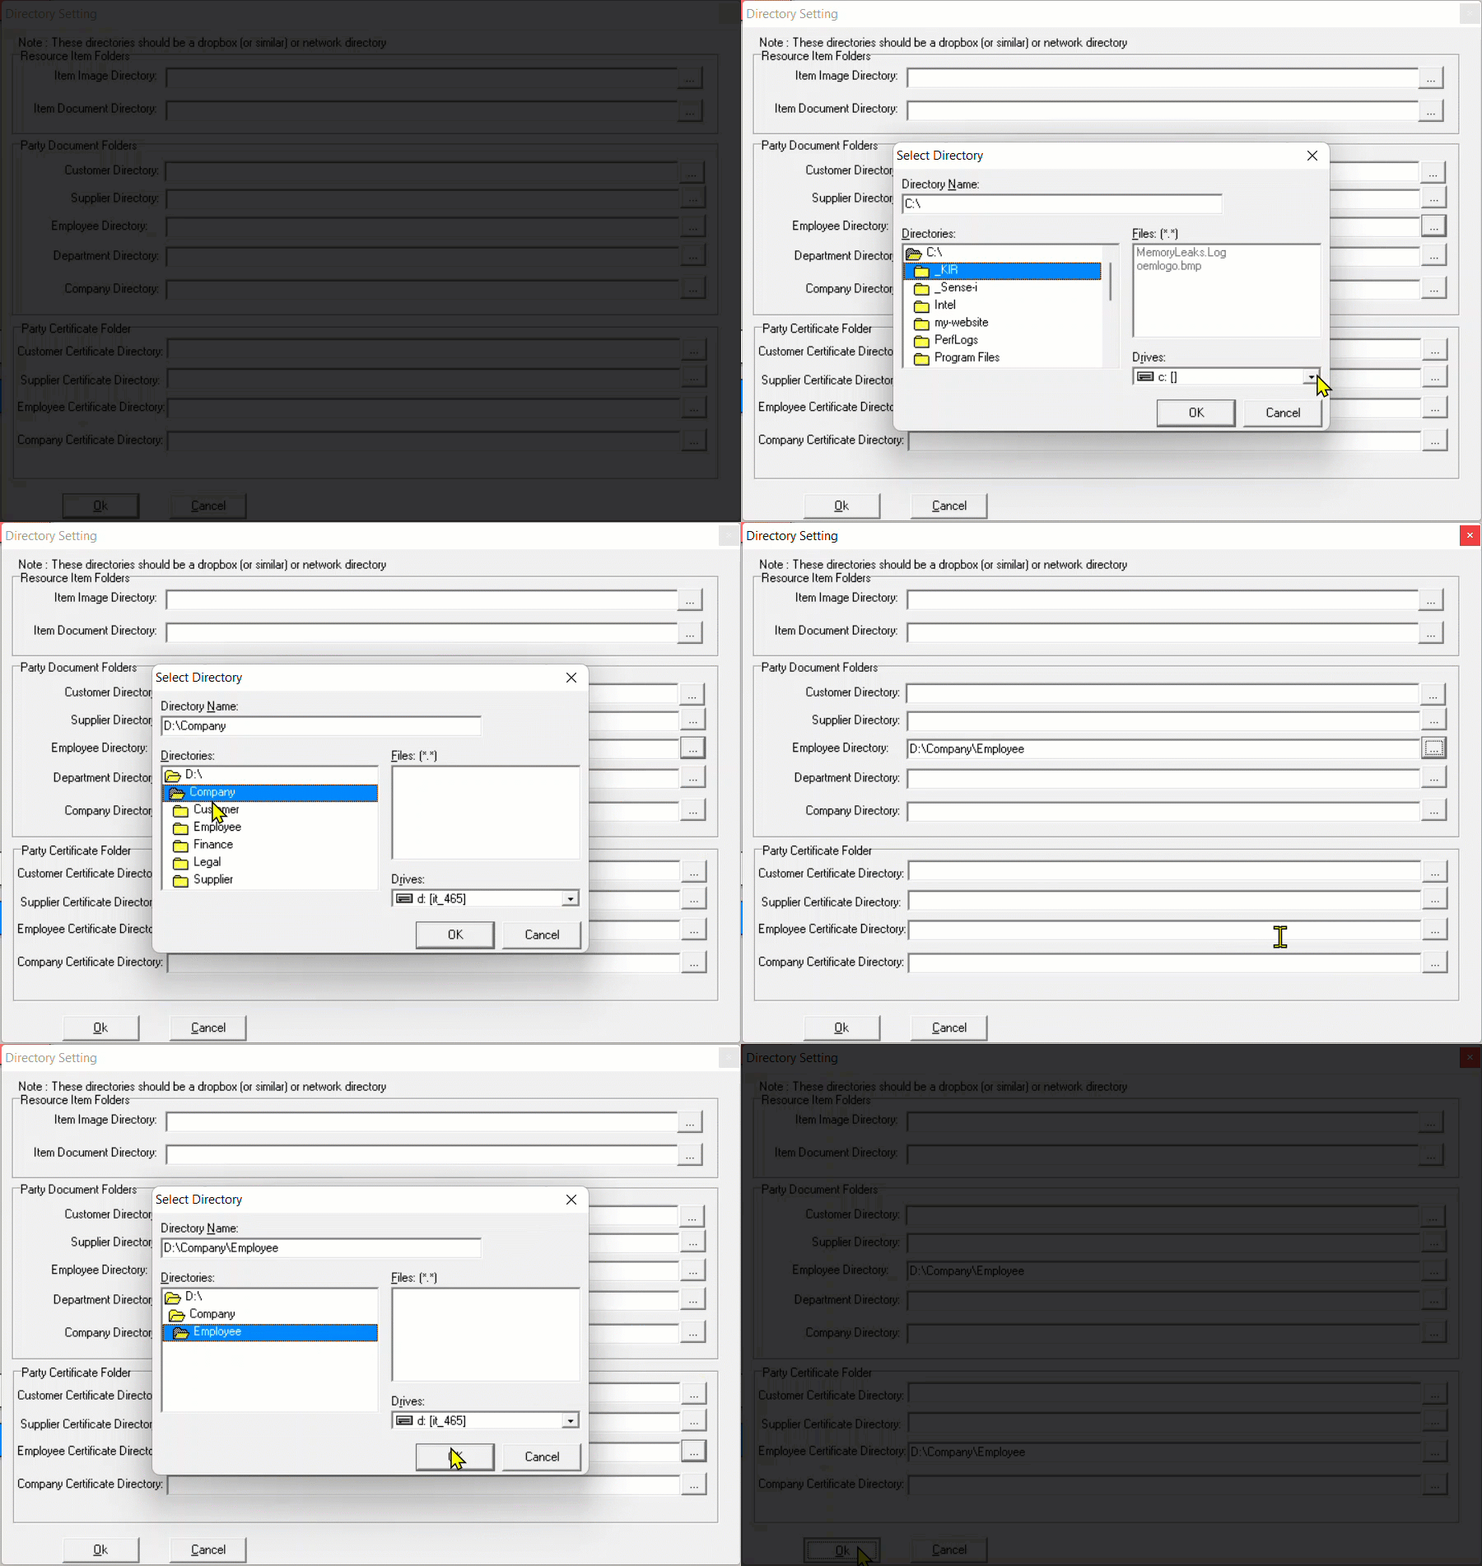
The Directory Settings for Employee Documents and Certificates have now been completed.
Follow the same procedure as detailed above to define the Directory Settings for Resource Items, Customers, Suppliers, Departments and the Company.
- Once you have entered all the information for Directory Settings click the OK button.
Certificate Definition and Rules
The following Step-by-step guideline describes the process of viewing, adding and maintaining Certificate Definitions for all parties in the SEMS system.
-
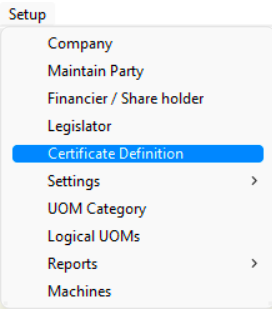
Select the Setup option from the Main Navigation menu.
-
Click on Certificate Definition from the Drop-down menu.
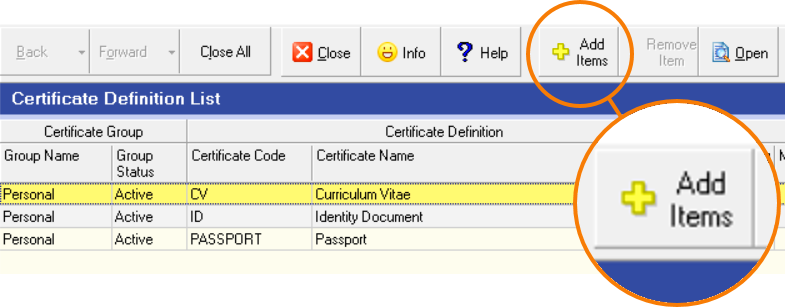
The Certificate Definition List screen is displayed.

Initially the SEMS system lists 3 Certificate Definitions under the Personal Group;
- Curriculum Vitae (CV)
- Identity Documnet (ID)
- Passport
In this exercise we will be adding another Certificate Definition and apply the appropriate rules.
We will be adding a Matric Certificate record for a specific employee in the next stage.
Thus the reason for definining an additional Certificate with relevant rules.
- Click the Add Items button on the Form bar.
The Add New Certificate screen is displayed.
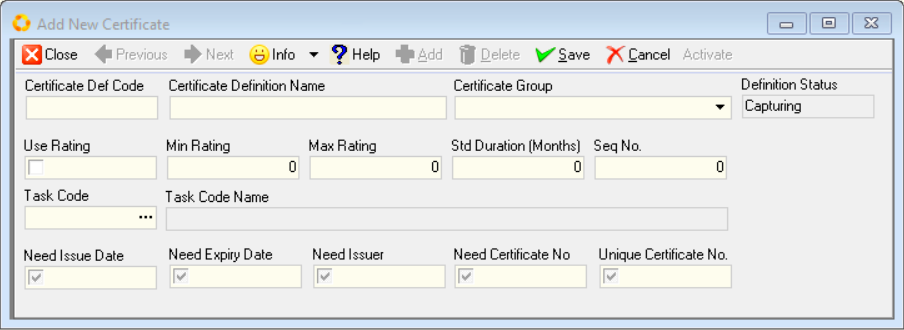
- Capture an appropriate Certificate Definition Code in the Certificate Def Code field.
In this instance the code EDU-NQF4-NSC is used...
EDU, an abbrviation for Education
NQF4 - National Qualification Framework, Level 4
NSC - National Senior Certificate
-
Complete the Certificate Definition Name field.
-
Choose the relevant option from the Certificate Group drop-down menu.
The Use Rating checkbox, together with the Min Rating and Max Rating fields are used when you need to apply different values / weights to the same type of certificates.
In the case of Matric Certificates, some candidates will have different results and / or subjects when compared to others. This can be useful from a management perspective when deciding which employees are better suited for a specific task or project.
- Once the primary Certificate Definition fields have been completed, click the Save button.
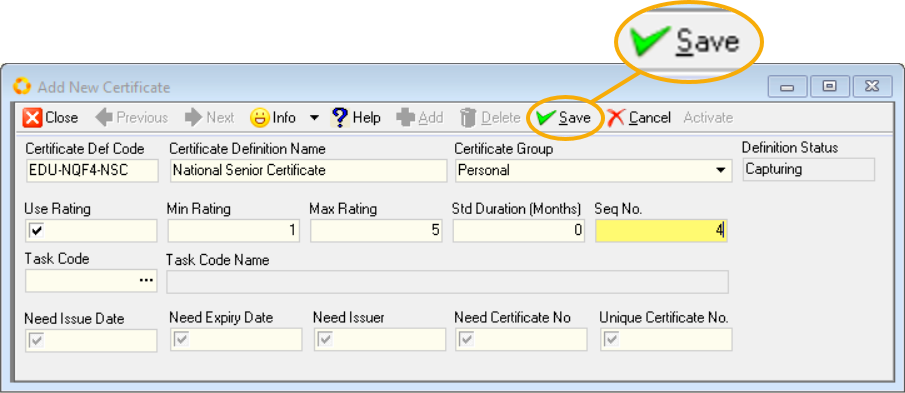
- Once saved, the Certificate Definition Rules can be applied by selecting / de-selecting the relevant checkboxes;
- Need Issue Date
- Need Expiry Date (in those cases where a certificate is only valid for a certain period of time, e.g. drivers license.)
- Need Issuer (where more than one authority supplies the same type of certificate)
- Need Certificate Number
- Unique Certificate No.
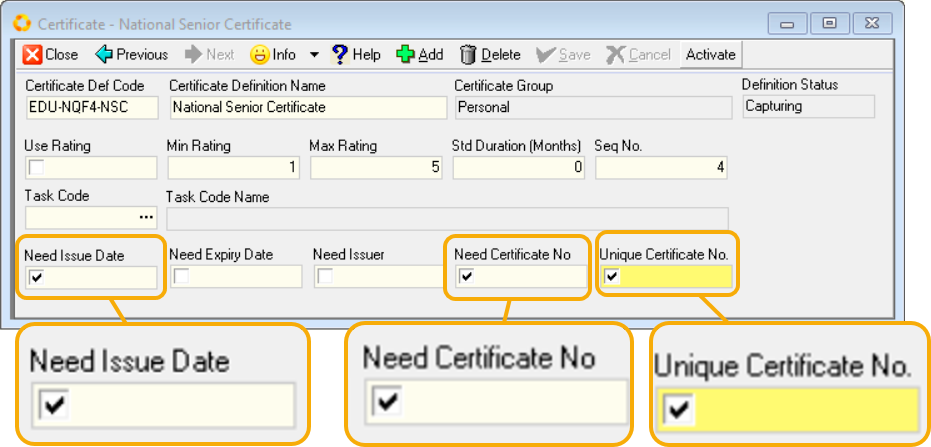
In the example above, those rules relevant to a Matric Certificate were selected.
-
Once you are satisfied that all the information is correct, click on the Save button and then Activate the record.
-
The Certificate Definition & Rules screen can now be Closed.
The Certificate Definition List screen now displayes the newly added Definition.

Repeat the above procedure to add further Certificate Definitions.
The Certificate Definition needs to be Deactivated before amendments can be made. This is also true for those definitions that need to be deleted / removed.
Add / Maintain Certificate records and associated documents for individual employees
-
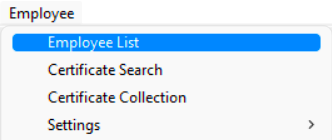
Select the Employee option on the Main Navigation Menu.
-
Click on Employee List in the Drop-down Menu.
The Employee List grid is displayed.
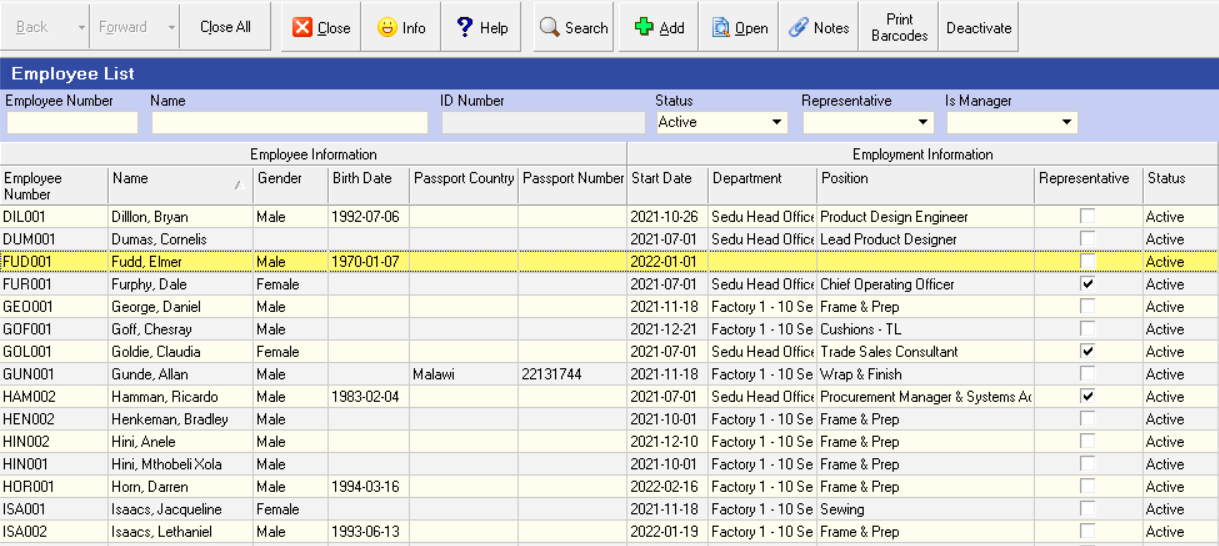
- Select the employee record row and the click the Open button on the Form Bar (alternatively, double-click the record row to Open.)
The specific Employee screen is displayed.
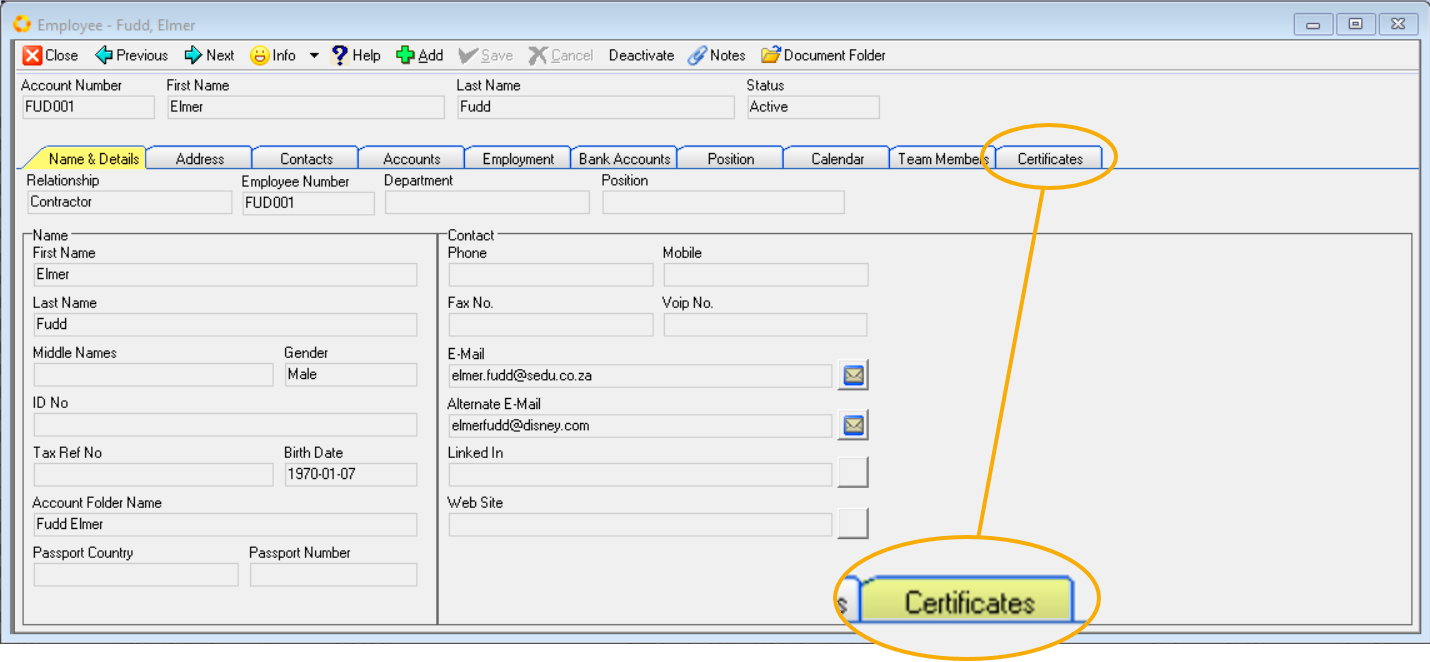
- Click the Certificates tab.
The Certificates Tab grid is is displayed. Intially there will be no Certificate / Document records.

- Select the Add button on the Form Bar.
A Confirmation dialogue box is displayed.

- Click Yes to confirm the creation of the relevant employee sub-directory.

- Click the OK button on the Information dialogue box.
At this satge of the procedure, it is neccessary to copy or move and/or save the employee document files to the newly created sub-directory.
This is achieved by using Windows File Manager.
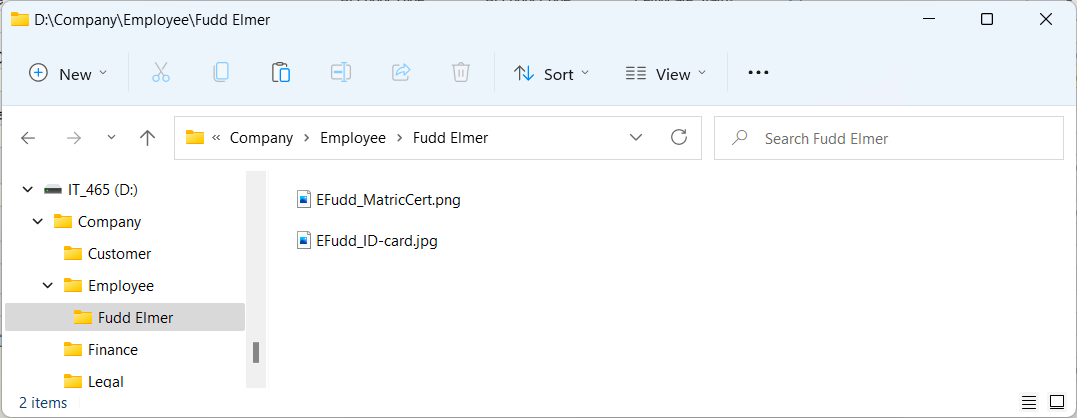
- Select and Open the certificate / document file from Windows File Manager using the associated application.
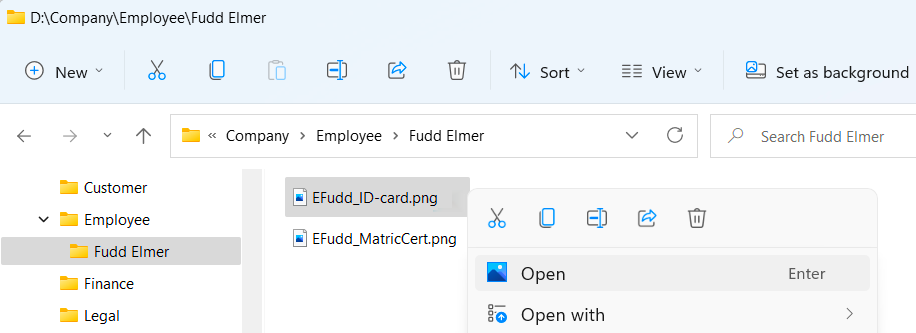
- Use this for reference to enable the capture of information to the SEMS system.
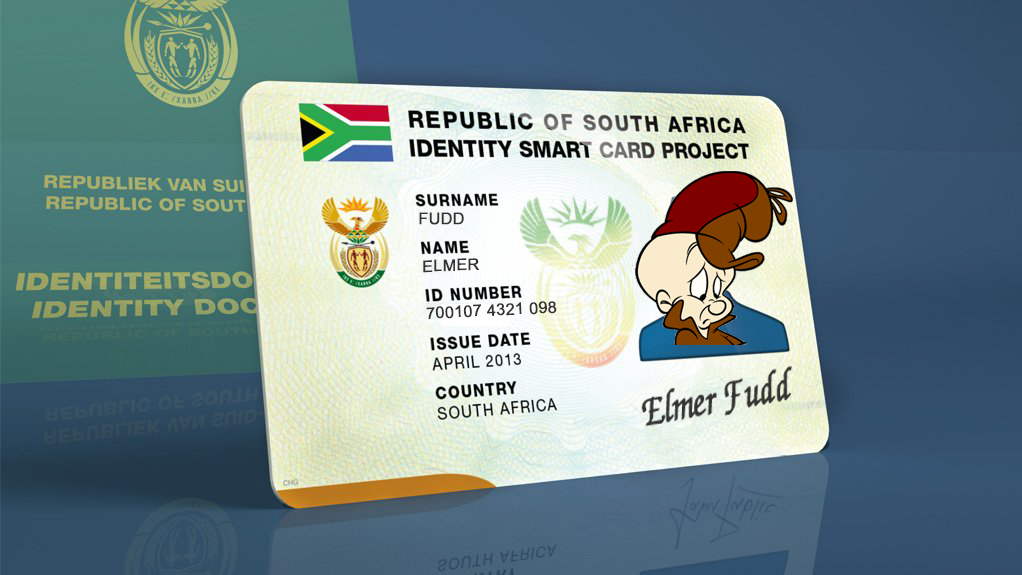
If your computer system has a dual screen setup, it is recommended that the certificate/document file is displayed on one screen, while the SEMS application is active on the other screen.
Alternatively, the two applications could be displayed side-by-side on a single screen setup.
Another option would be to "ALT + TAB" between the two applications.
- In the SEMS application, click on the Add button on the Form Bar of the Certificates Tab in the Employee screen.

The Add New Certificate screen is displayed.
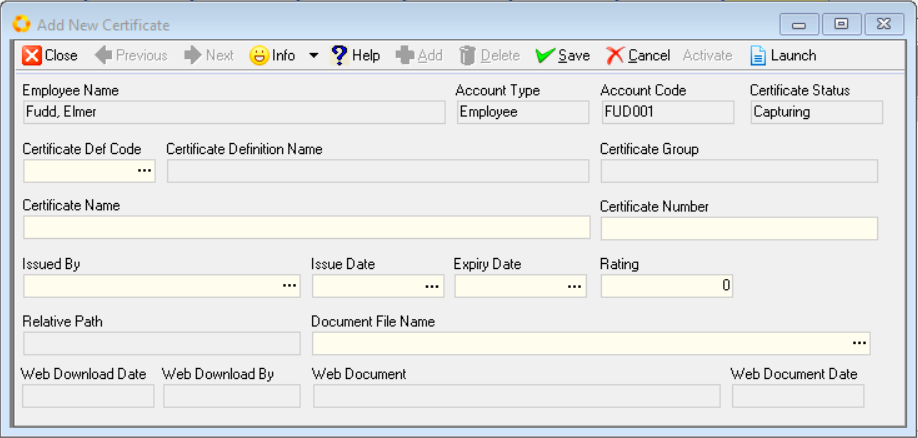
- Select the three-dot button in the Certificate Def Code field.
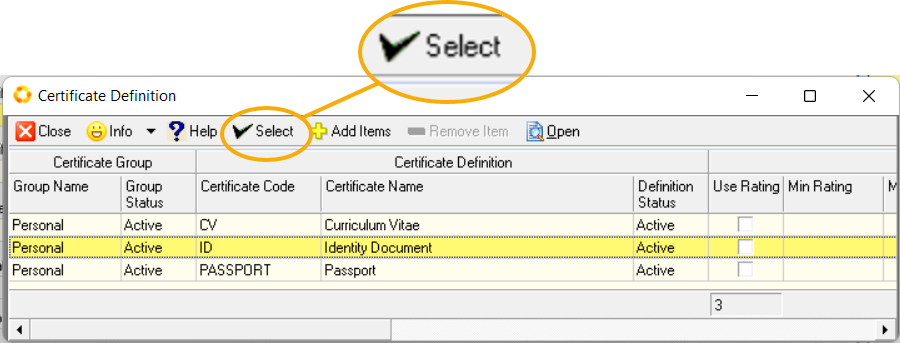
The Certificate Definition grid screen is displayed.
-
Click on the relevant Certificate Definition record, in this instance, the ID | Identity Document row...
-
Then click the Select button on the Form Bar.
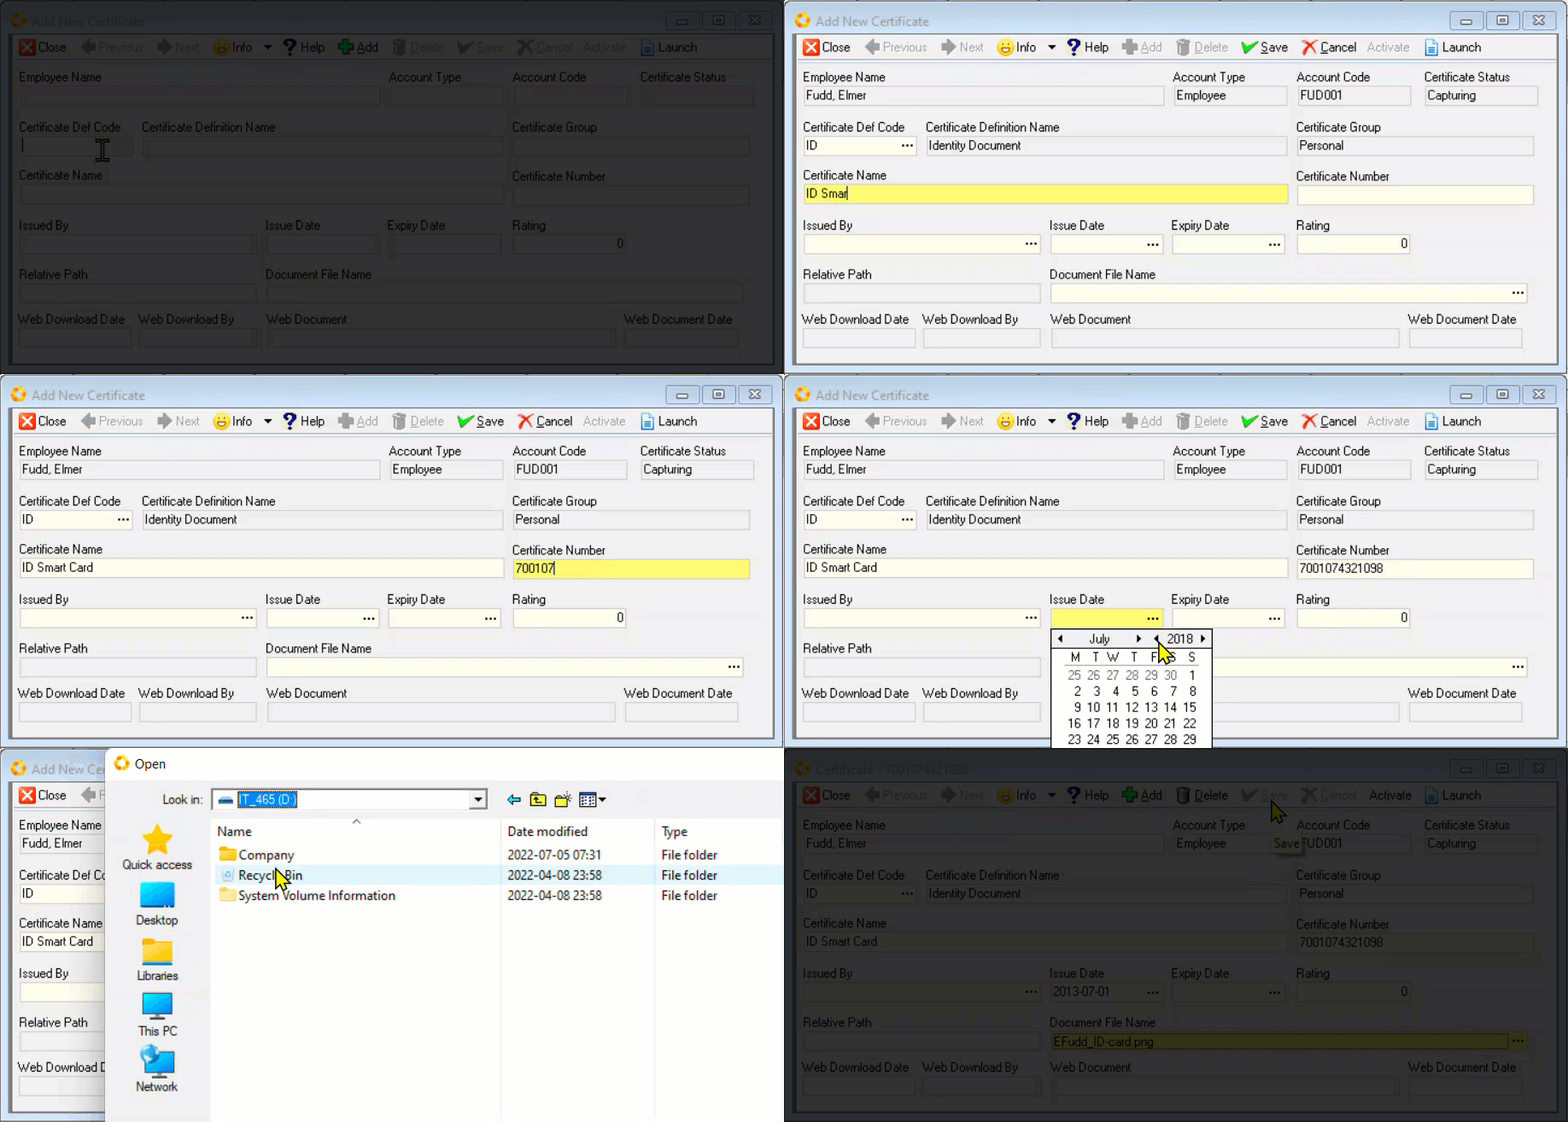
The Definition Name and Certificate Group is automatically populated by the system.
-
Enter the relevant information in the Certificate Name field.
-
Capture the Certificate Number - in this instance, the identity number.
-
Select the Issue Date from the calender, accessed by clicking on the three-dot button and navigating to the correct date of issue.
The Issued By, Expiry Date and Rating fields don't need to be captured in this case, as this information is extraneous in this particular representative exemplar.
-
Select the three-dot button in the Document File Name field...
-
Navigate to, select and Open the relevant document file.
-
Once all the the neccessary information has been captured, click the Save button.
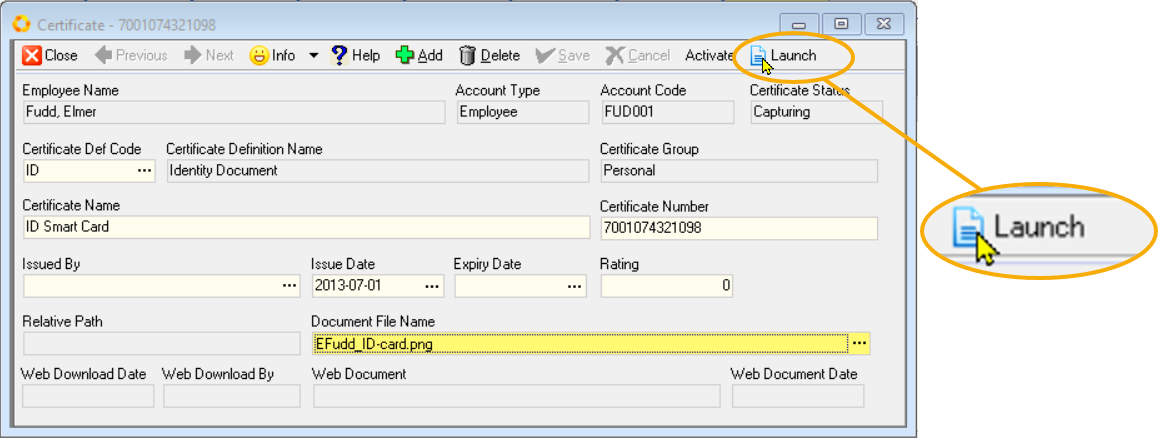
- The Launch option on the form bar opens the document file.
-
Check and compare the information to ensure all details have been captured accurately.
-
Once any neccessary amendments have been made and you are satisfied that the information is correct, click the Save button on the Form Bar.
-
The Certificate Detail record can now be Activated and Closed.
The Certificates Tab grid is displayed, with the newly added record listed.
To capture additional Certificates & Document records, repeat steps 10-23 as detailed above.
This is the end of this procedure.