Add SEMS Users
Introduction
This step-by-step guide will show you how to Add SEMS Users in the Sense-i system, enabling them to log in to the SEMS application.
The task of Adding SEMS Login Users is typically done by the SEMS System Administrator in your Organisation.
The SEMS System Administrator would also be responsible for issuing Manual One-Time-PINs (OTP) for those Employee's / SEMS users that forget their passwords.
Issuing Manual OTPs would only occur under the following conditions:
- If the Company Outgoing Email configuration has not been setup, OR
- where those Employees / SEMS Users do not have an Email address captured in the system.
For further information on redressing the above conditions, refer to these documents:
In certain instances SEMS Users / Employees would not use email. In these instances the issuing of manual OTPs would be required.
Login Users
Navigate to the Login Users Screen
-
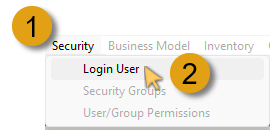
Click on Security in the Main Navigation Menu.
-
Then click on the Login User option in the drop-down menu.
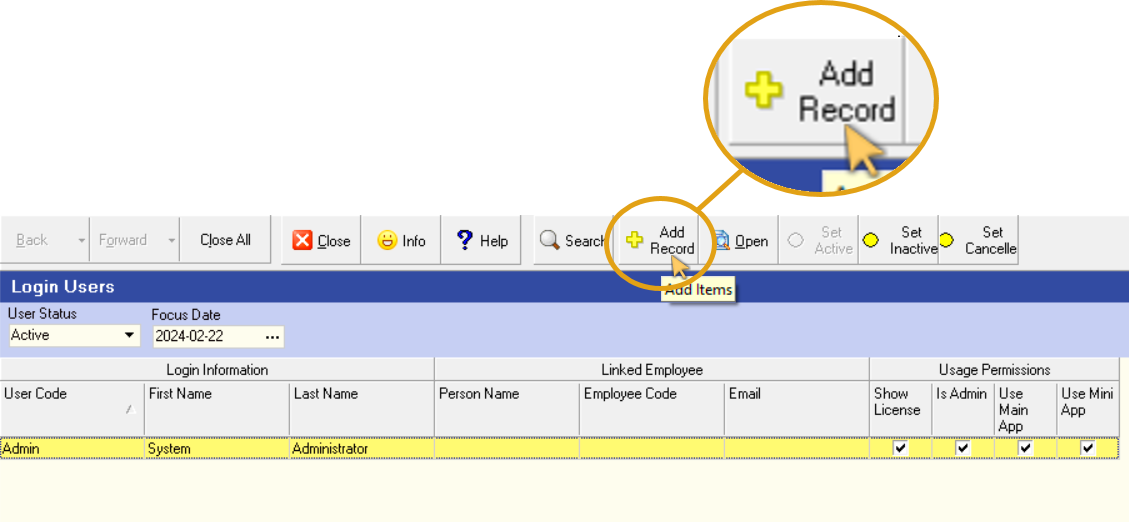
The Login Users screen is displayed.

The first time this screen is accessed by the SEMS System Administrator, only the SEMS System Administrator is displayed in the Grid List.
Once the SEMS Login Users have been added, this screen will list the Employees, and other individuals that have login access to the SEMS system.
Add New Login User
- Click on the Add Record button on the Action Bar.
The Add New Login User screen is displayed.
All fields that have a little red Asterisk sign next to the name MUST be completed.
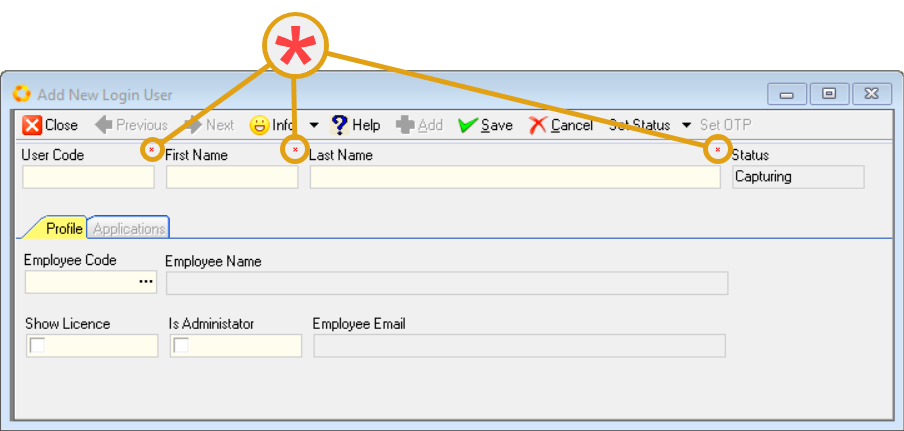
To add a Login User it is necessary to complete these fields.
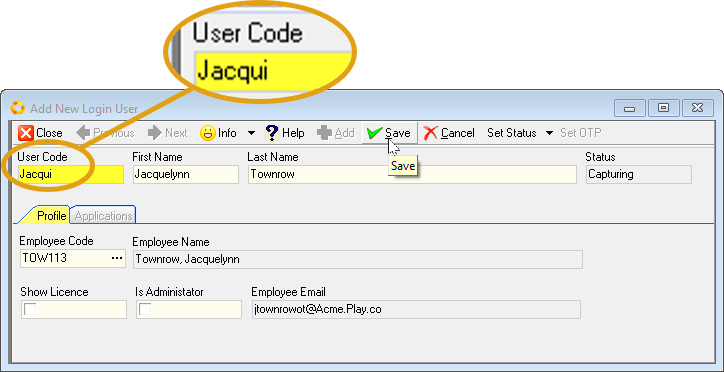
- Enter the User Code in the User Code field.
This is the User Name that the employee would use to login to the SEMS system.
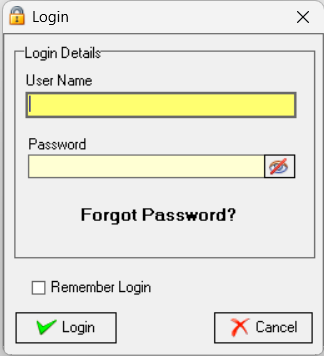
Refer to the document titled "Log in & Maintain Password".
-
Enter the employee's first name in the First Name field.
-
Enter the employee's surname in the Last Name field.
It is recommended that one of the first Login Users to be added should be an employee (typically in the Human Resources department) responsible for adding and capturing the relevant Employee Profile information for other employees in the company.
Refer to the document titled "Capture Employee Information".
Once this process has been completed, New Login Users can be added efficiently.
Employee Codes can be linked to employees listed under the Employee Code field in the Profile TAB of the Add New Login User screen.
- Click the three-dot button in the Employee Code field.
The Select Employee screen is displayed.
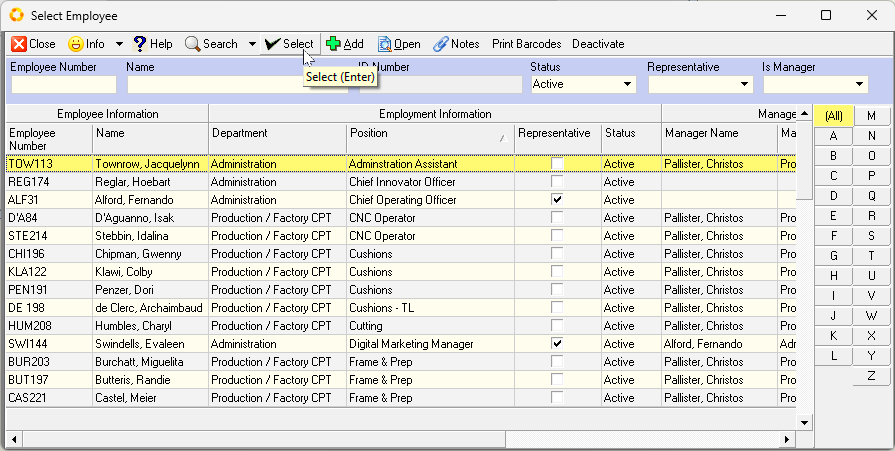
- Search for, and select the relevant employee by clicking on the applicable row, and then click the Select button on the form Action Bar.
The system will return to the Add New Login User screen.
The system automatically displays the Employee Code, Employee Name and Employee Email details as captured in the "Capture Employee Information" process.
Make a note of the User Code that you've assigned to this employee - this needs to be communicated to the relevant employee for SEMS login purposes.
-
Click on the Show Licence checkbox if the employee needs to see the SEMS Licence Expiry messages.
This would be relevant for those employees (Finance Department) responsible for Supplier payments, and in particular, the Sense-i monthly Licence fees.
-
Click on the Is Administrator checkbox only if the employee is granted full security rights and access to the SEMS application.
Employees that have been granted Administrator privileges have the highest security clearance and have full access to the entire SEMS application.
- Click the Save button on the Action Bar.
The screen is updated with the title Login User - User Name.
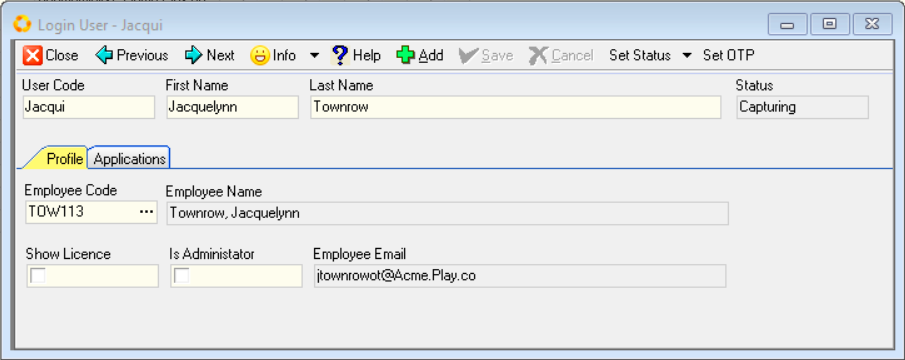
The Applications TAB is now accessible.
Login User Applications
-
Click on the Applications TAB.
-
Then click the Add Items button on the Action Bar.
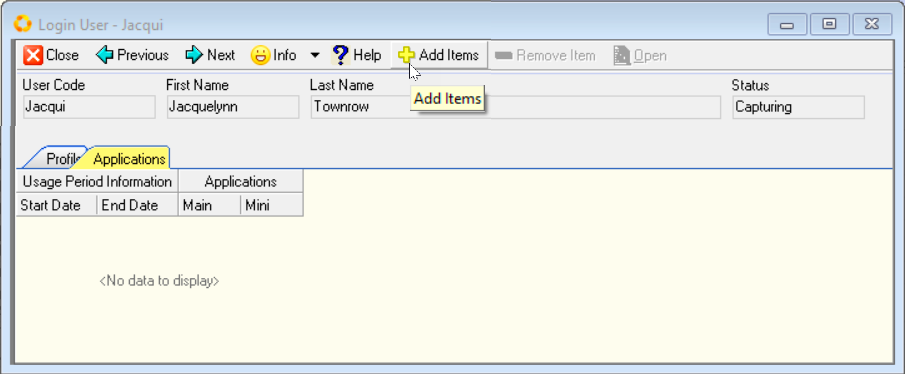
The Add New Application Usage screen is displayed.

-
Click on the three-dot button in the Start Date field.
-
Select the Start Date using the pop-up Calendar.

Leave the End Date field blank - this can be set, if required, in the future.
-
Click the checkbox in the Allow Main Applic field to grant the Login User access to the Main SEMS application.
-
Click the checkbox in the Allow Mini Login field to grant the Login User access to the Sense-i Maestro application, as used in the Manufacturing / Factory floor environment.
Either one, or both of these applications can be used by the Login User, depending on his/her job function and responsibilities.
- Click the Save button on the form Action Bar.

- Then click the Close button.
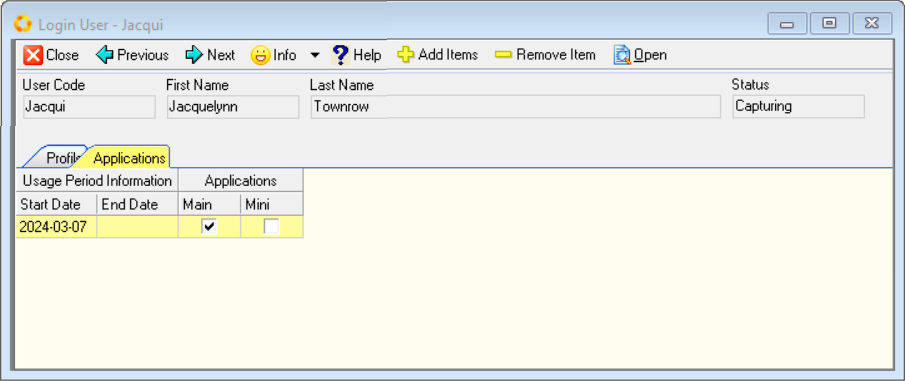
The Applications TAB will be updated with the information captured.
Save & Activate Login User
-
Click on the Profile TAB.
-
Click the Save button on the Action Bar.
-
Then click the Set Status drop-down arrow.
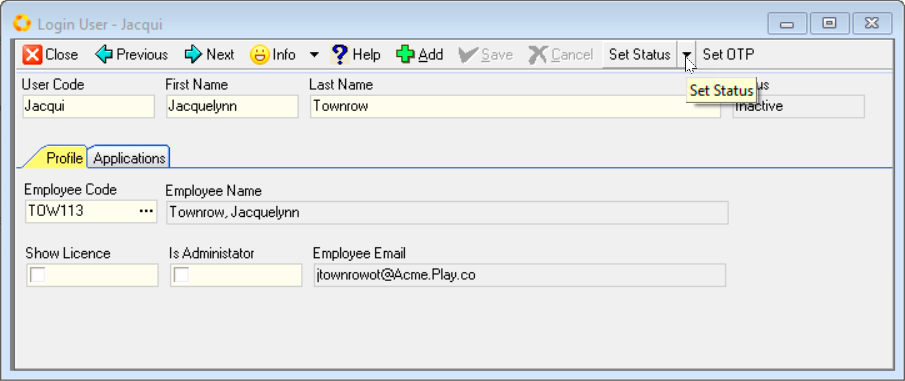
- Click the Set Active option in the drop-down menu.
- Click the Close button on the form Action Bar.
The Login User must now be assigned the related system Securities & Permissions.
Refer to the document titled "Assign User/Group Permissions".
Once the above process has been completed, the new Login User can be provided with his/her User Name.
The following links should also be included in the communication with the Login User / Employee:
Issue Manual OTP
If the Company Outgoing Email configuration has been captured, AND where those Employees / SEMS Users do have a functioning Email address captured in the system, SEMS will automatically generate and email a OTP to the individual when he/she clicks the Forgot Password and subsequent Request One-Time-Pin buttons.
Refer to the section "Forgot Password" in the document titled "Log in & Maintain Password".
Administrators would use this procedure to issue a Manual OTP (One-Time-Pin) when SEMS Users / Employees have forgotten their Login Password.
This is necessary in those instances where Company Outgoing Email configuration has NOT been setup, and/or SEMS Users / Employees do not use email, or do not have access to their email.
-
Click Security on the Main Navigation Menu.
-
Click Login User in the drop-down menu.

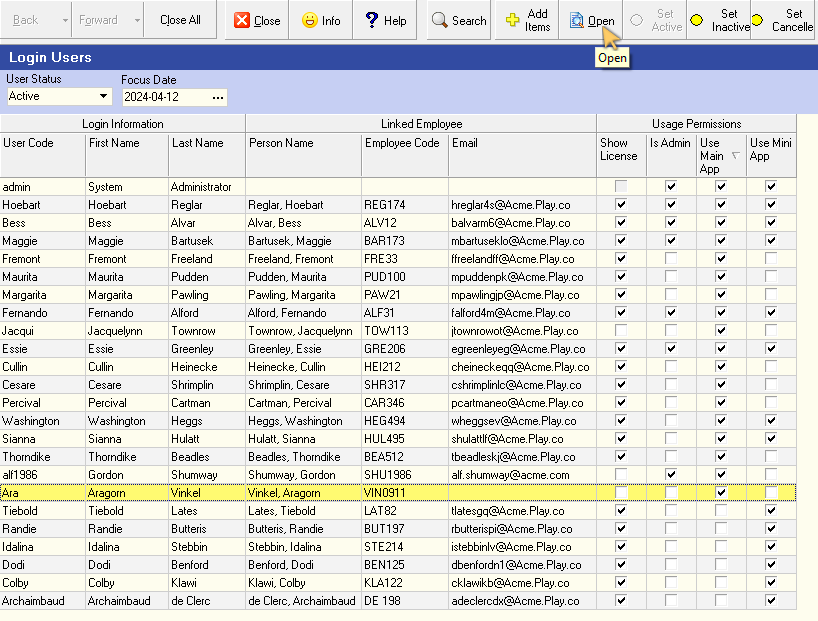
The Login Users screen is displayed.
- Select & Open the Login User record row.
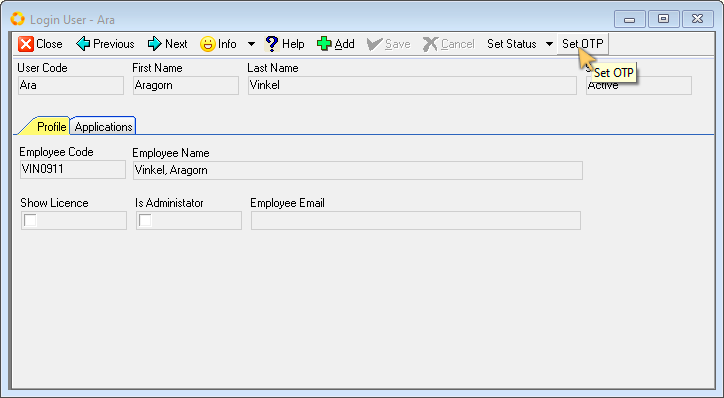
The Login User - User Code screen is displayed.
- Click the Set OTP button on the form Action Bar.
The system automatically generates a unique OTP.
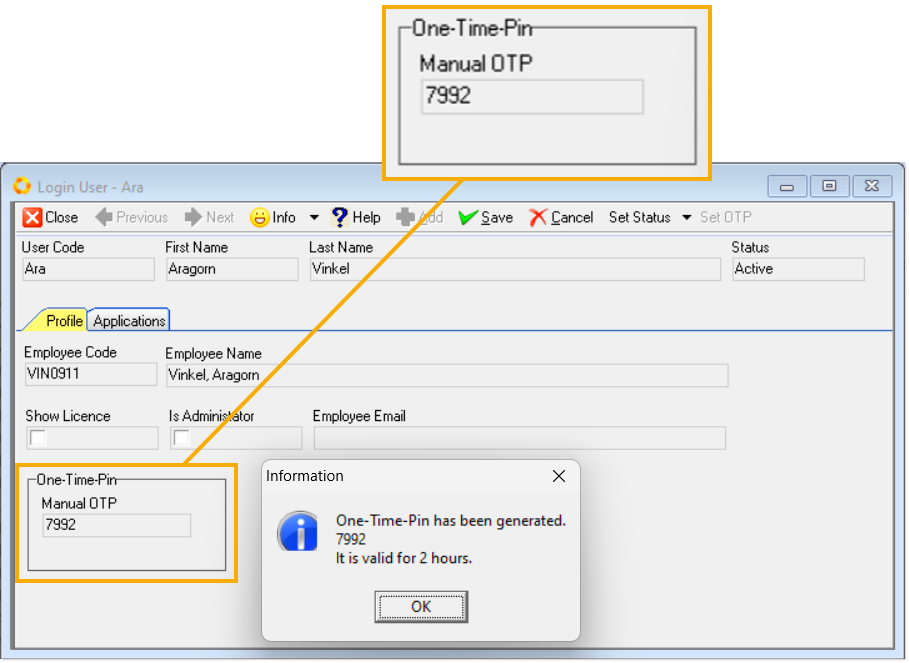
The One-Time-Pin is only valid for a certain time.
If the OTP is not used within the time period, the Login User would need to request a new OTP and the above steps would need to be repeated.
-
Click the OK button to close the Information dialogue box.
-
The One-Time-Pin can now be communicated to the SEMS User / Employee.
-
Click the Close button to exit the Login User screen(s).
This is the end of this procedure.