Understanding the SEMS User Interface
Procedure Guideline
Introduction to the Sense-i System
Using the Screens to Search for and Update information.
This procedure describes the components and terminology you need to know to make effective use of all help materials and standard operating procedures that accompany the Sense-i Enterprise Management System.
Introduction
The SEM System has been developed as a centralised system that enables employees throughout the company to view up-to-date information. This is an important point to remember because it helps to understand how the system works. Unlike a normal, PC-based computer program where the software and the information are both located on the computer on your desk, the SEMS System is known as a Client-Server system. The computer program used to enter and view information is based on each user's Personal Computer, and the software and actual information is stored on a central computer, known as the Server.
This means that at any point, there may be several, or indeed tens or hundreds of users adding and viewing information at the same time that you are also working on the system.
This affects the SEMS program in two ways, and if you understand these, then understanding the system becomes that much easier.
The first effect that a Client-Server system has on the user is that people may be entering information that you need to use. In order to prevent users from entering duplicate information, for example two users each entering the same Customer Information, the system presents a list of information that already exists in the system, and before you add new information to the system, you need to review the information in the List Screen and check to see whether another user may have already added the information you wish to use.
The second effect of a Client-Server system is that the system does not want to cause users to wait un-necessarily for answers to questions. In order prevent many users from all requesting complete sets of information, and thereby slowing the system down for all users, the system has Search Criteria at the top of each list screen that enable you to reduce the number of records the system will display in a report. Using the Search Criteria wisely enables you to narrow the list of information that is presented by the system and keeps the system working quickly for all the users. The way in which you interact with the information in the system is through the screens and the menu items, fields and buttons on each screen. As you begin to use the system and gain experience, you will notice that the way the screens work is designed to help you find information easily and keep the system working quickly for all users. Exactly how the system does this will become clear as we look at the following screen examples.
The Five Main Screen Elements
There are five key elements or sections to the screens on the system.
These are...
-
The Main Navigation Menu;
-
The Drop-down Menu(s) and Side Menus;
-
The Main Form;
-
The Form Bar and its buttons;
-
The Back, Forward and Close All button bar.
The screen image below shows the initial typical view when logging onto the system.
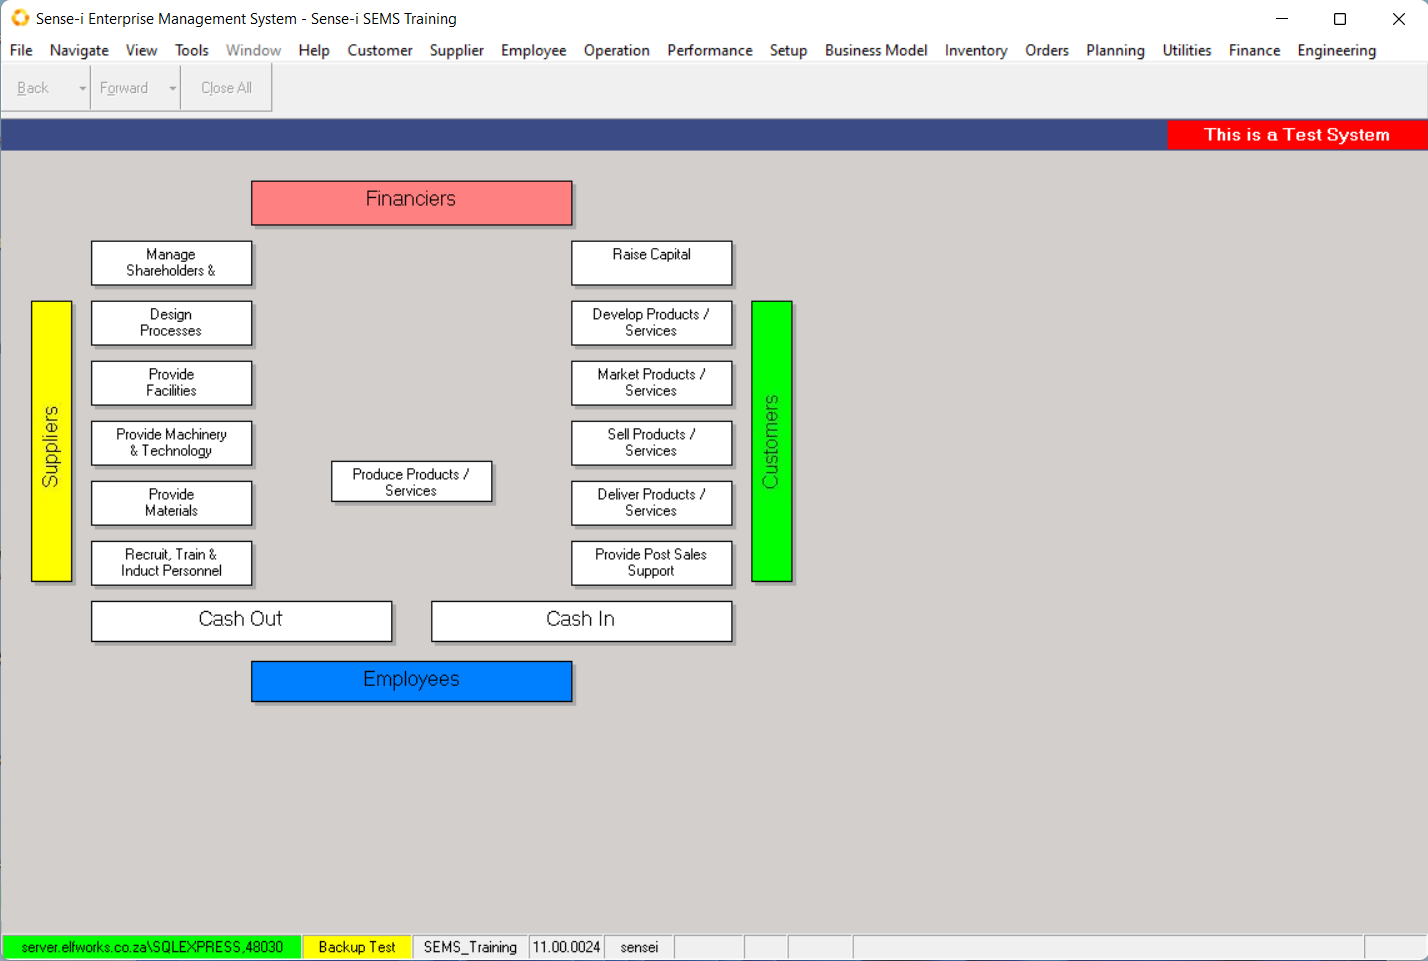
The Main Navigation Menu is the list of functions that runs horizontally along the top of the screen.

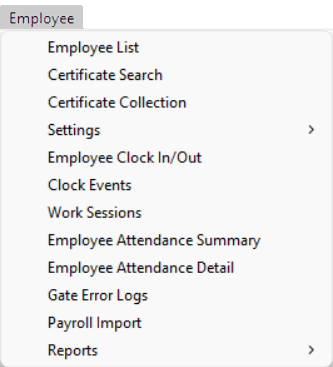
The Drop-down menu(s) or Secondary Navigation Menus are accessed by clicking on any of the Main Navigation Menu options.
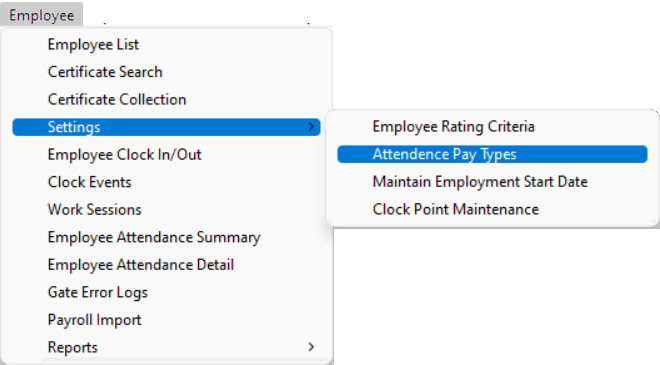
The Side Menus or third-tier navigation options are available as further navigation from relevant drop-down menu options.
When all forms are closed, the MAIN FORM is light grey screen, with a graphic depiction of the business process.
The FORM BAR is inactive when all forms are closed.
As you click on a button or menu item the system opens the Form associated with the function in the Main Form section of the screen. All information is entered in Forms and all reports are presented in the Main Form area.
In this example the Maintain Sales Quote Form is displayed (accessed by selecting Customer from the Main Navigation Menu, and then clicking on Sales Quote on the Drop-down Menu).
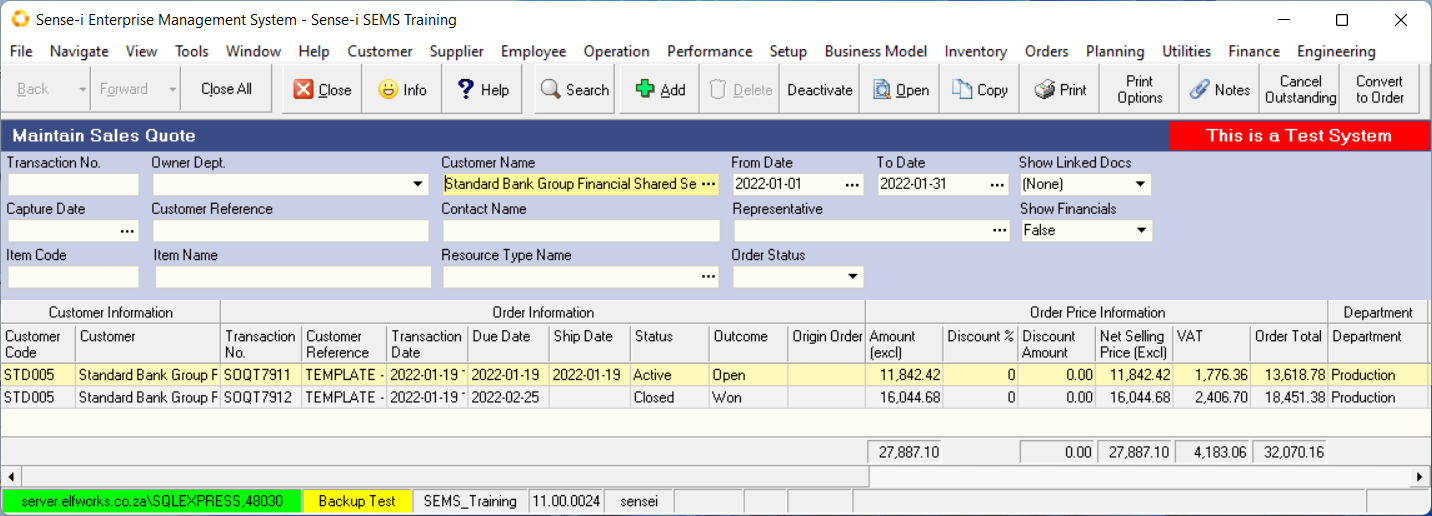
The Back and Forward buttons allow you to move
between open forms.
The Close All option closes all the open forms and returns you to the initial start view.
The system displays a series of buttons in the Form Bar that are related to the form that you are using. This makes it easy to use the system because you only ever have access to features that are relevant to the form you are using at the time.

How The Screens Operate
When you click on a function, either in the Main Menu or on the Drop-down / Side Menu, the system will always first display a LIST SCREEN.
The LIST SCREEN shows you what information has already been captured in the system by yourself and other users. This helps because it shows people what information is available, and if used correctly, prevents people from entering the same information more than once.
The LIST SCREEN lists all the information in the system for the function you have chosen. So, if you have clicked on the Customer Profile button, the system will open a FORM called CUSTOMER LIST and display all Customer records that match the SEARCH CRITERIA on the form.
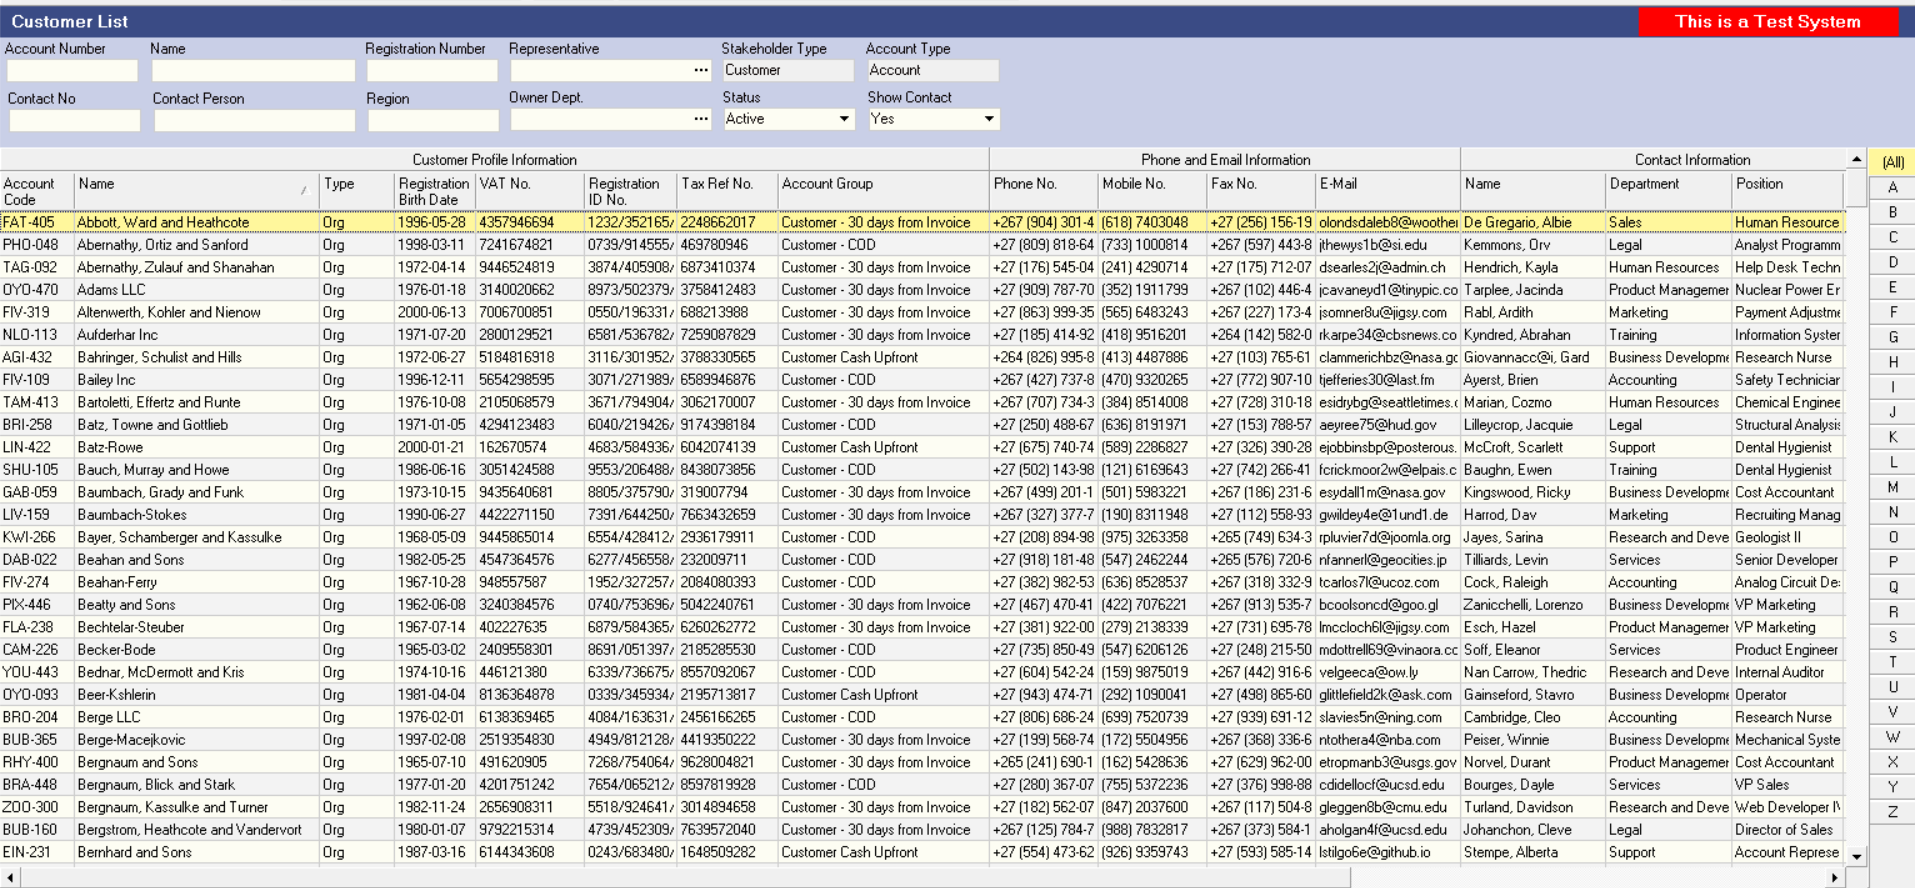
You will notice that each LIST SCREEN consists of two different sections. The top section of each LIST SCREEN is called the SEARCH CRITERIA PANEL.
This section of the form displays several boxes called Fields into which you can type or choose specific information (e.g. a Customer Name, or a date range, from one date to another date).

The software program uses the words and options you have entered into the fields on the SEARCH CRITERIA PANEL to find all RECORDS or TRANSACTIONS that are stored on the server and then display this information in the GRID on the LIST SCREEN.
The List Grid Panel
On closer examination, you will notice that FIELDS contain information and options that relate to the specific form or function you are using.

You will also notice that the system displays a set of buttons immediately above the blue bar on which the name of the form is listed. This is called the Form Bar. These are the functions that relate to the open form.

Using The System To Find Information
-
Select the Customer option on the Main Navigation Menu.
-
Then click on the Customer option on the Drop-down Menu.
- Notice how the system opens a screen titled Customer List.
This is the normal LIST SCREEN for viewing and updating Customer information in the system.

- Enter information in the Search Criteria Panel. For example, enter a Name or a portion of a Name in the Name field.
To find all customers that contain the letters "Fish" in their name you can type the % symbol and then the letters "fish" in the Name field.
-
Then click on the Search Button on the Form Bar.
-
Notice how the system updates the list of Customer Profiles on the screen to show only those Customers that match the name you have entered.

So, to briefly recap, the when you click on a function, the system provides a list screen that displays all the information already in the system. To prevent displays lists of thousands of records, the system FILTERS the information to display on RELEVANT INFORMATION.
You enter SEARCH CRITERIA on a LIST SCREEN to select what information you consider to be relevant. The shorter lists make it easier for you to find the exact information you need and also, keeps the server working faster for all of the other users on the system.
Using The System To Update Information
- There are only three things that you can do on any computer system.
You can ADD new information.
You can change or EDIT existing information.
And you can DELETE existing information.
- Click on the ADD Button on the Customer List Form Bar.
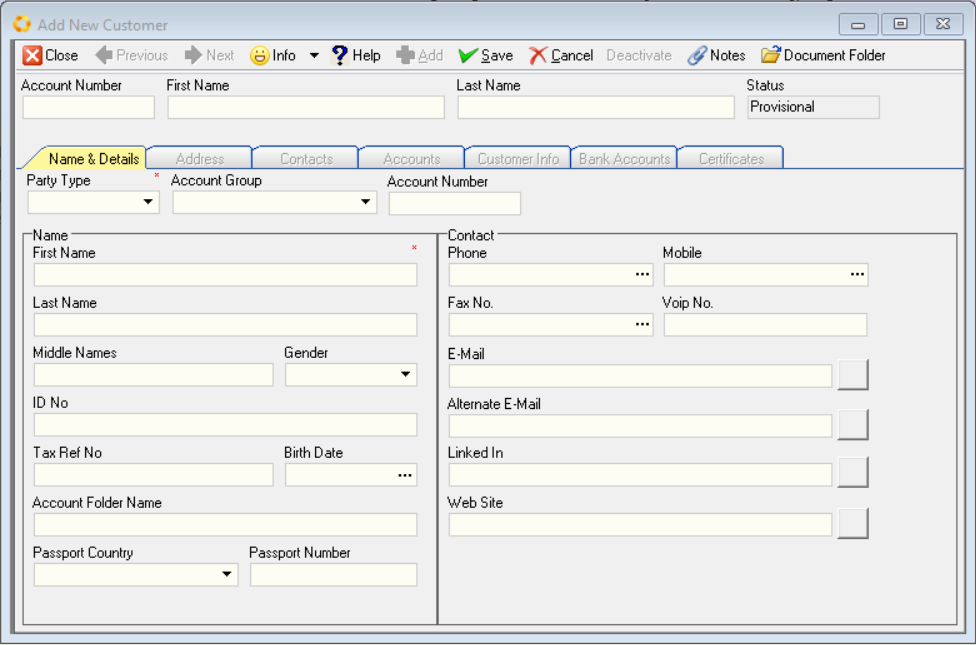
- When you click on the ADD or OPEN Buttons on the form bar you will notice that the computer system opens a new screen.
If you clicked on the ADD Button, the system opens a BLANK FORM into which you can enter new information.
If you chose the OPEN Button, the system opens the same form but with the information of the existing record that you chose to EDIT.
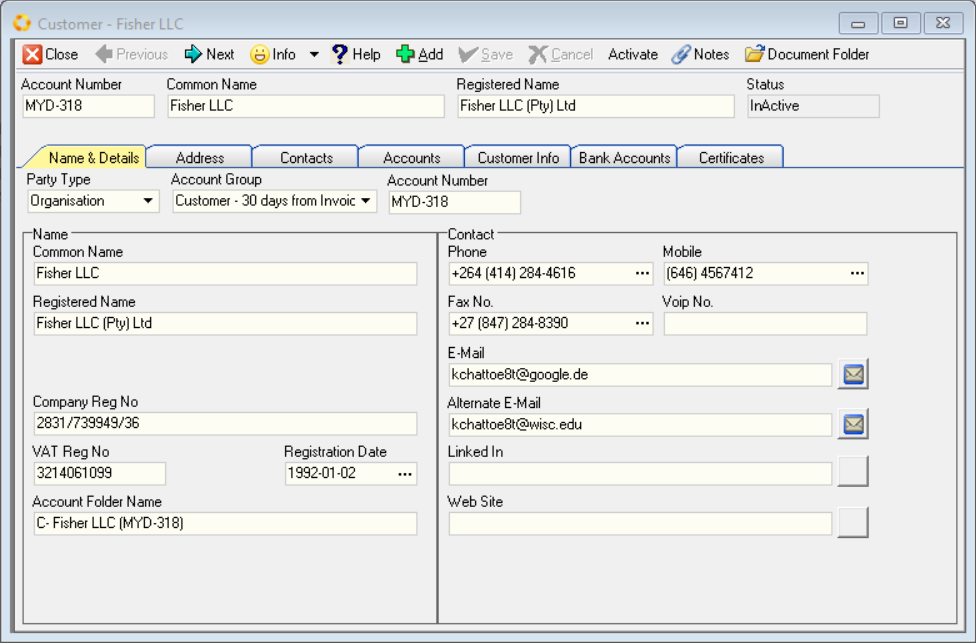
To Edit information of an existing record, click on the Deactivate option on the Form Bar.
Once you have amended the relevant information, click on the Activate button.
If you chose the DELETE Button, the system will ask you if you are sure if you wish to delete an existing records from the database.
When adding information you will notice that each form that you open
contains specific information that must be completed.
These are called Fields.
Completing any of these forms is straight forward. There are only two ways you can enter information.
The first is that you can type information into a field that allows this. For example, the Name field or the Phone Number field on the Add New Customer Form.
The second way to enter information into a Form is to choose information from a list of information already in the system.
When you do this, the system displays the List Options in a Drop-down list from which you then select the information you wish to use.
For example, on the Customer Profile Form you need to select Terms that apply to the Customer's Account from the Account Group drop-down list.
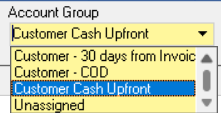
Completing a form is simply a matter of working through each field on the form step-bystep and entering information using these Entry Methods.
Completing a Form
Whenever you click on a field that requires you to choose or SELECT information that already exists in the system, the system will display LIST SCREEN, as described earlier.
When you need to select information the system displays the available information is a LIST GRID.
And you will remember that each LIST SCREEN consists of a SEARCH CRITERIA PANEL and the LIST GRID.
So you can search for specific information in the system in exactly the same way that you did in the first example of the LIST SCREEN we described above.

You can search for information without being exact about what records or transactions you want the program to find. To do this type the % sign before you type a partial or complete word. So to find all customers that have the letters FISH in their name, type the symbol % and then fish. For this example, type %fish in the Name field on the SEARCH CRITERIA PANEL.
Then click the SEARCH Button on the Form Bar.

To select information, you will need to click on the record in the LIST GRID that you want to use and then...
Click the Open Button on the Form Bar.
The system will open the relevant Maintain Customer Profile screen, in this case the Customer - Fisher LLC form, and will display the existing information for that specific customer.

Additional fields and information is accessed by clicking on the associated TABS, in this case Address, Contacts, Accounts, Customer Info, Bank Accounts and Certificates.
Recap
The system is that simple to use. You simply complete the blank form you have chosen by clicking on a field. The system will then open a LIST SCREEN and you SELECT the information you need from this screen, CLICK the SELECT Button on the FORM Bar, and the system will return you to the form you are completing and display the SELECTED INFORMATION in the Form. Where you need to type information is a specific field, you simply use the keyboard to enter the appropriate information on the required space on the form. It is that easy.
-
Select a Function. For example, Customer / Sales Order.
-
The system opens a List Screen.
-
Enter information in the Search Criteria Panel.
-
Then click the Search Button.
-
The system finds the relevant records and information.
-
You can choose to ADD new information.
-
Or you can choose to EDIT or DELETE existing information.
-
Click on the Add or Open button(s).
-
The system Opens a Form.
-
Select a Field, and then click on The Open button.
-
Enter / Select the correct information.
-
Repeat steps 10 -11 until the form is complete.
-
Then click the Save and Close buttons.
-
The system returns you to Step 2.
The entire system works in this way. So once you have mastered these simple steps, using the system will be that much easier and you will not have to worry about how the remaining functions work in the system.
You will be free to focus you energy and attention instead on understanding what the function does from a business perspective and concentrate on entering the correct information and making the correct decisions.
This is what is important in making any business and team function successfully.
This is the end of the Basic Introduction to the SEMS User Interface.