Capture Sundry Payment (SAF-4015)
Procedure Guideline
The Transactions function is the most frequently utilized function in the Sense-i Cashbook module. This function is used for capturing information about transactions that have occurred in the company's bank account.
To access this function, open the correct Cashbook or Bank Account first.
-
Click on Finance on the Main Menu.
-
Then select Bank Account from the drop down menu.
The system will open the Maintain Bank Account screen. This screen lists all of the Cashbooks or Bank Accounts that have been captured in the system.

-
Click on the row that contains the Bank Account in which you wish to capture transactions.
-
Then click the Transactions button on the Form Bar.
The system will then display a screen titled Maintain Bank Transactions. This screen lists all of the transactions that have been captured in the selected Bank Account between the From Date and To Date listed in the header panel.

There are 7 different types of transactions that you can capture in the Sense-i Cashbook.
These are explained below...
Transaction Types
Understanding the different Transaction Types.
| Transaction Type | Description |
|---|---|
| Customer Receipt | Use this function to capture any payments received from Customers who appear in the Accounts Receivable or Debtors module. This function requires that you select a Customer that has been captured as a Debtor and then select specific invoices against which to allocate the money received. |
| Sundry Receipt | Use this function to capture any money received from a party who is not recorded in the Accounts Receivable system. This could be for ad-hoc cash sales of sale products, scrap materials, machinery sold and so on. |
| Supplier Payment | Use this function to capture any payments made to Suppliers who have been captured in the Accounts Payable or Creditors module. This function requires that you select a Supplier that has been captured in the system as a Creditor and then select to allocate the payment made. |
| Sundry Payment | Use this function to capture the details of any payments made to a party who not recorded in the Accounts Payable system. This could be for adhoc or sundry purchase items such as materials or equipment bought on special or ad-hoc services that have been provided to the company. |
| Payroll Payment | Use this function to capture the details of any payments made to settle NET SALARY or NET WAGES DUE to employees or contractors who work for the company. This function requires that you select a specific Employee against which to record the payment. This function does not include details of deductions, taxes or any payments made on behalf of employees to other parties. |
| Tax / Financial Services Payment | Use this function to capture the details of any payments made to settle deductions that are payable to third parties or to record details of payments made to settle any tax deductions made against employee accounts or to process repayments on leases and loans. |
| Bank Charges | Bank Charges and Interest Payments. |
Payment for Sundry
Entering a Sundry Payment
-
Click Add on the Maintain Bank Transactions form bar.
-
To enter a Sundry Payment, click the Payment for Sundry option on the drop down list of menu items.
-
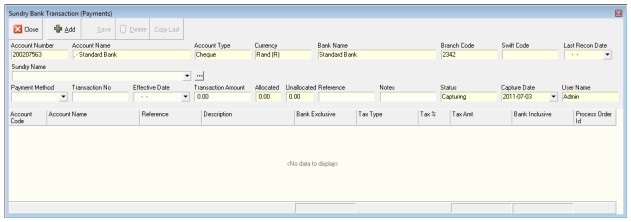
The system will display a screen titled Add New Sundry Supplier Payment.
This screen will enable you to enter the details of the payment being made so that it can be posted to the bank account and later to the general ledger.

-
Enter the name of the party to whom the payment is being made in the Sundry Name field. As you type in the party's name the system will display a list of existing parties with matching names. This enables you to quickly select the name of someone to whom you have previously posted a payment and also to analyse payments made against various parties. Please ensure that you are entering party names correctly to prevent un-necessary duplications from being entered in the system.
-
In the payment method field select the type of the transaction from the three-dot pop up list of bank transaction types. This could be either; Cheque, EFT or Cash.
-
Enter a Transaction Number in the Transaction No field. Note that you can set the system to automatically generate transaction numbers to save you time.
-
Select the date on which the payment is being made from the drop-down calendar in the Effective Date field. You can also type the date in this field using the format of yyyy-mm-dd. The Effective Date will be used by the system for assigning the transaction to a financial period. (For more on Financial Periods, see the procedure titled Maintain Financial Periods in the General Ledger module.)
-
Enter the total amount being paid in the Transaction Amount field. This is the amount that will appear on the bank statement and in the cashbook. Note: if there is discount applicable, you will enter this in the discount column and the system will then use that amount to calculate the total amount. The amount you enter in the Transaction Amount field however must be the net amount of the payment as it will appear on the bank statement for the selected bank account.
-
The system will display the total amount that you have allocated to accounts in the General Ledger in the Allocated field.
-
The system will display the difference between the total amount being paid and the amount that has been allocated to accounts in the General Leader in the Unallocated field.
-
Type a reference in the Reference field. This should be the invoice number on the document you have received from the party to whom you are processing the payment.
-
If you wish to add any note to the payment, type this in the Notes field.
Next you need to allocate the payment or receipt to one or more general ledger accounts. You would do this to break up the details of the payment or receipt into greater detail so that you can analyse the actual expenditure or income in the general ledger. For example, if you were capturing a payment made to a travel agent for business travel, you might want to split the payment up into Airfare, Accommodation and Car Hire. Of course you do not need to do this and can simply assign the transaction to a single general ledger account.
To enter the details of each payment and receipt you need to complete the following fields. You can press the tab key to move the cursor from one field to the next. If you press the tab key in the final column or field the system will create a new row into which you can enter different information from the preceding row.
- Click the Add button at the top of the form.

-
The system will add a blank row to the detail section of the Sundry Bank Transaction screen.
-
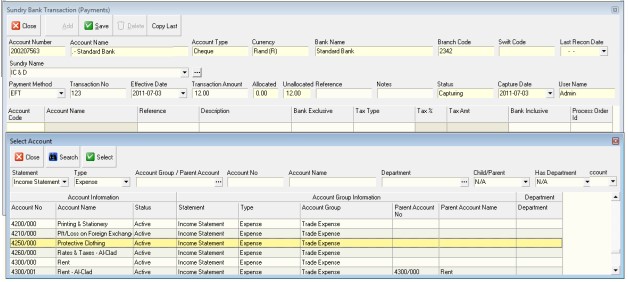
You can either type in an account code from the General Ledger Chart of Accounts in the Account Code field if you know what it is, or you can select an Account from the General Ledger using the Chart of Accounts lookup screen.
-
Click the three dot button in the Account Code field to view this list. You can search for a specific account using either the type of Statement, the Account Group, the Account Code or the Account Name.
-
Once you have the account to which you wish to post this transaction displayed in the list, click on the account and then click the Select button.
The system will close the Select Account window and display the Code and Name of the Account you have selected in the row.

-
Copy the Reference from the header into each row.
-
Enter the Exclusive Amount (that is the amount without payment) in the Bank Exclusive field.
-
Select the appropriate Tax Type applicable to this transaction. Note if there is no VAT Number on the invoice for which you are processing the payment then this should be VAT Exclusive.
-
The system will display the Tax Rate and Amount in the Tax % and Tax Amount fields.
-
And the system will add the Tax Amount to the Bank Exclusive Amount and show the Total allocated to this General Ledger Account in the Bank Inclusive field.
-
If you need to allocate the payment to more than one General Ledger Account, then press the down arrow to create a new row and repeat steps 18 to 25 for each Allocation you need to make.
-
When you have completely allocated the payment and the Unallocated Amount in the header is 0.00, click the Save button.
-
Repeat the above steps to process any other sundry payment you need to make.
This is the end of this procedure.