Capture & Maintain Bank Charges (SAF-4061)
Step-by-step Guideline
The SEMS System allows you to define a set of standard recurring bank charge and interest items that appear regularly on your bank statement and to link these charges to a General Ledger account in order to simplify and speed up their capture in your cashbooks.
-
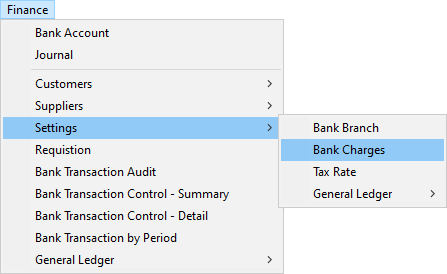
Click on Finance on the main menu.
-
Then click the Settings menu item on the drop down menu.
-
Then select the Bank Charge Items menu option.

The system will open a screen titled "Maintain Bank Charge Items." This screen allows you to define a list of standard items you will capture in your various bank accounts each month. The list of bank charge items is shared across all your various bank accounts.
Add Bank Charge Item
- To add a new Bank Charge Item, click the Add button on the form bar.
The system will open a screen titled "Add New Bank Charges."
This screen allows you to define a Name that describes the Bank Charge,
usually this is the same as the wording appearing on the Bank
Statements you receive and the system allows you to link the Bank
Charge Item to a specific account in the General Ledger.

-
Type in the Name that describes the bank charge.
For example, Bank Charges, Service Fees, Account Fees, Internet Bank Fee and so on. -
You need to specify whether the Bank Charge Item you are adding is normally a Debit or a Credit in the Cashbook.
Select the appropriate option from the drop down list underneath the Post in GL as field. -
Click Save and then Close.
-
The system will return you to the Maintain Bank Charges list screen and display the record you have created in the screen.
-
Repeat the above steps for each Bank Charge Item you wish to add to the system.
Edit Bank Charge - Select GL Account
-
Select the specific Bank Charge Item from the list.
-
Click on the Add Items button.
-
...
-
Click on the three-dot button in the General Ledger Account field and select an Account from the General Ledger to which you wish to post the bank charge.
-
Click the Select button on the Chart of Accounts lookup form.
-
The system will return you to the Edit Bank Charge Item screen.
Capture Bank Charges
The Employee Time log screen is a good example of a screen suited to quick data entry.
To capture a Bank Charge item in the cashbook;
- Select Add, then Bank Charge from the Maintain Bank Transaction screen.

- The system will open the Add Bank Charge / Interest Item screen and place the cursor in the Effective Date field.

-
Click on the drop down arrow in the Effective Date field to select a date on which the Bank Charge appeared on your bank statement.
-
Select a predefined Bank Charge Item from the drop down list of defined Bank Charge Items.
You can use predictive text to auto filter this list. -
The system will display the Account Number and the Account Name of the linked account from your General Ledger in the Account Number and Account Name field.
-
Enter the currency value of the Bank Charge Item in the Transaction Amount field.
The system will display the default posting rule for the bank charge
item in the Sense field, if you wish to change this, click on the
drop down arrow and select the desired posting.
This sign indicates how the transaction amount will be posted in the cashbook.
The transaction amount will be posted to the linked General Ledger
account using the opposite sign.
- You can then Cancel, click Next Item or Save and Close.
If you click Next item the system will keep the same date as the previous entry.
This is the end of this procedure.