Bank Account(s) (SAF-4001)
Procedure Guideline
Use this procedure to capture details of each of the company's bank accounts (including credit cards, petty cash and mortgages) in the Sense-i System.
-
Click on Finance on the main menu.
-
Select Bank Account on the drop down menu.
The system will display a list of all of the Bank Accounts that have been captured in the Sense-i system.

- Click the Add button on the Form Bar to capture the details of the bank account you wish to add to the system.

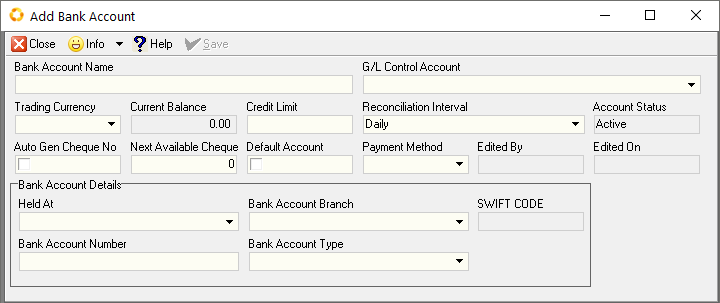
The system will display a blank Add Bank Account screen that will enable you to enter the details of a new bank account in the Sense-i system.
-
Type in the name that you use to describe the account in the Bank Account Name field. This should match the name of the account that is printed on your cheques or the statement you receive from your bank.
-
Select the account in your General Ledger Chart of Accounts that acts as the Control Account for the Bank Account you are adding.
If you need to, refer to the procedure titled Maintain Chart of Accounts to add an Account if one does not already exist.
-
Select the currency in which the money in the account is stored from the drop down list of available currencies in the system.
-
Enter the current Balance on the latest Bank Reconciliation you have done for this account.
-
Enter the Credit Limit available on this account is an overdraft or credit facility has been implemented for this account.
-
Select the frequency with which you want the account to be reconciled to statements received from the bank.
This could be daily, weekly or monthly. -
The system will display the status of this account in the Status field.
-
If you wish to print system generated cheques for the payments made from this account or you wish the system to specific the numbers for the cheques automatically, then tick this box.
-
The system will enable the "Next Available Cheque Number Field" if you have checked the box in step 13.
Enter the next available cheque number for this account. -
If you wish this account to be used as the default account for customer payments then check this box.
The system will then print the details of this account on all the transaction documents printed (such as Sales Order Invoices and Statements) that you send to the company's customers. -
Select the name of the financial institution at which this account is held from the list that appears when you click on the three dot button in the Held At field.
-
Select the name of the branch at which this specific account is held from the list that appears when you click on the three dot button in the Bank Account Branch field.
-
The system displays the Swift Code for this branch if one has been defined. This is used for routing payments between banks located in different countries.
-
Enter the bank account number as it appears on your bank statement.
-
Select the type of account.
-
Once you have completed capturing the details of the bank account, click the Save button on the Form Bar.
-
Click Close, then click the Search button. The system will display the account you have captured in the list of Bank Accounts in the system.
This is the end of this procedure.