Excel Bank Statement Preprocessing
Introduction
Once the Bank Statement has been downloaded as an Excel file directly from your Financial Institution, OR coverted to Excel format from PDF, some preliminary preparation of the information is required before the bank transactions can be imported into SEMS.
This includes moving the information from one place to another, fixing formats, truncating extraneous spaces, creating new metrics, recoding missing variables etc.
Copy Template Sheet to Excel Bank Statement
-
Open the Excel Bank Statement spreadsheet, then
-
Download the relevant SEMS Bank Statement Import Template spreadsheet.
Download Standard Bank Template
Request a relevant Bank Statement Import Template spreadsheet from the Sense-i Team by email.
(mailto:info@sense-i.co)
In this example, we will be using the Standard Bank Import Template.
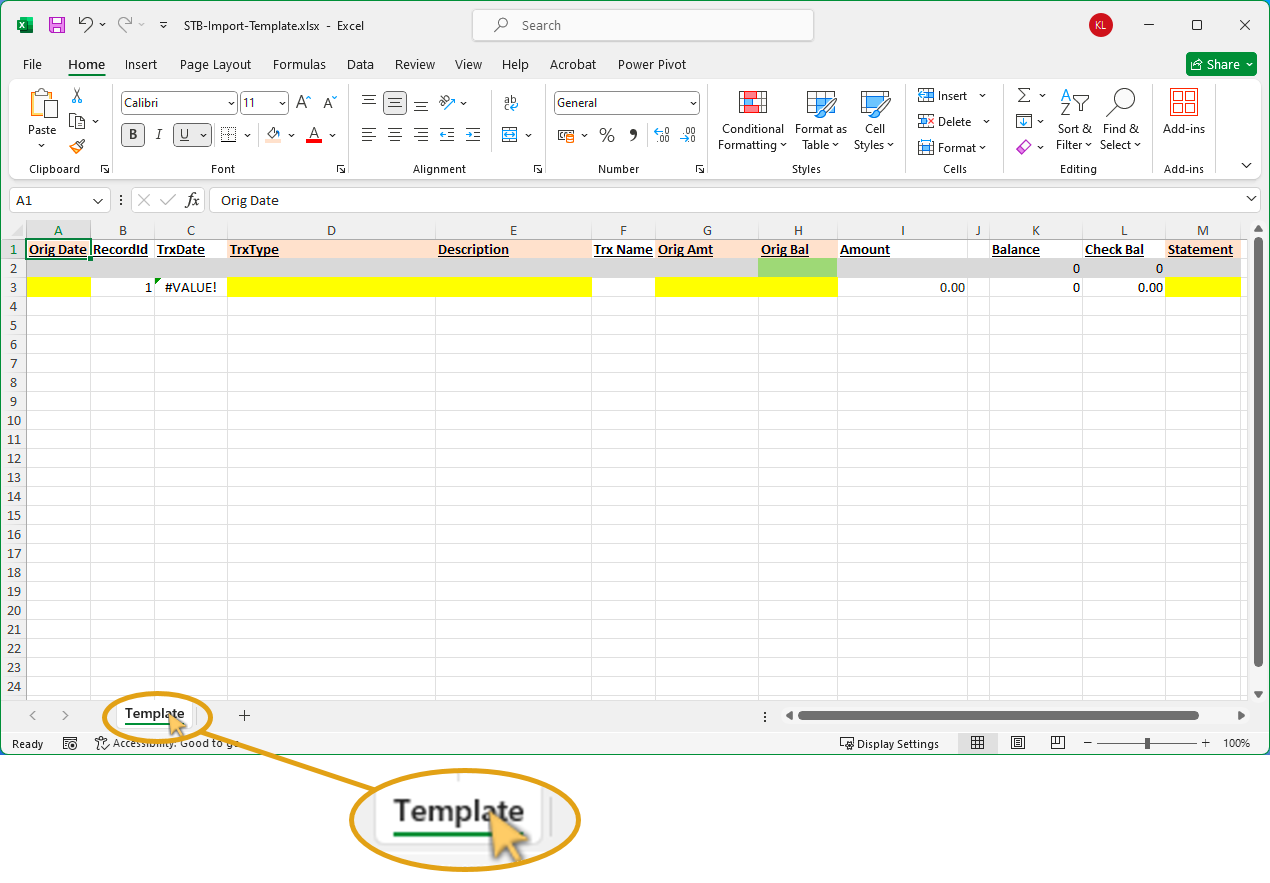
- Open the SEMS Bank Statement Import Template spreadsheet.
-
Right-click on the bottom TAB named Template.
-
Click on Move or Copy... in the pop-up menu.
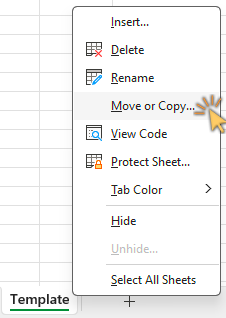
The Move or Copy dialogue is displayed.
-
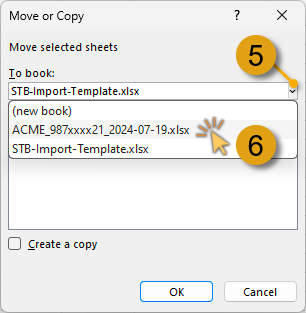
Click the drop-down arrow in the To book: field, then
-
Click on the Excel Bank Statement as opened in step 1 above.
-
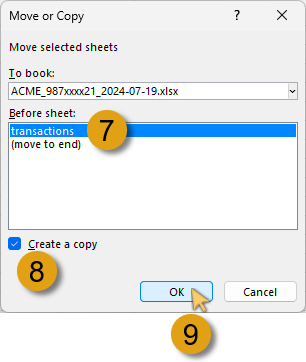
In the Before sheet: list, click on the first item in the list.
-
Click on the Create a copy check-box, then
-
Click on the OK button.
-
Close the SEMS Bank Statement Import Template spreadsheet.
-
Save the Excel Bank Statement (with the Template and transactions TABs) as a new Excel file.
Identify Essential Data
In this section we will be working in the newly saved Excel Bank Statement spreadsheet.
If you have followed the steps above, the Excel Bank Statement spreadsheet should resemble the following:
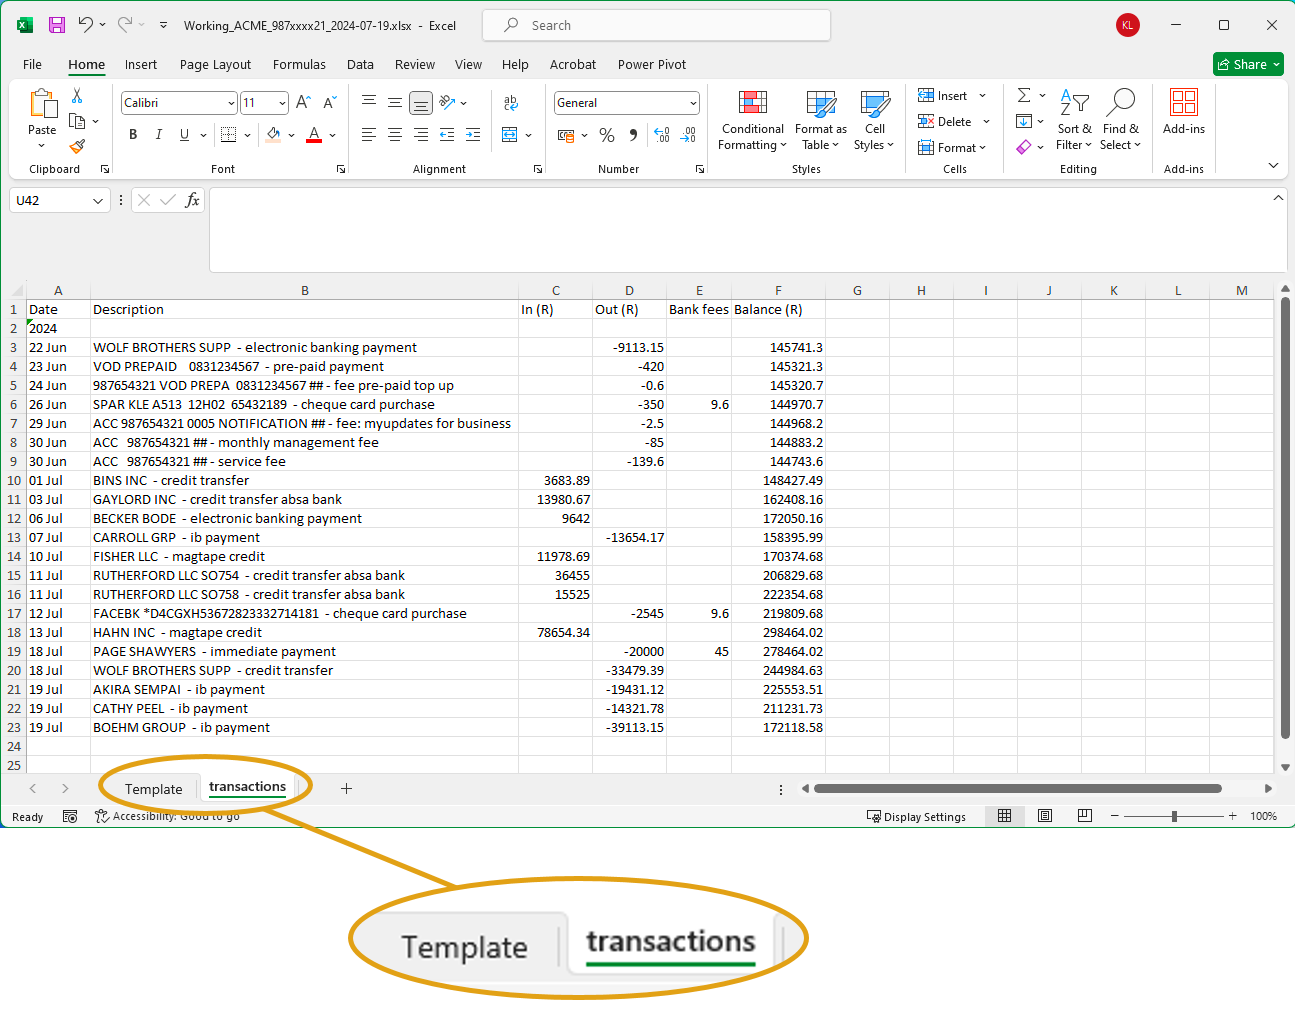
- Click on the transactions TAB to display the Bank Transactions table.
The Bank Transaction table TAB may well be named differently, depending on the download source.
We will now explain and demonstrate how to identify and copy the essential data from the bank statement transaction table to the SEMS Bank Statement Import Template sheet.
- Identify the essential data in the sheet.
The essential data is the Transactions Table(s) with the column headings and associated transaction record rows.
The column headings may differ depending on the Financial Institution / Bank.
This is an example of the First National Bank transaction column headings:
| Date | Description | Amount | Balance | Accrued Bank Charges |
|---|
While this is an example of the Standard Bank transaction column headings:
| Date | Description | In (R) | Out (R) | Bank Fees | Balance |
|---|
While the specific column headings may differ from bank to bank, they are essentially similar, e.g.
- Date
- Description
- Amount = Credits / Debits
- Balance
- Accrued Bank Charges = Bank Fees
Copy & Paste Date / Update Record ID Rows
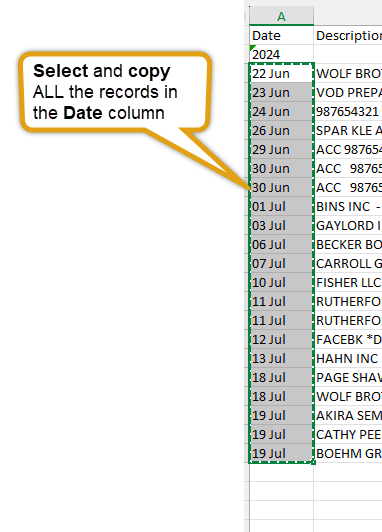
- In the "transactions" sheet, select and copy ALL the records in the Date column.
-
Click on the Template TAB, then
-
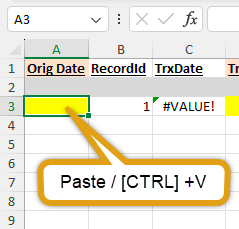
Right-click on the Yellow highlighted cell under the Orig. Date column, and click Paste / [CTRL]+V.
-
Select the relevant cells under the RecordID column, starting with the cell containing the number "1".
-
Click the Fill button in the Editing section of the Ribbon.
-
Click the Series... option.
-
In the Series dialogue window, ensure the following options are selected:
- Series in: Columns
- Type: Linear
- Step Value: 1
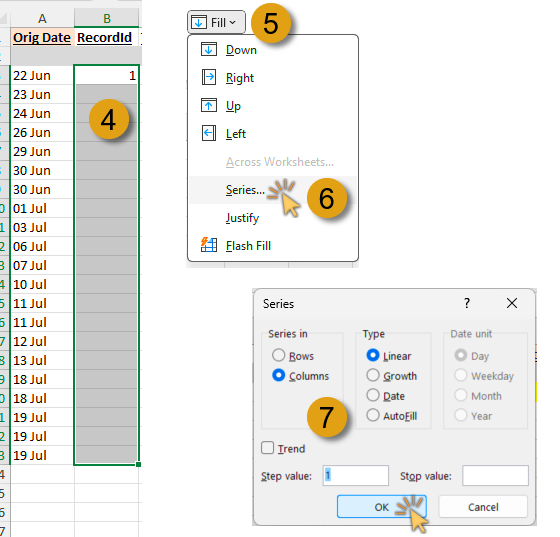
- Click the OK button.
The RecordID column is updated with sequential record numbers.
Convert Origin Date to Correct Format
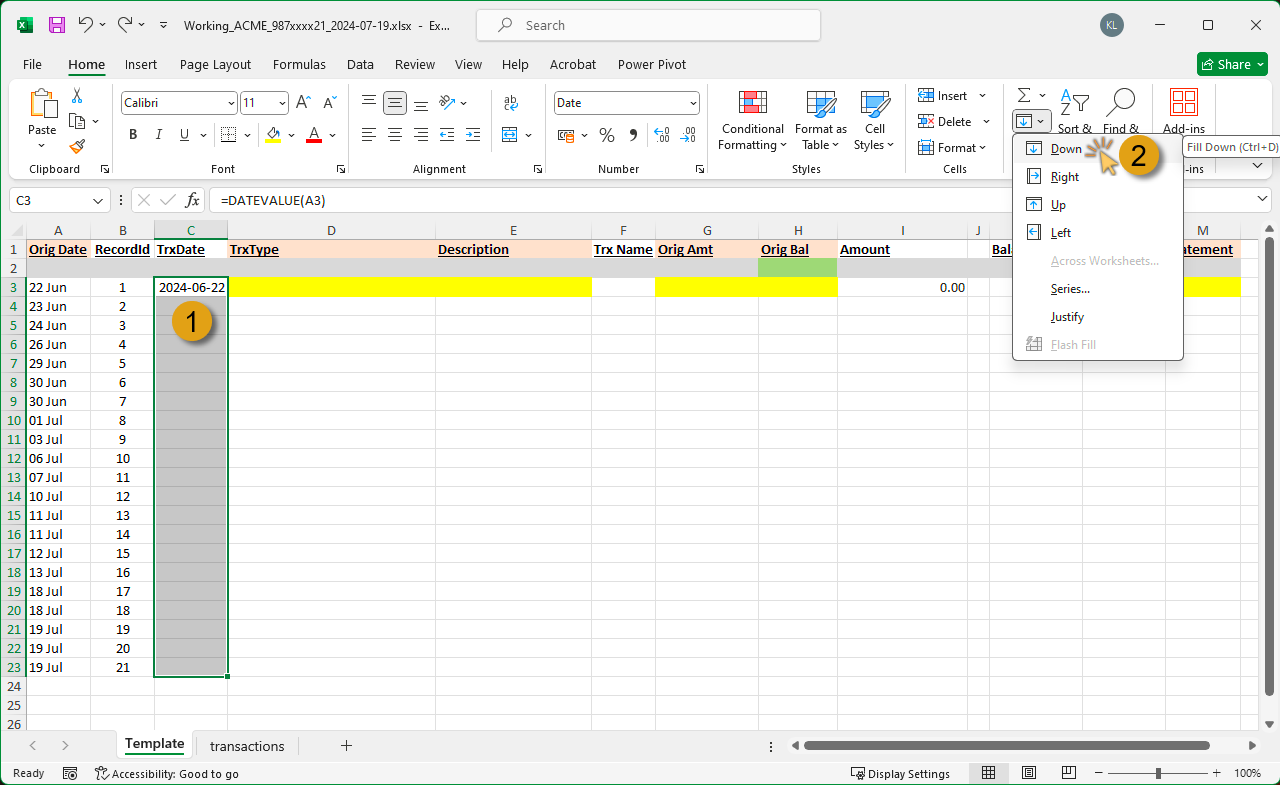
The next step is to update the TrxDate column in the Template sheet with the formula, =DATEVALUE(A#) to convert the Orig Date to the correct format.
The first record under the TrxDate is displayed using the correct date format.
-
Select the relevant cells under the TrxDate column, starting with the first record, then
-
Use the Fill Down / [CTRL]+D function.
The TrxDate column is updated with the formula, displaying the correct date format.
Split Transaction Type & Description
The next steps entail splitting the Description column in the transactions TAB into 2 separate columns.
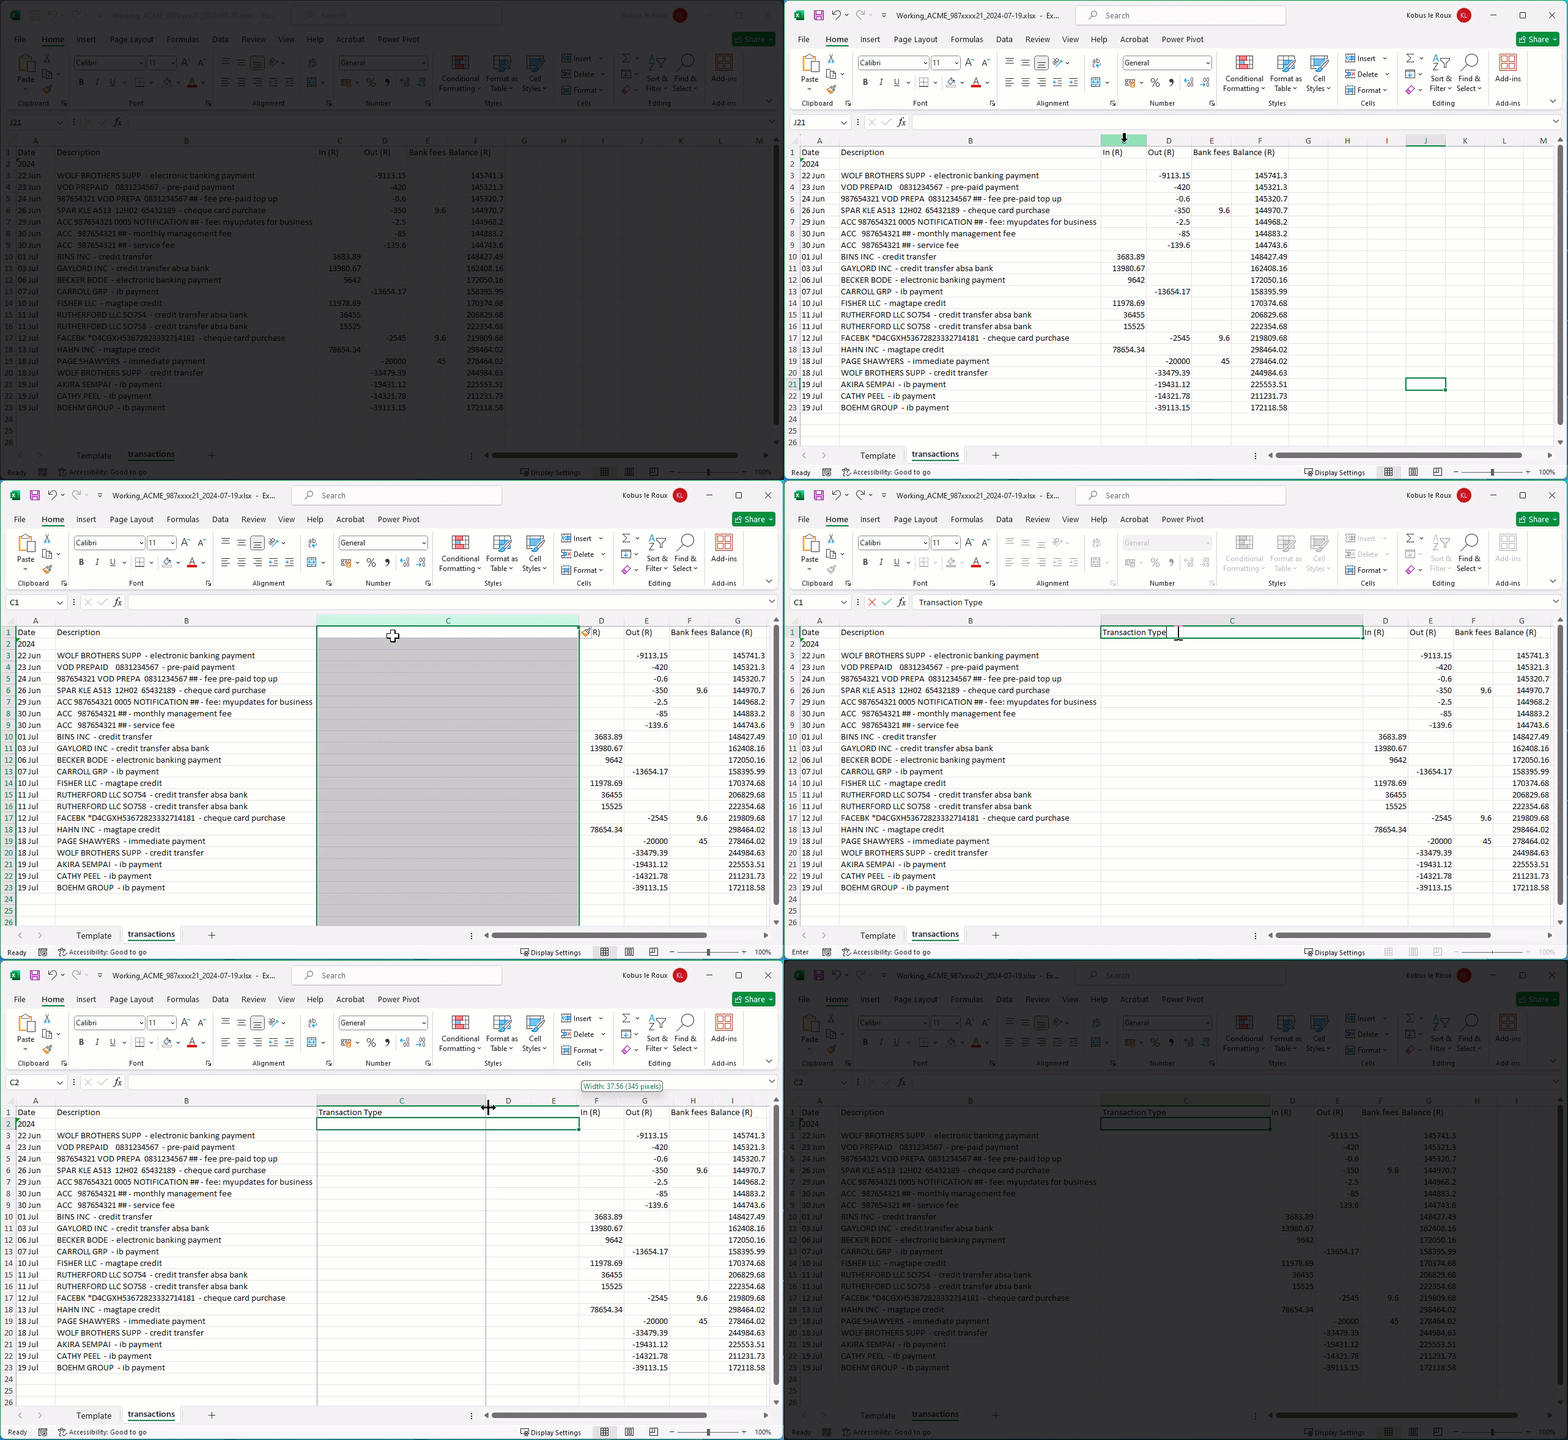
-
Click on the "transactions" TAB.
-
Insert a new column to the right of the Description column.
-
Give the new column a heading name in the header row... in this instance we will use Transaction Type.
-
Select the records under the Description column.
-
Replace all characters where the split is required with a unique character - in this example we will replace the " - " (space dash space) characters with the "|" (vertical slash) character.
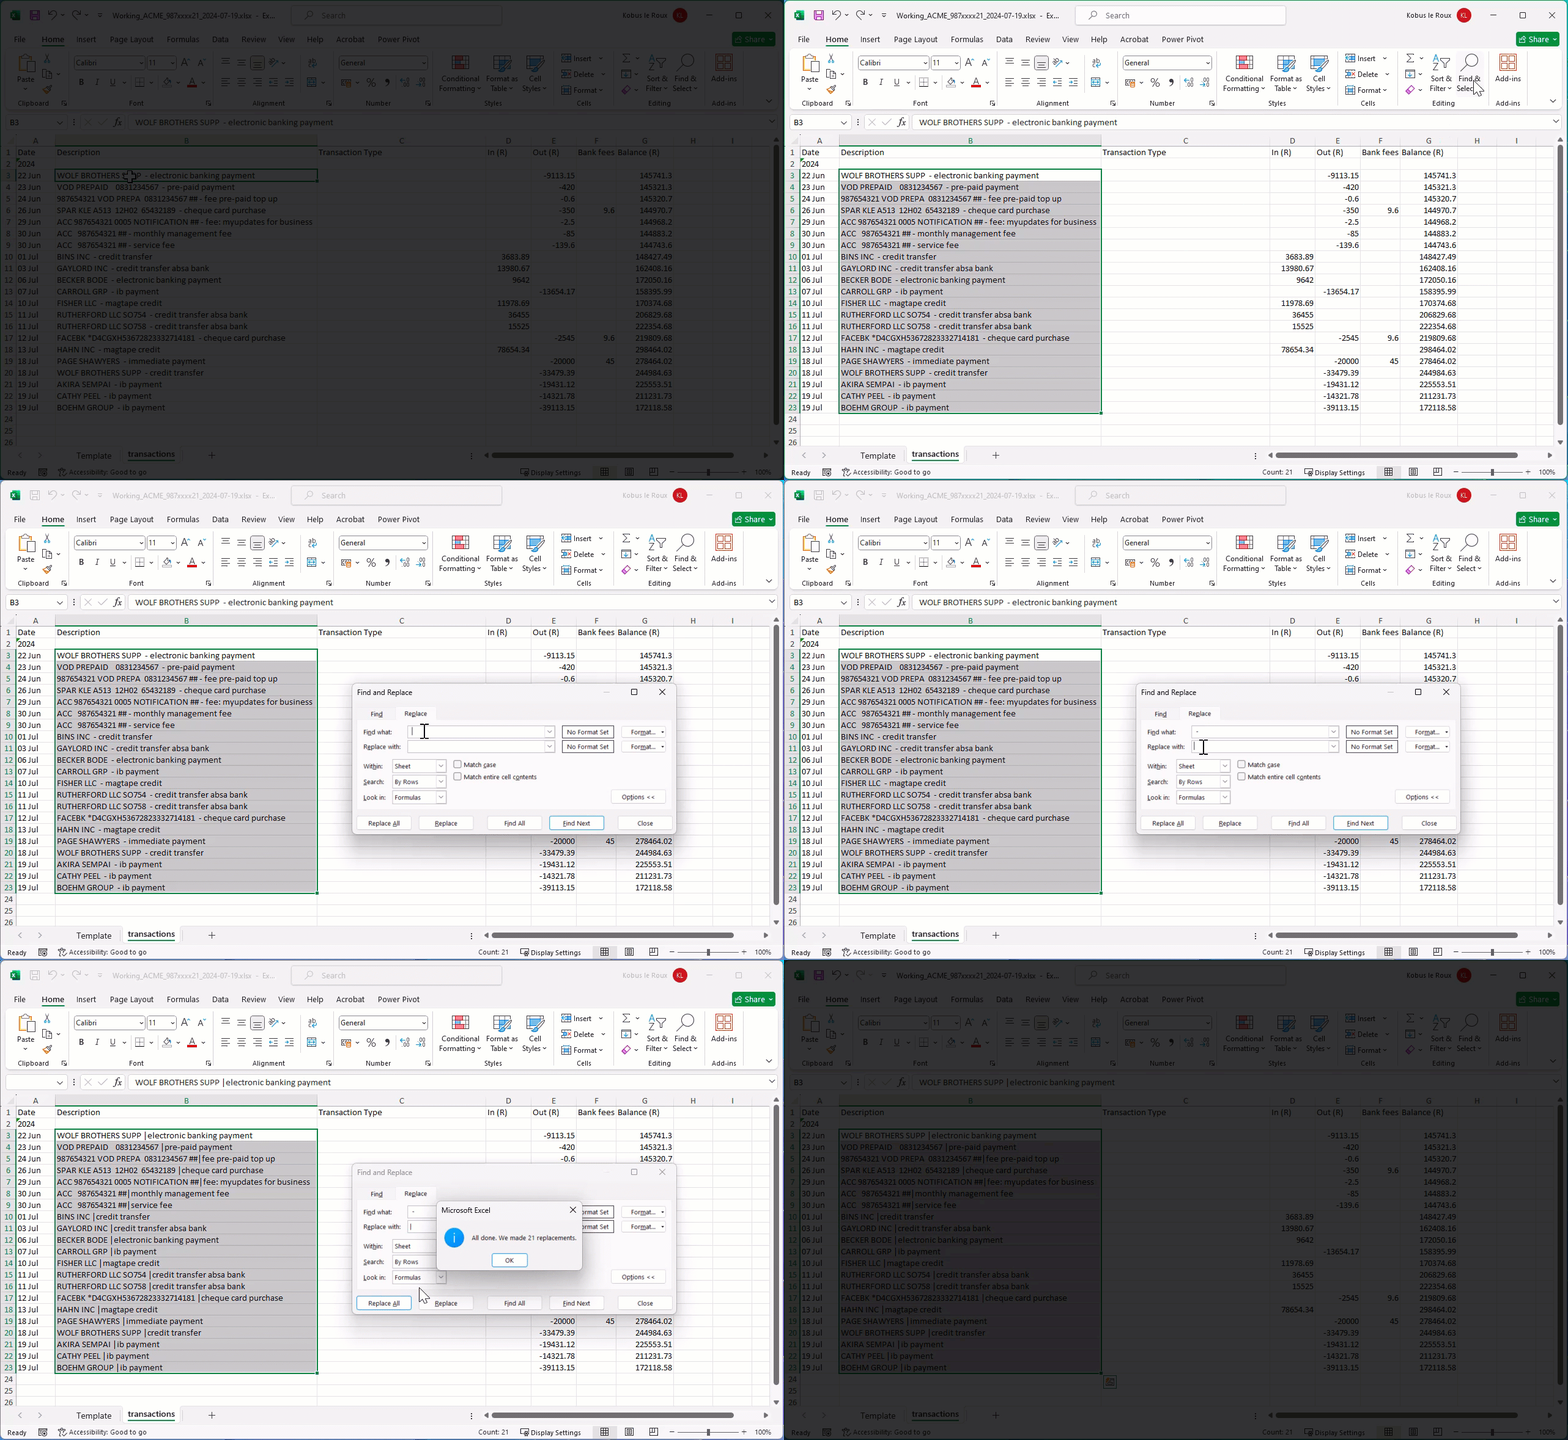
If all the records under the Description column have an identical pattern, you can select all cells and replace the relevant characters with a unique character that will be used as a delimiter.
Alternatively, you can work through each individual cell to insert the unique character.
-
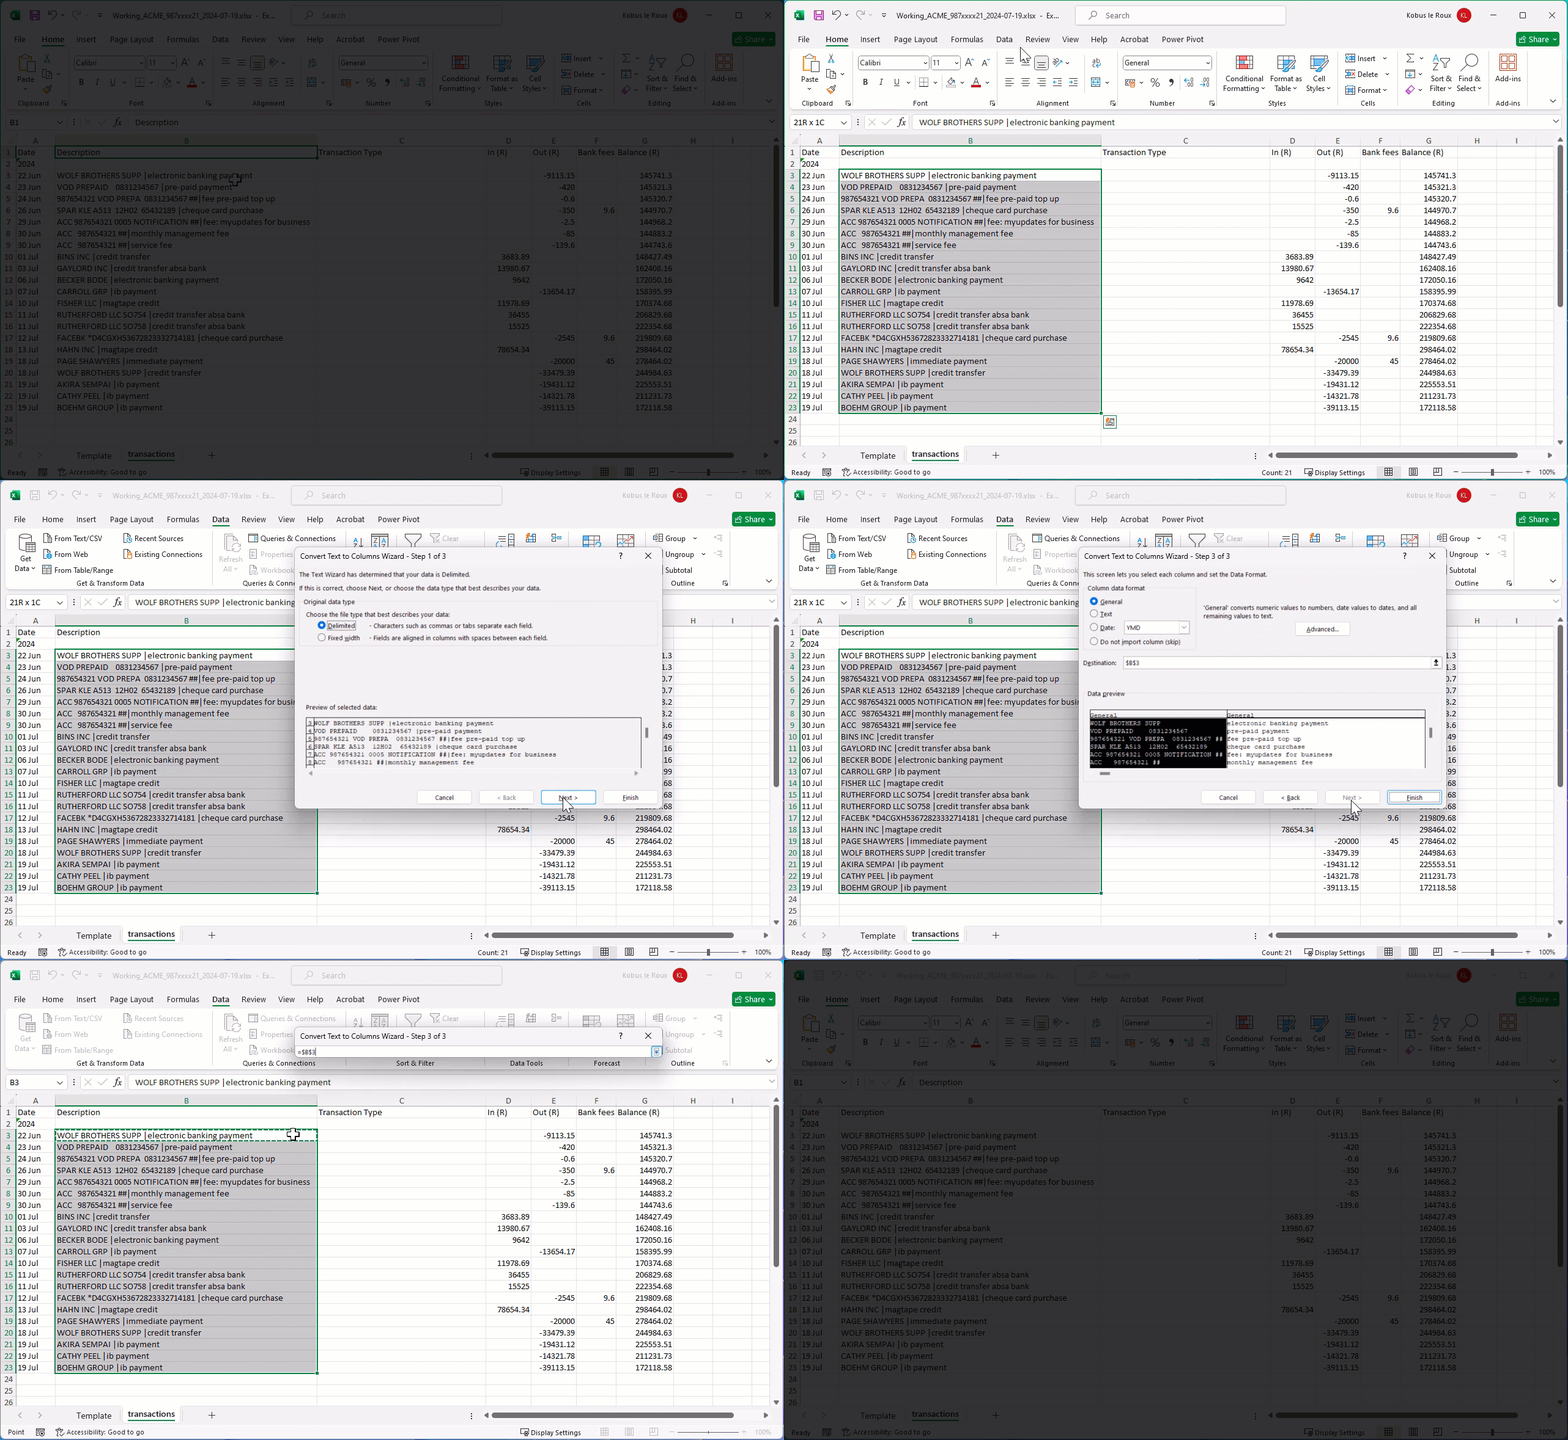
Select the records that you want to split into the new column.
-
Click on the Data menu option, then
-
Click on the Text to Columns icon in the Data Tools section of the Ribbon.
The Covert Text to Columns Wizard is displayed.
-
Ensure the Delimited option is selected in Step 1 of 3.
-
Click Next.
-
In the Delimiters section, click on the check-box adjacent to Other, then
-
Type in the | (vertical slash) character.
-
Click Next to continue.
-
Click on the action button in the Destination field to choose the intial cell.
-
In this example we choose the 1st cell record under the Description column, then press [Enter] / [Return].
-
Click Finish to run the Text to Columns Wizard.
The updated sheet is displayed with records split into the Description and Transaction Type columns.
Copy Transaction Type & Description to Template Sheet
-
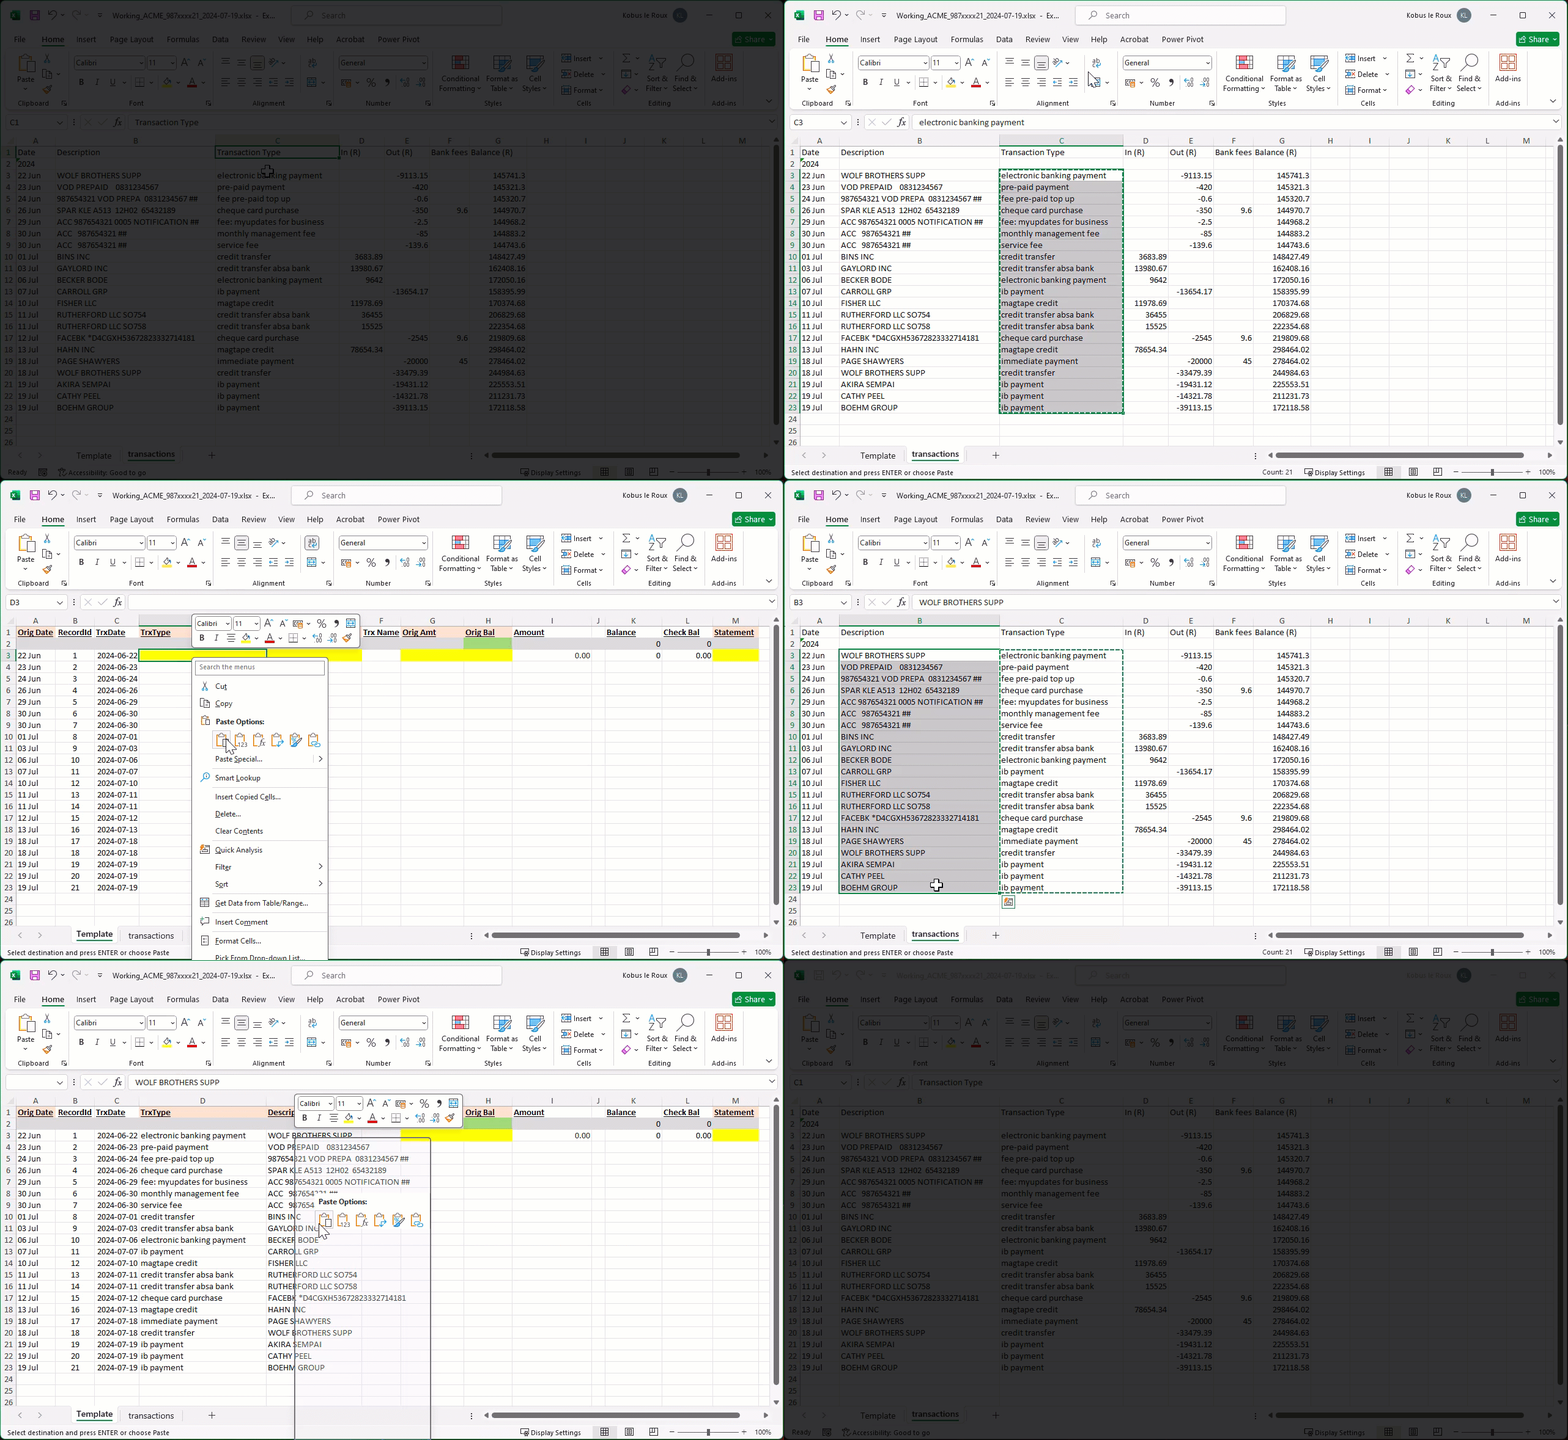
In the transactions sheet, select all the records in the Transaction Type column.
-
Right-click, and select Copy / [CTRL]+C.
-
Click on the Template TAB.
-
Click on the first record cell under the TrxType column, then click Paste / [CTRL]+V.
-
Click on the transactions TAB.
-
Select all the records in the Description column.
-
Right-click, and select Copy / [CTRL]+C.
-
Click on the Template TAB.
-
Click on the first record cell under the Description column, then click Paste / [CTRL]+V.
Format Currency Records
-
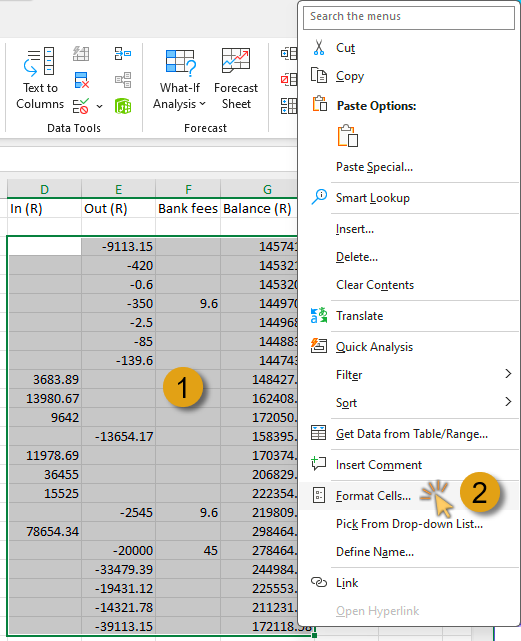
Select all cells that contain currency records.
-
Right-click, and then click on Format Cells.
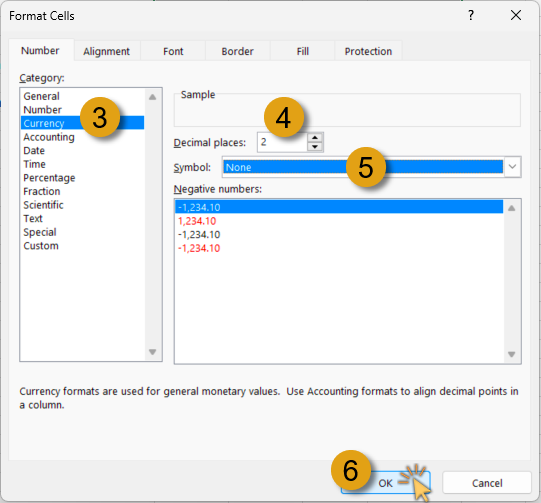
The Format Cells window displays.
-
Click on Currency in the Category section.
-
Ensure the Decimal places value is set to 2.
-
In the Symbol field, click on the drop-down arrow, and select None.
-
Click the OK button to close the Format Cells window.
The selected cells are updated with the format applied.
Add Transaction Amounts
The next steps entail combining the Credit and Debit amount columns into a single column.
-
Click on the "transactions" TAB.
-
Insert a new column to the right of the Out (R) (Debit) column.
-
Give the new column a heading name in the header row... in this instance we will use the name Amount (R).
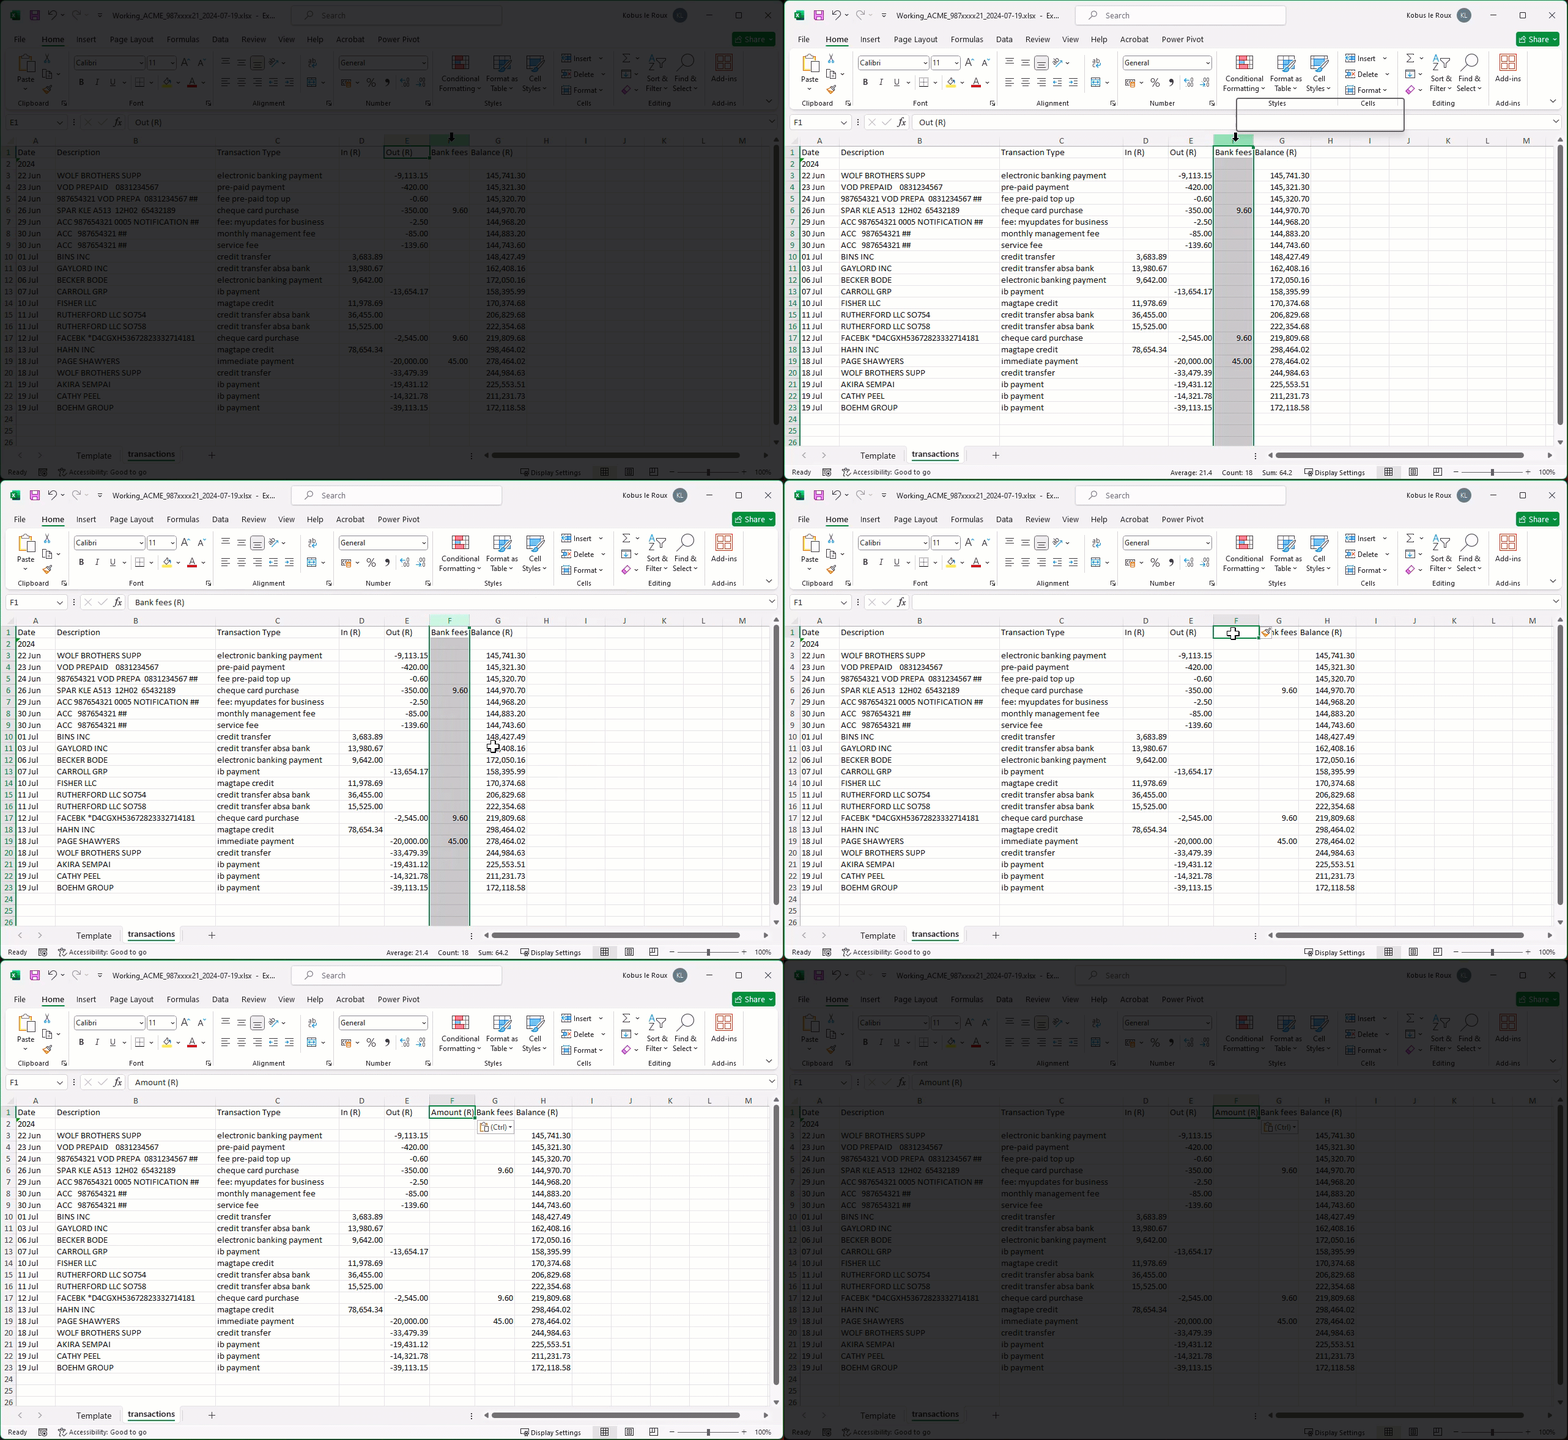
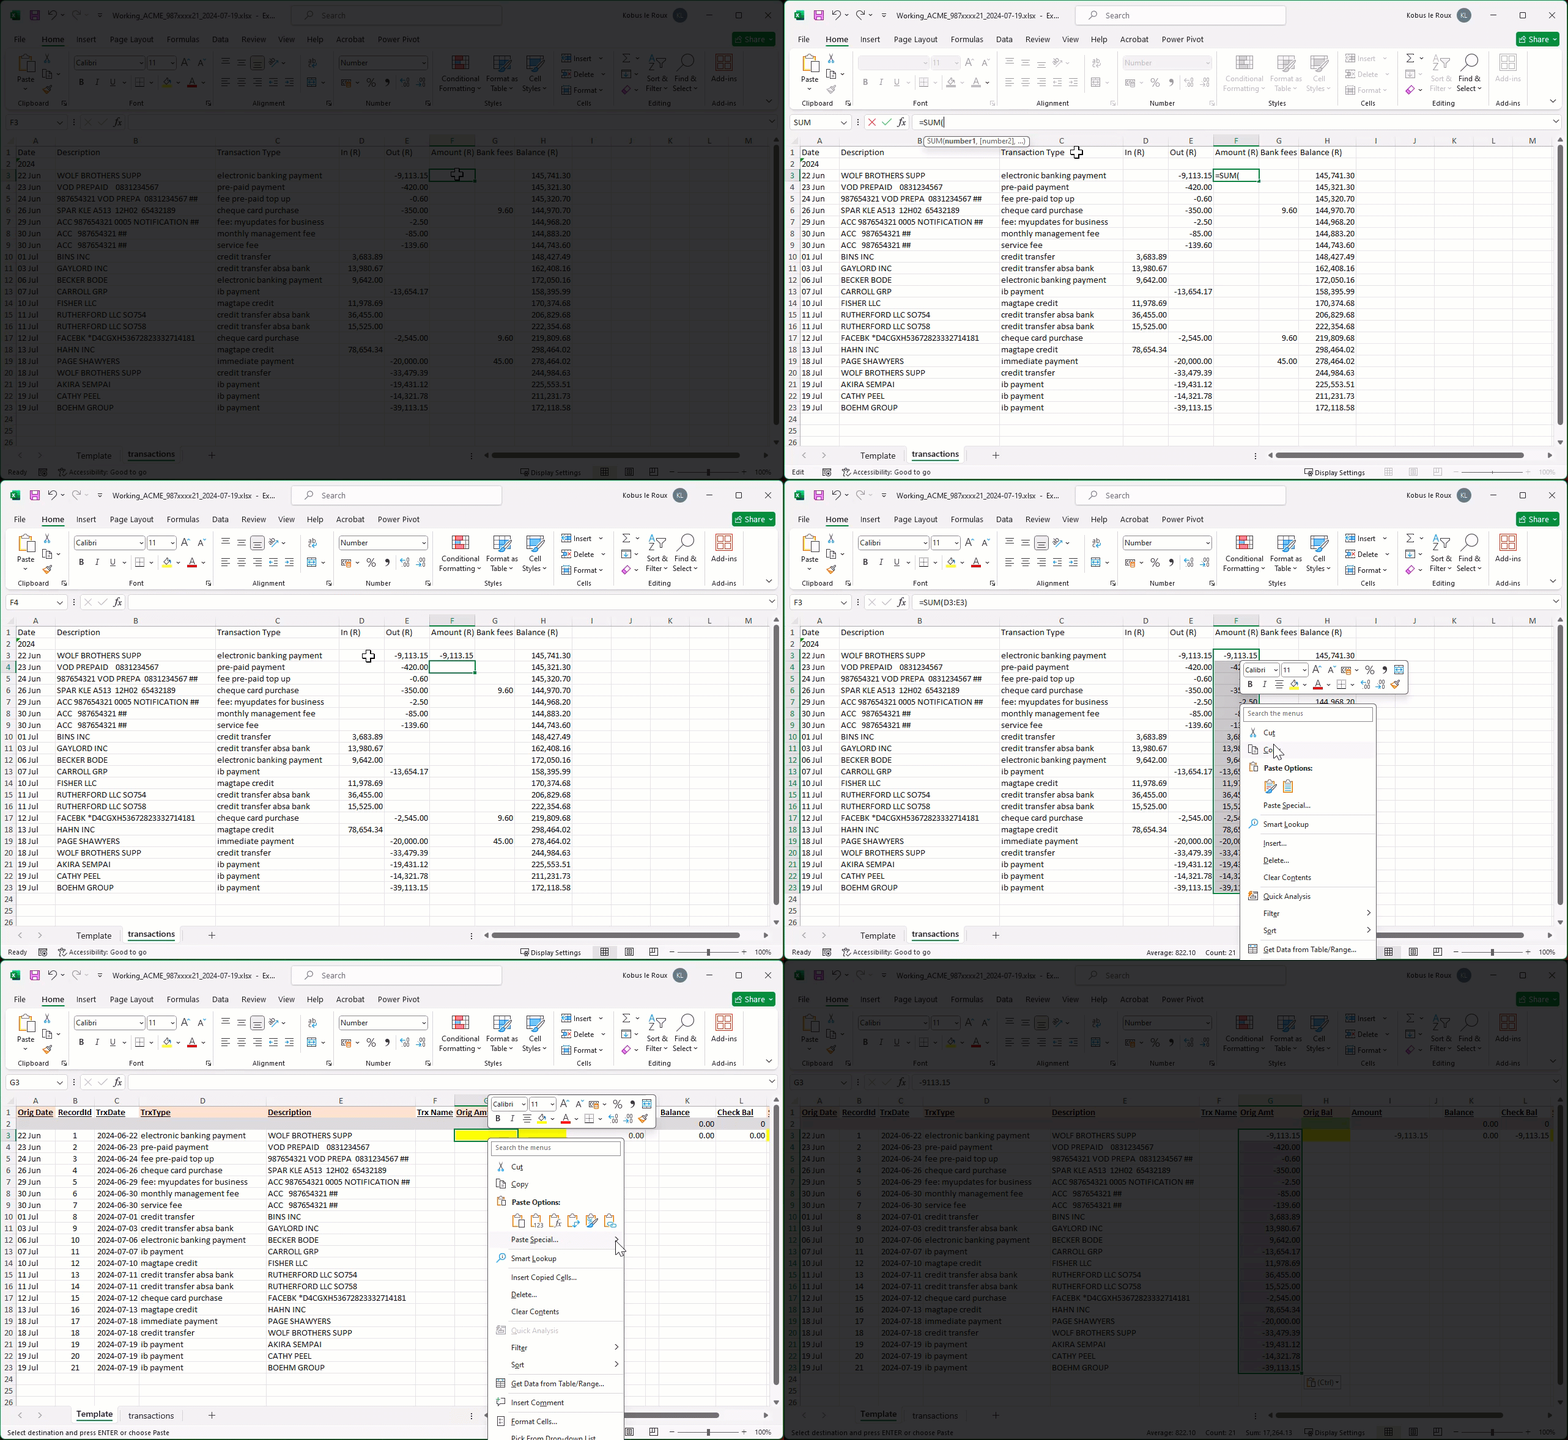
- Click on the first relevant record cell under the newly created Amount (R) column.
-
In the Formula field, type the formula "=SUM(", then
-
Select the relevant cells in the In (R) and Out (R) columns.
-
Press Enter to apply the function.
-
Use Fill-Down to copy the formula to all cells in the column.
Hover the cursor over the bottom-right corner of the cell, and then double-click to copy the formula down to the relevant cells.
The Amounts (R) column is updated.
-
Select and Copy the updated record cells in the Amounts (R) column.
-
Click on the Template TAB.
-
Right-click on the first record cell in the Orig Amt column, then
-
Select the Paste Values & Source Formatting option.
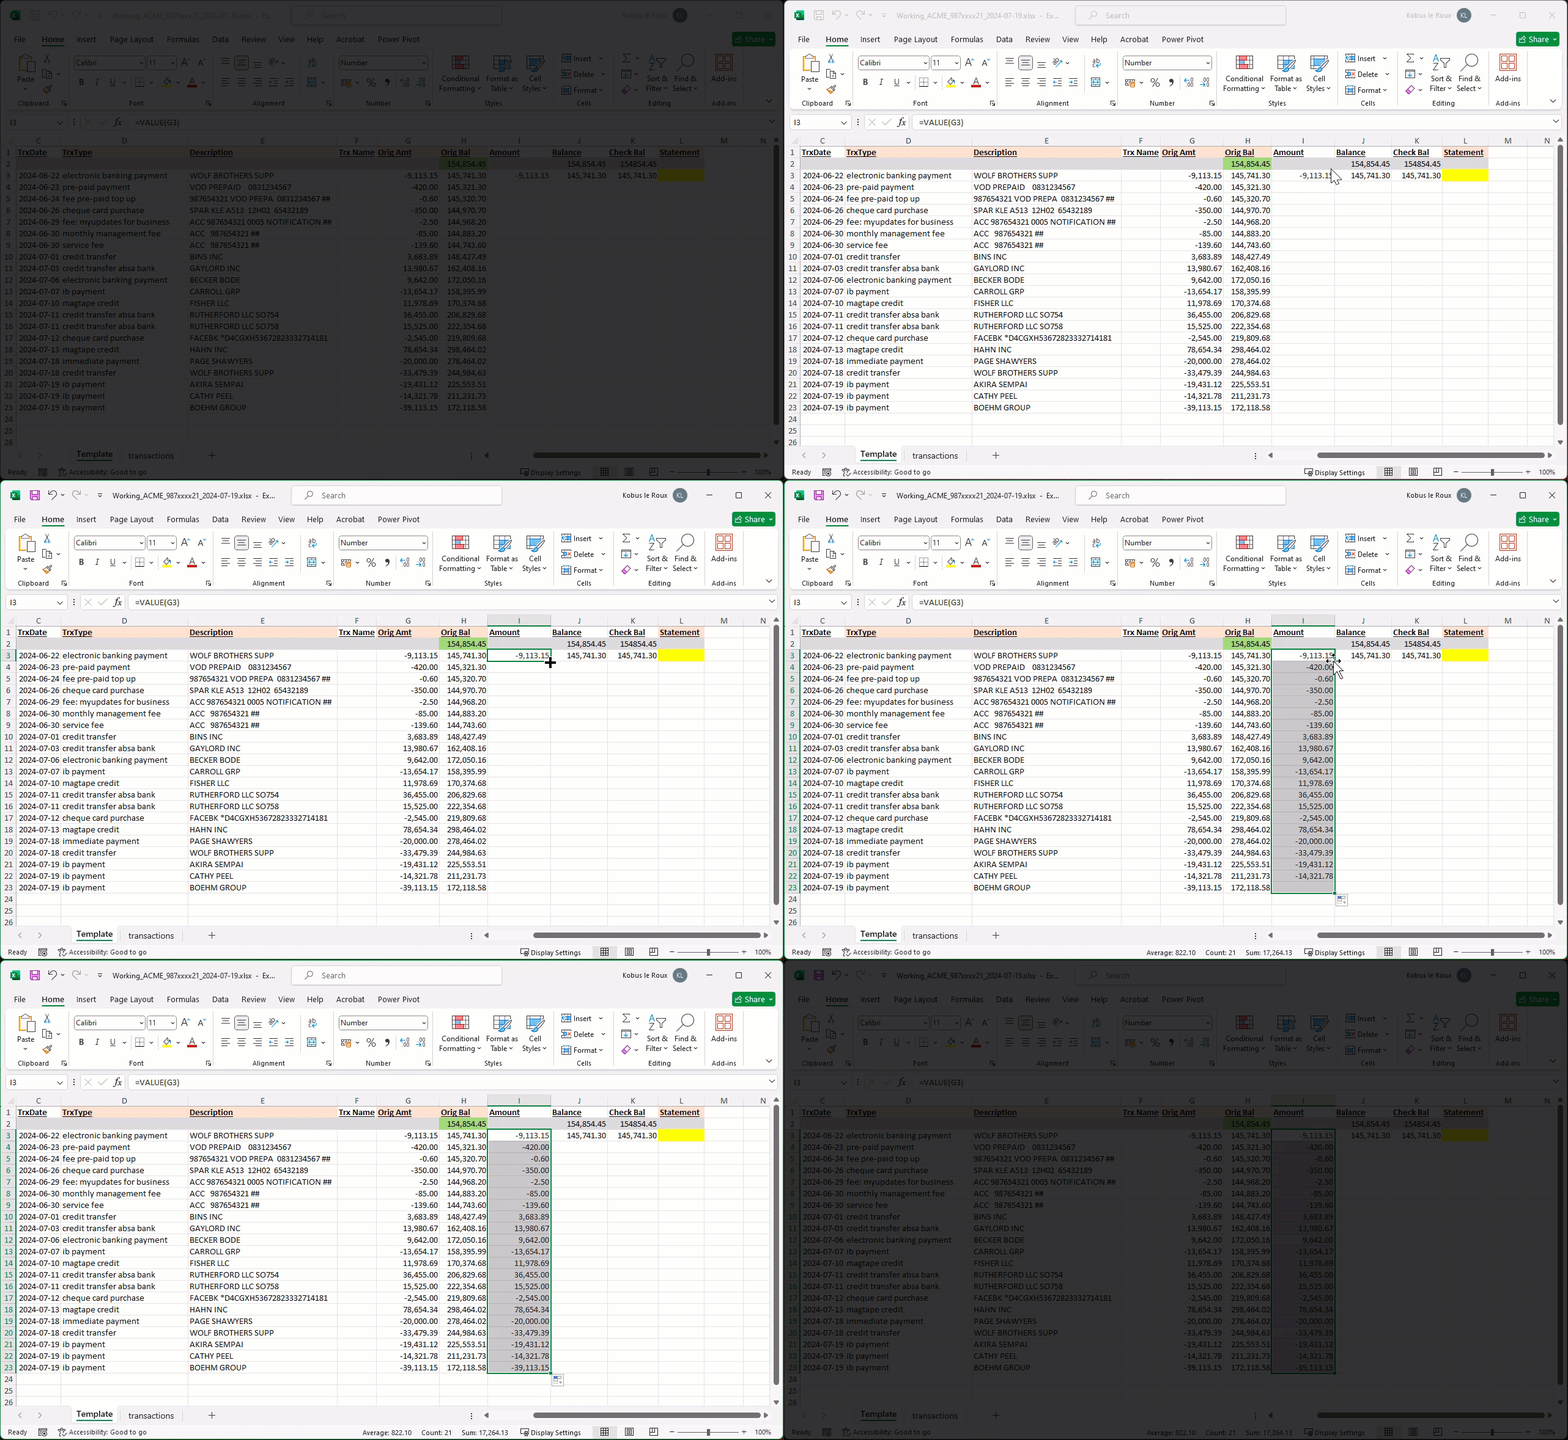
The Orig Amt column is updated.
-
Select the first record cell under the Amount column.
-
Use Fill-Down to copy the formula to all cells in the column.
The Amount column is updated.
Copy Balance Records to Template
In this section, we will Copy the Bank Balance records from the transactions sheet to the Template sheet.
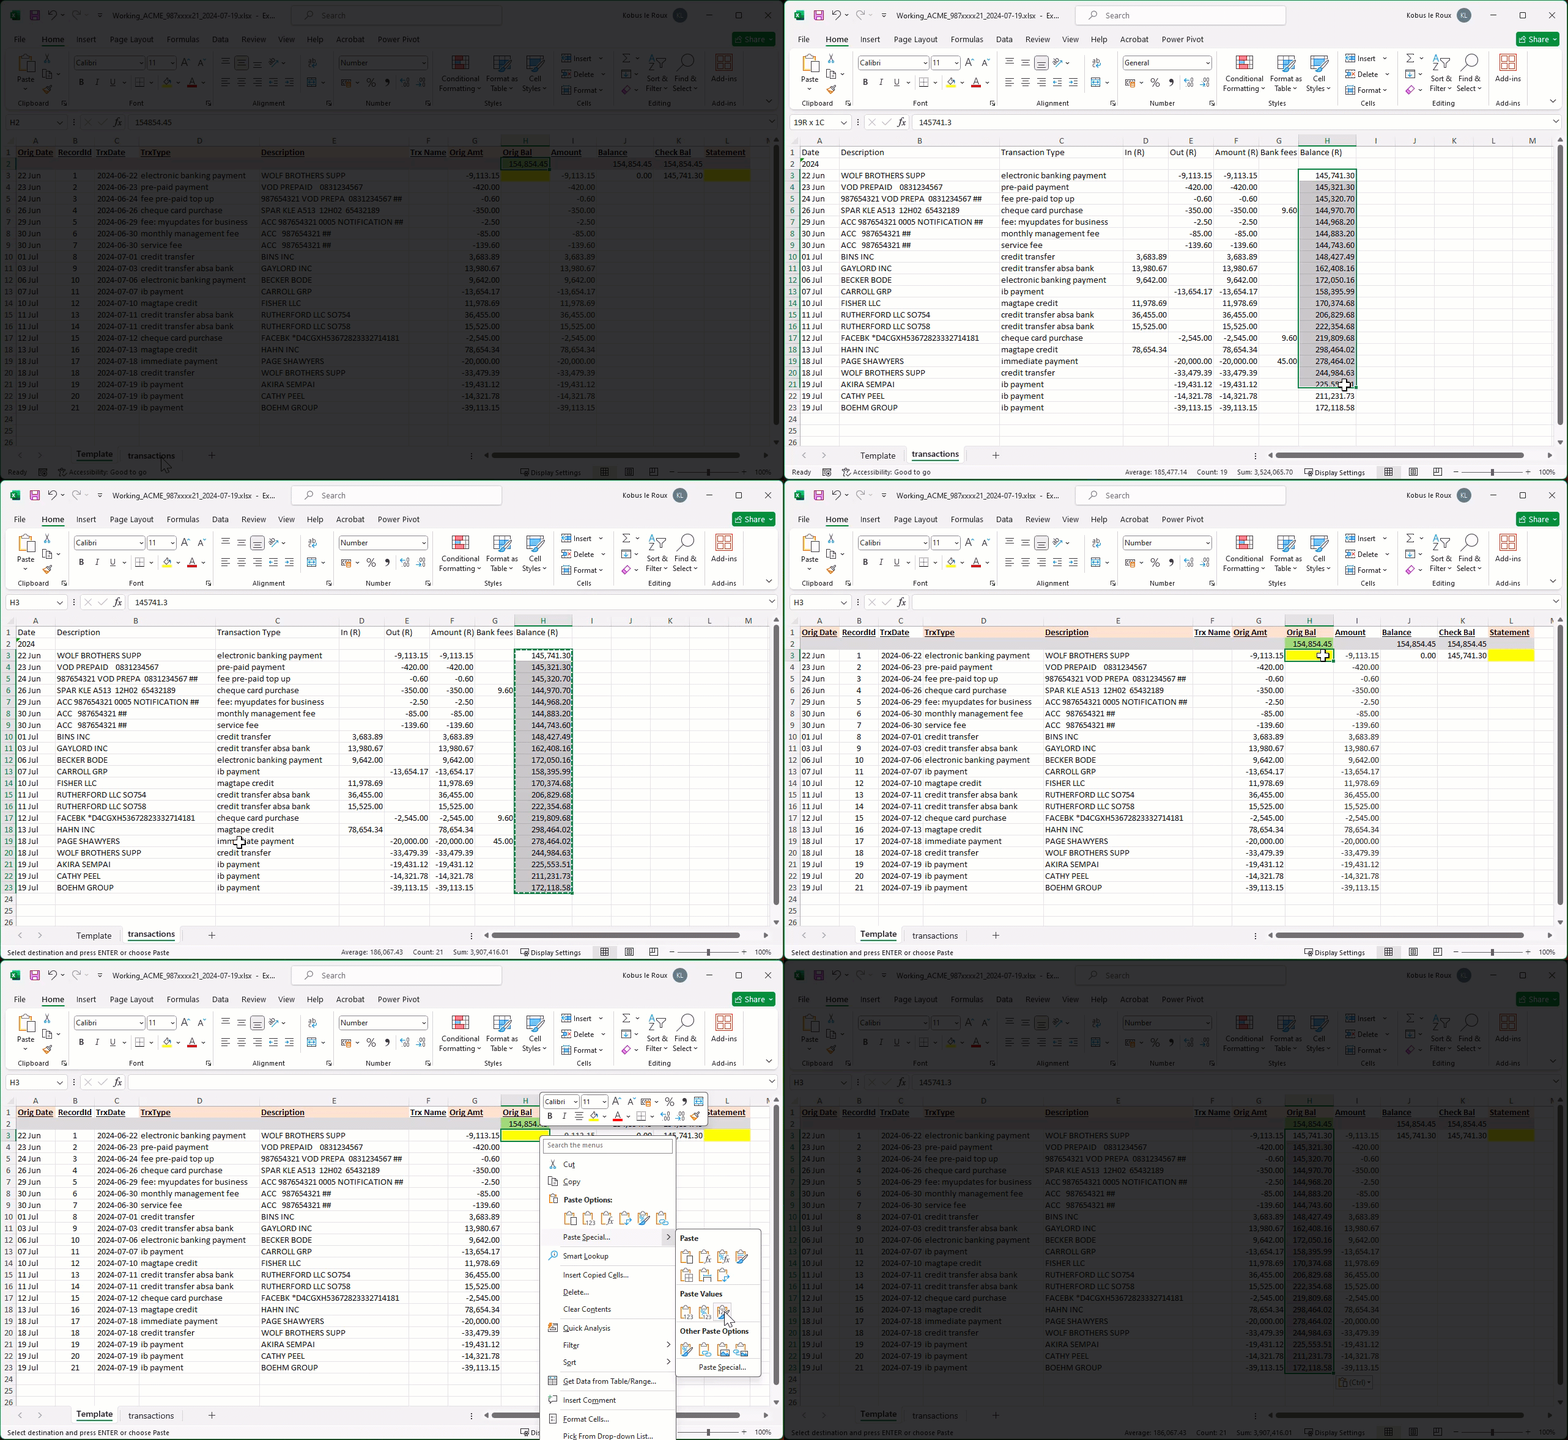
- It is recommended that you add the Balance brought Forward amount in the 1st cell (highted in green) under the Orig Bal heading column.

Although optional, this step will enable you to check the running balance, as copied from the "transactions" sheet, against the calculated balance on the Template sheet.
-
In the "transactions" sheet, select and Copy the record cells in the Balance (R) column.
-
Click on the Template TAB.
-
Right-click on the first record cell (highlighted in yellow) in the Orig Bal column, then select the Paste Values & Source Formatting option.
The Orig Bal column is updated.
-
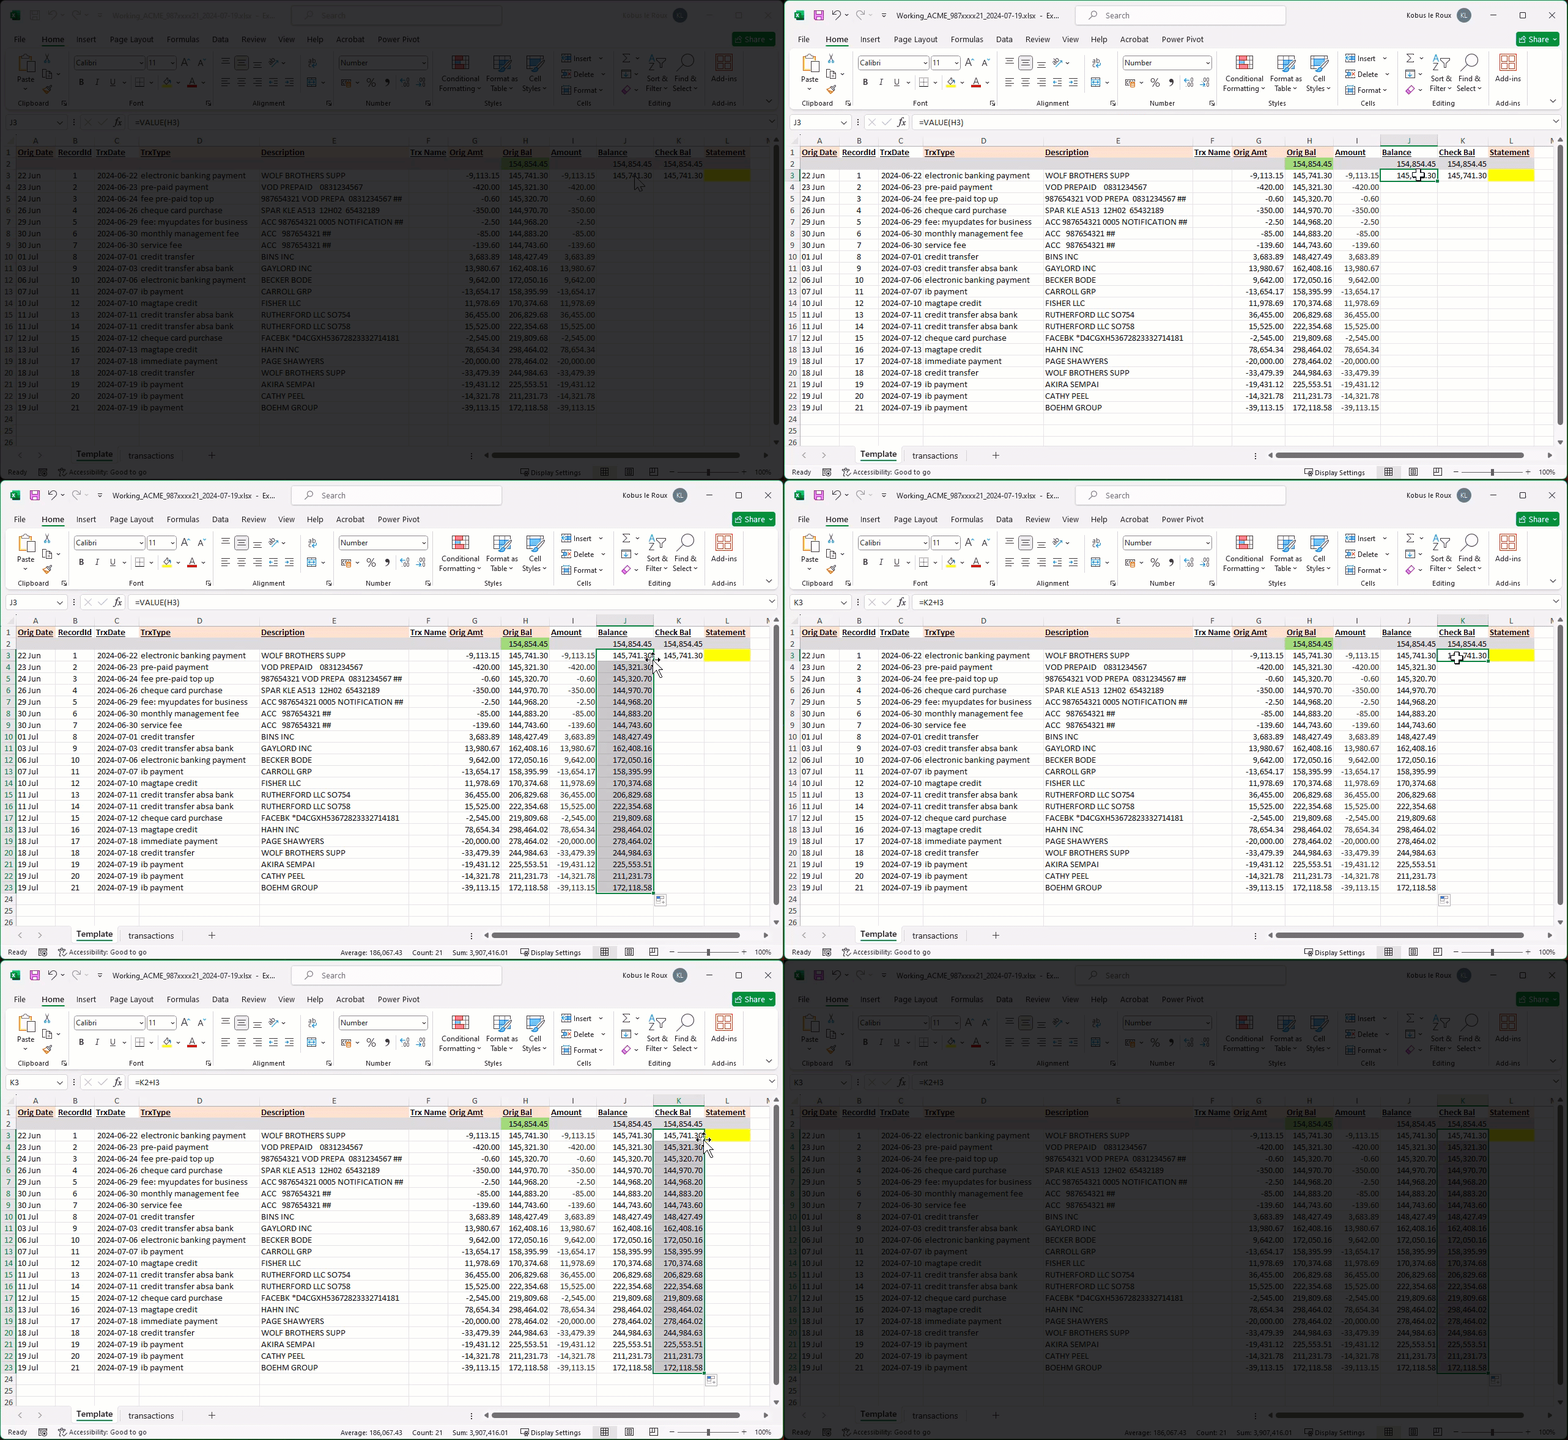
Select the first record cell under the Balance column.
-
Use Fill-Down to copy the formula to all cells in the column.
The Balance column is updated.
-
Select the first record cell under the Check Bal column.
-
Use Fill-Down to copy the formula to all cells in the column.
The Check Bal column is updated.
Add Statement Number
In this section we will add the Bank Statement Number in the Template sheet.
Adding the Bank Statement number is important, as the SEMS import function uses this value to differentiate between the records in the various imports performed.
-
In the Template sheet, click on the first record cell (highlighted yellow) in the Statement column.
-
Type in the periodic statement number.
-
Use Fill-Down to copy the number to all cells in the column.
The Statement column is updated.
This completes the Excel Bank Statement Preprocessing process.
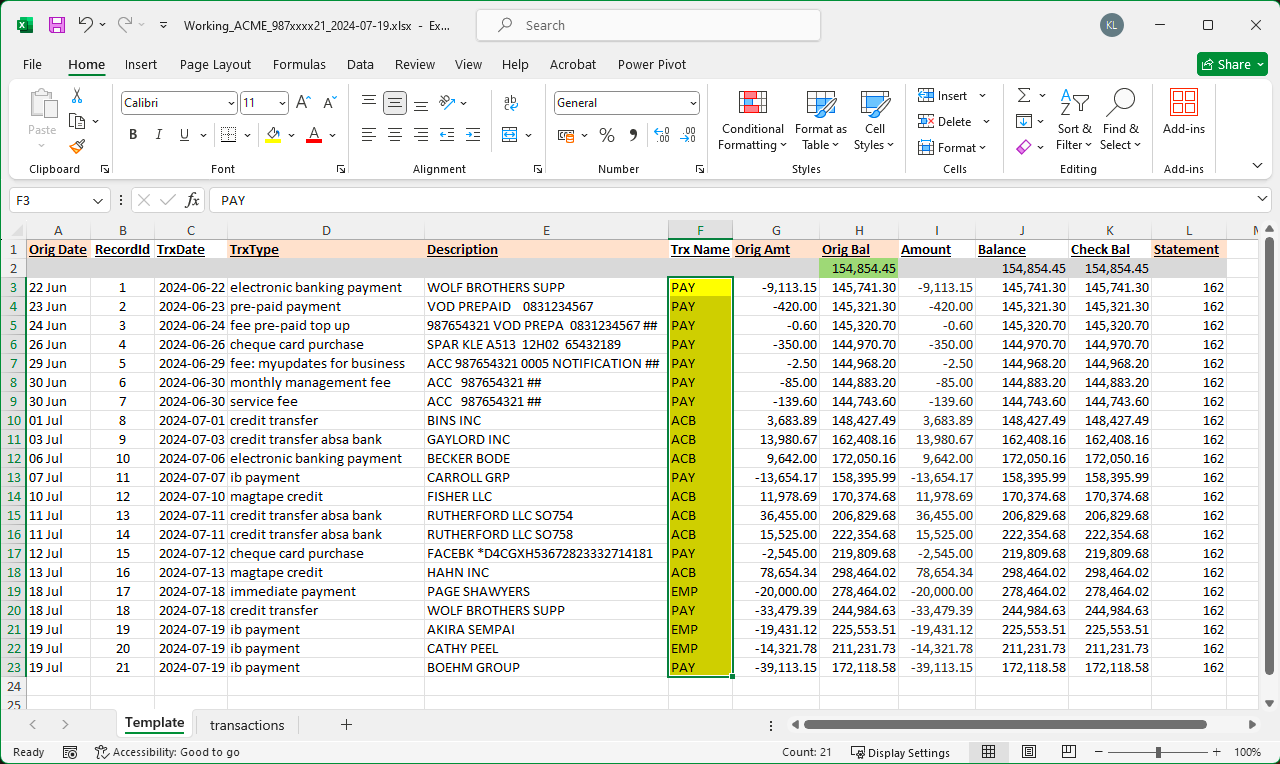
Add TRX Name Details (Optional)
As an option, you can add Transaction Name details in the Template sheet under the Trx Name column.
Save the Excel Bank Statement Spreadsheet
It is recommended that the Excel file is saved after each section detailed above.
Once you are satisfied that the information in the Template sheet is accurate, the updated Excel Bank Statement can be saved. The spreadsheet is now ready to be Loaded in the SEMS application using the Import Bank Transactions function.
Refer to the document titled "Load & Import Bank Transactions".