Load & Import Bank Transactions
Introduction
Once Bank Statements have been downloaded in Excel format, and preprocessing has been completed, the next steps include Loading and Importing the bank transactions into the SEMS application.
Once the bank transactions have been loaded, the SEMS application enables you to assign payments, credits and debits, to the relevant parties. This, in turn, will make it possible to generate accurate financial reports using the functions and features in the SEMS application.
Load Bank Statement
Navigate to IMPORT Screen
The first step in this guideline is to navigate to the Import Bank Transactions utility.
-
Click Utilities in the Main Navigation Menu.
-
Click Import Bank Transactions in the drop-down menu.
The system will display the Import screen.
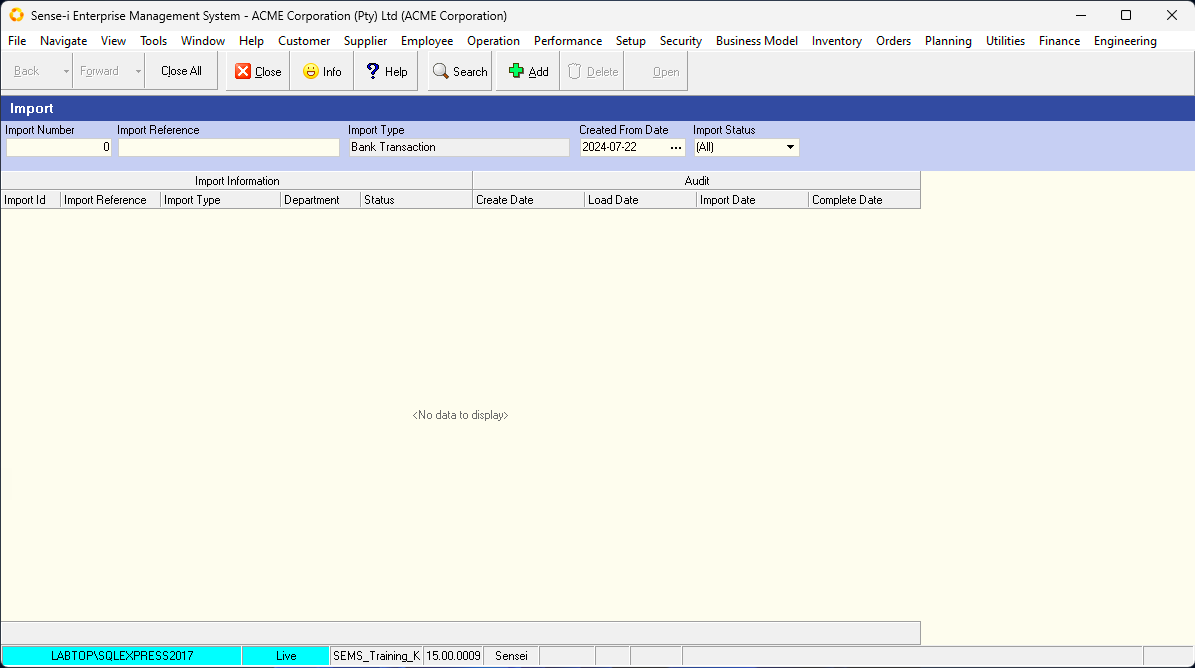
Import Search
To search for Bank Transactions previously loaded / imported:
-
Type in / select options in any of the search criteria fields in the search panel, then
-
Click the Search button on the Action bar.
The Import screen will list the relevant records of Bank Transaction records that match the search criteria entered.
To view the details of a specific record,
-
Click on the record row, then
-
Click the Open button in the Action bar.
The record details will be displayed in the Import - ### screen.

- Click on the TABs:
- Profile
- Column Mapping
- Imported Data
to view the detail information pages.
- Click the Close button to return to the Import List screen.
Add New Import�
- Click the Add button on the Import list screen.
The Add New Import screen is displayed.

-
Type in a descriptive reference in the Import Reference field.
-
Click on the three-dot button in the Company Account field.
The Company Bank Account screen will be displayed, listing the bank accounts.

-
Click on the appropriate bank account record row, then
-
Click the Select button on the form Action bar.
Profile TAB

- Ensure the Heading Row Number and Data Row Number fields are accurate.
The Heading Row Number and Data Row Number information MUST correctly correspond to those on the Excel file to be imported.
-
Click on the three-dot button in the Import File field.
-
In the File Manager pop-up window - navigate to, Select and Open the relevant Excel file.
-
Click the Save button on the form Action bar.
The Column Mapping and Imported Data TABs are now accessible.
Column Mapping TAB
- Click the Column Mapping TAB to view the default Column Mapping Import Information details.
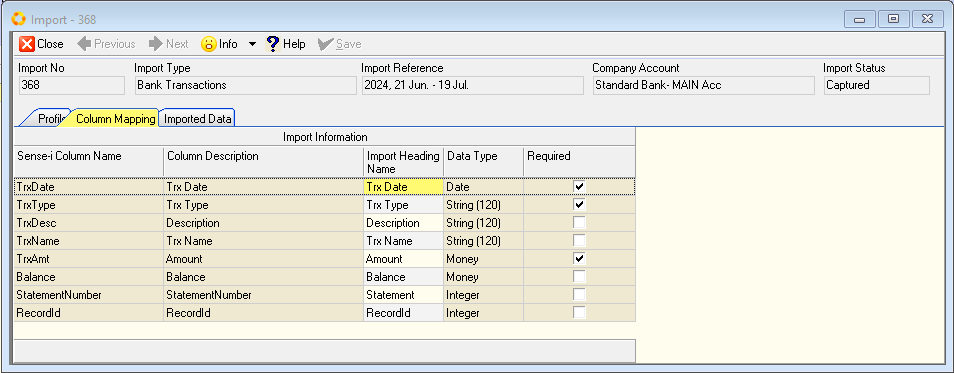
The Import Heading Name should directly correspond with the heading information row on the Template sheet of the Excel file.
Imported Data TAB
- Click the Open File button on the form Action bar.

The Information dialogue confirms the number of rows successfully pre-loaded.

-
Click the OK button to continue.
-
Click the Upload button on the form Action bar.
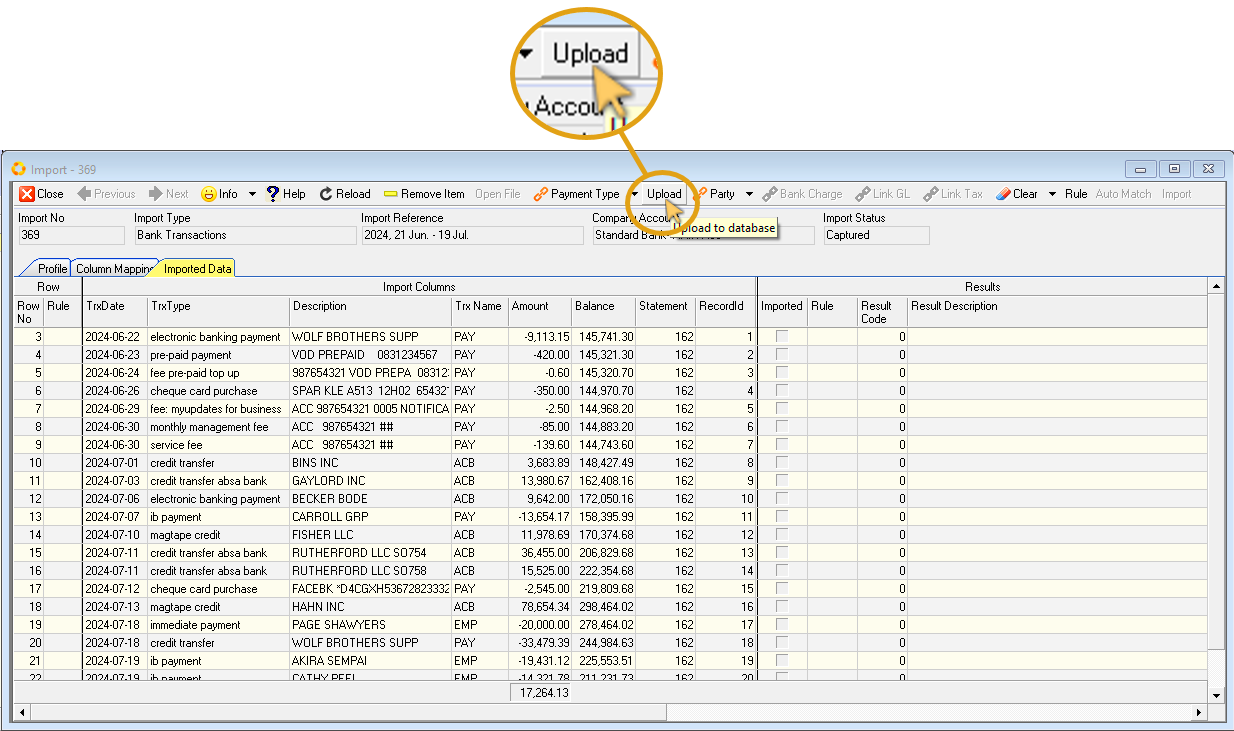
The information is now Loaded in the database. The Import Status is changed from Captured to Loaded.
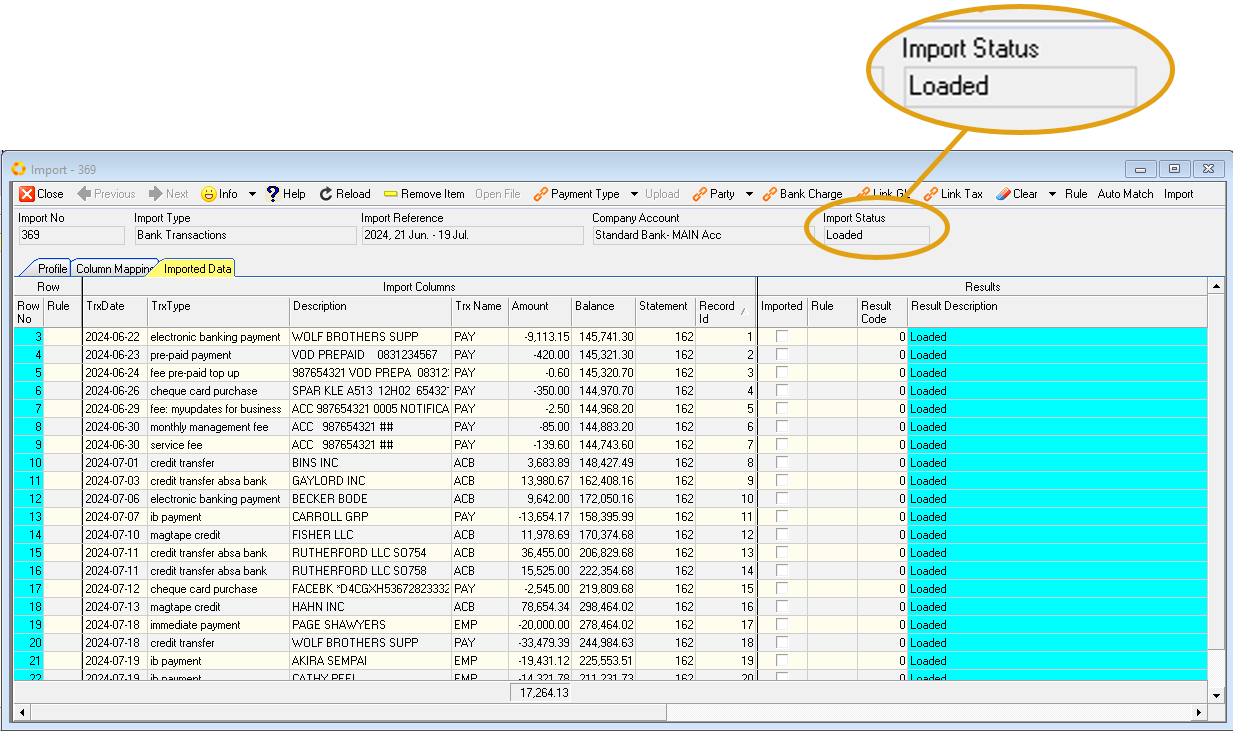
Assign Transaction Attributes
Once the bank transactions have been loaded, the next steps include:
- Designate Payment Type for each transaction
- Allot Transactions to the relevant Party
- Specify those transactions that are Bank Charges
- Link General Ledger account to applicable transactions
- Link Tax type to applicable transactions
Payment Type
Ensure you are on the Imported Data TAB of the Import-### list screen.
-
Click on the record row you you would like to assign a Payment Type to.
-
Click the Payment Type button in the form Action bar.
- Select the relevant option from the drop-down list.
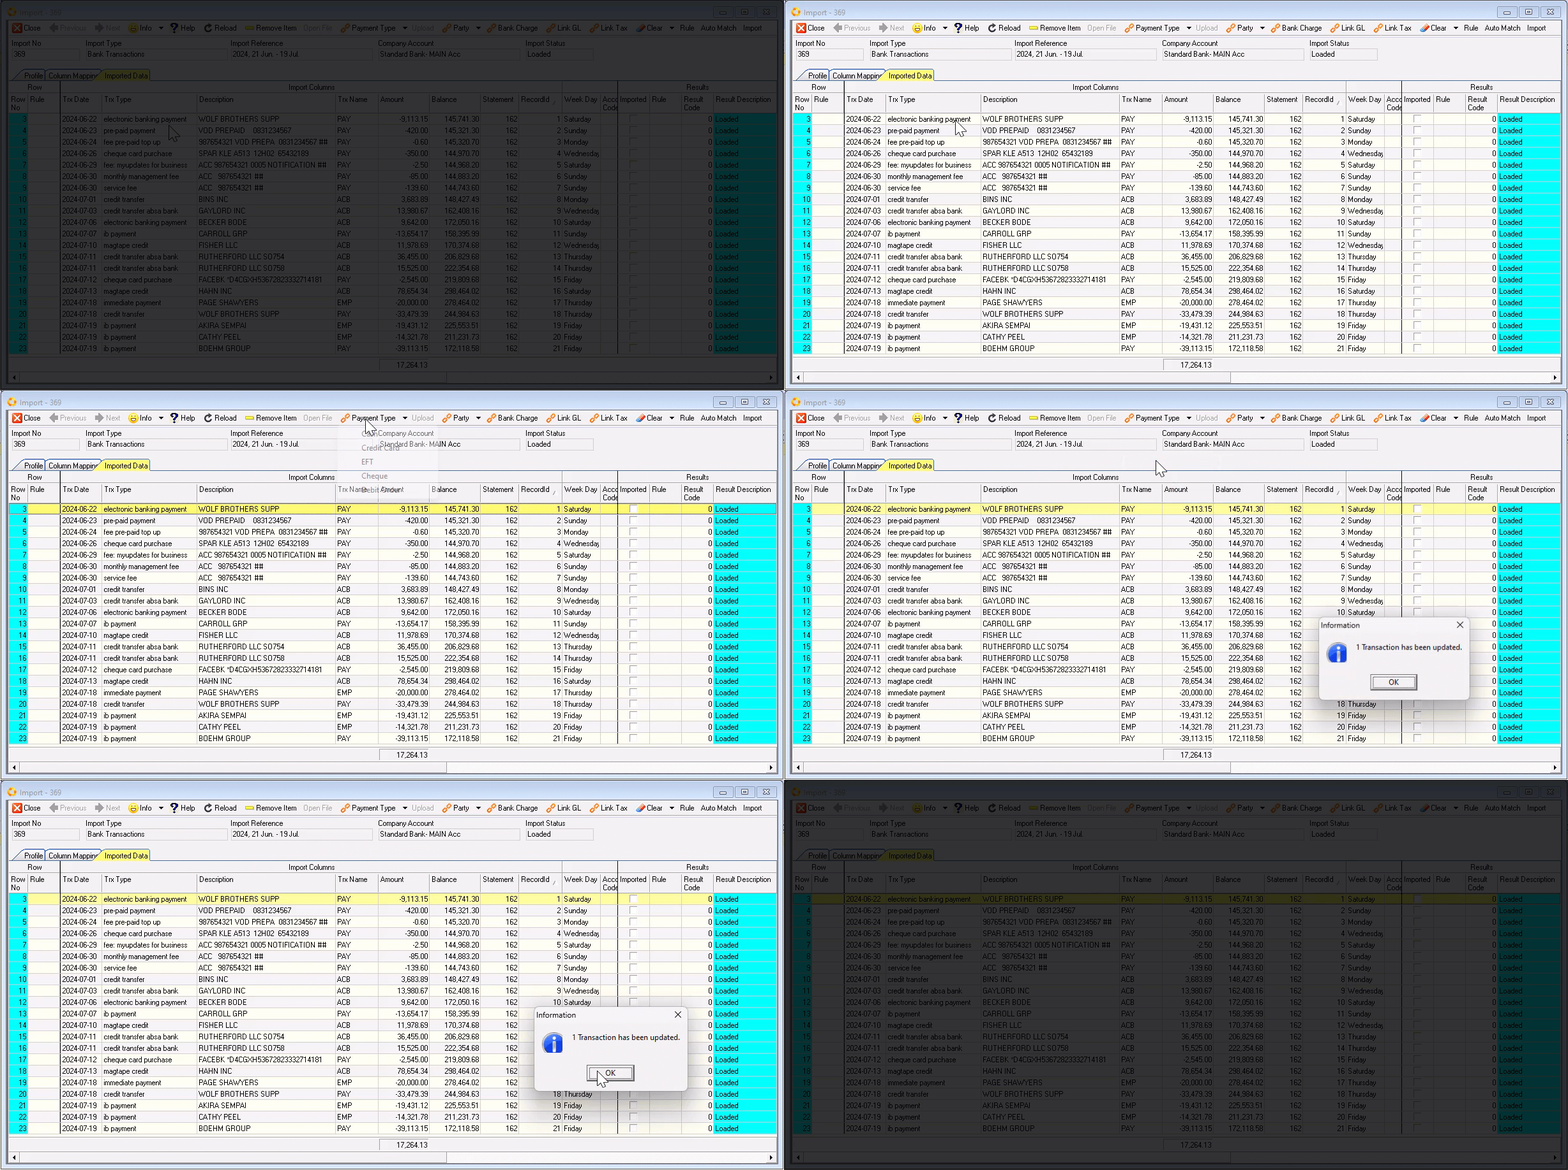
An Information Dialogue window is displayed, confirming the transaction has been updated.
- Click the OK button.
Select multiple record rows, [CTRL] click, to assign the same payment type to the applicable transactions.
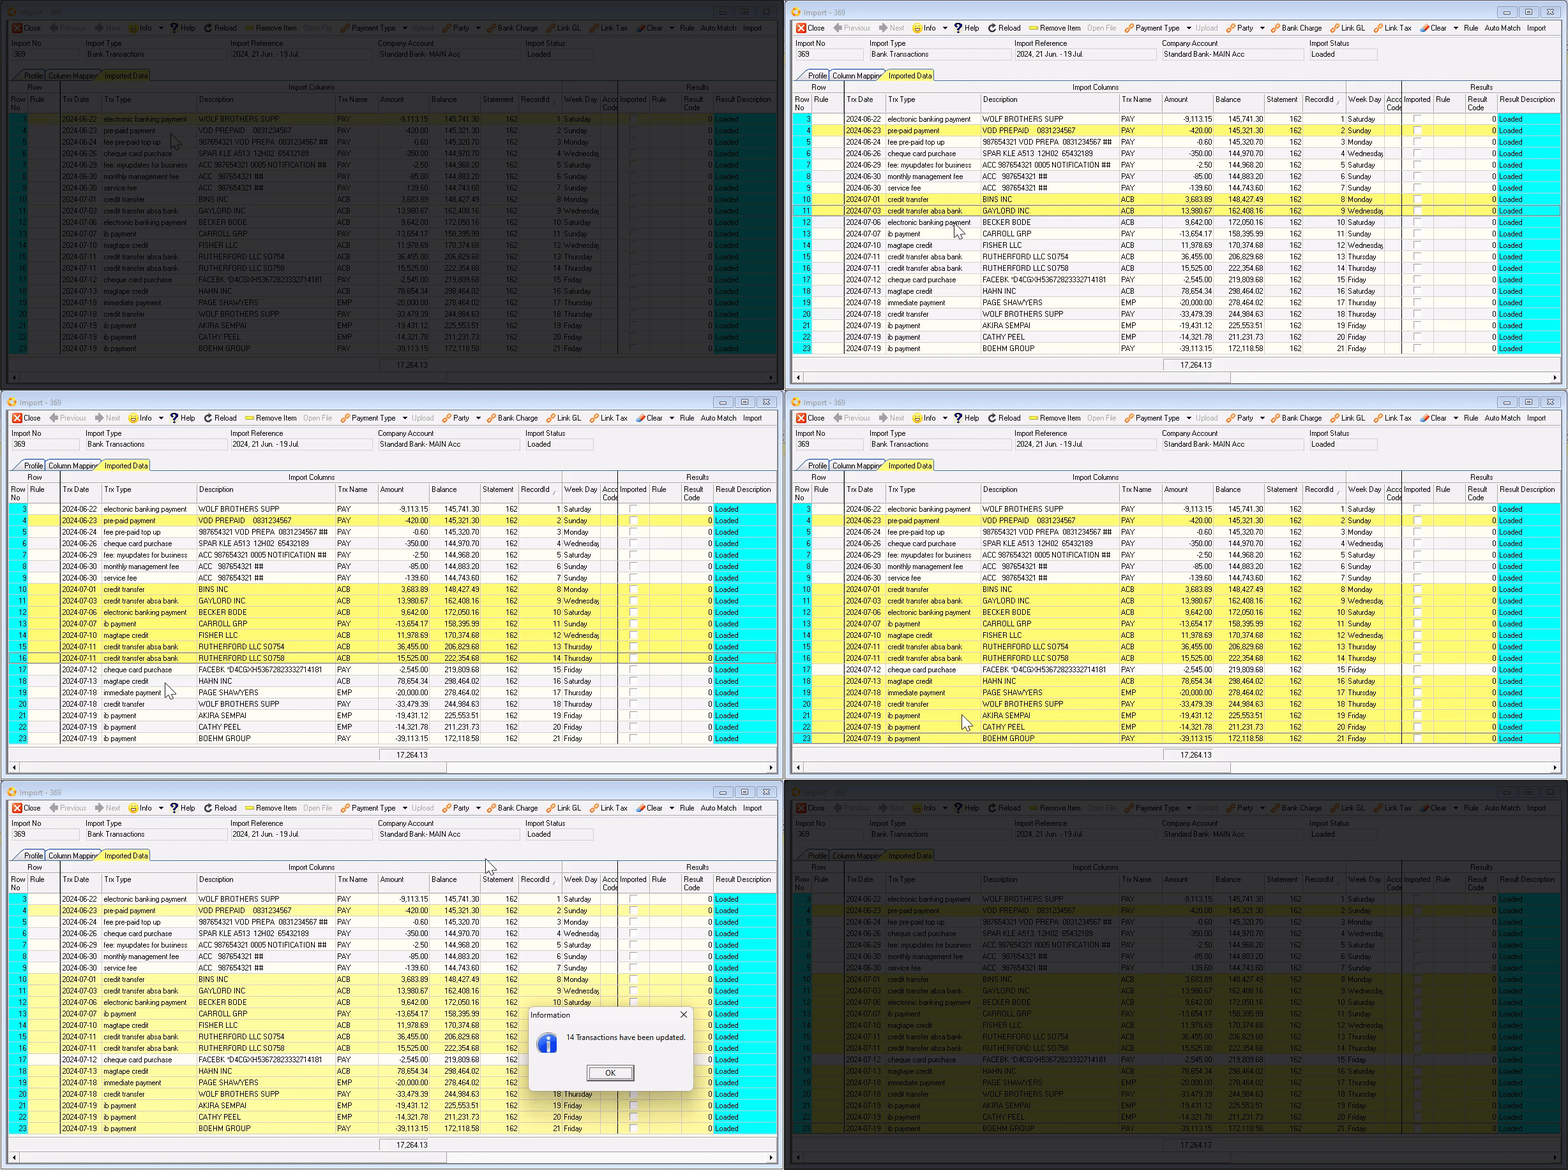
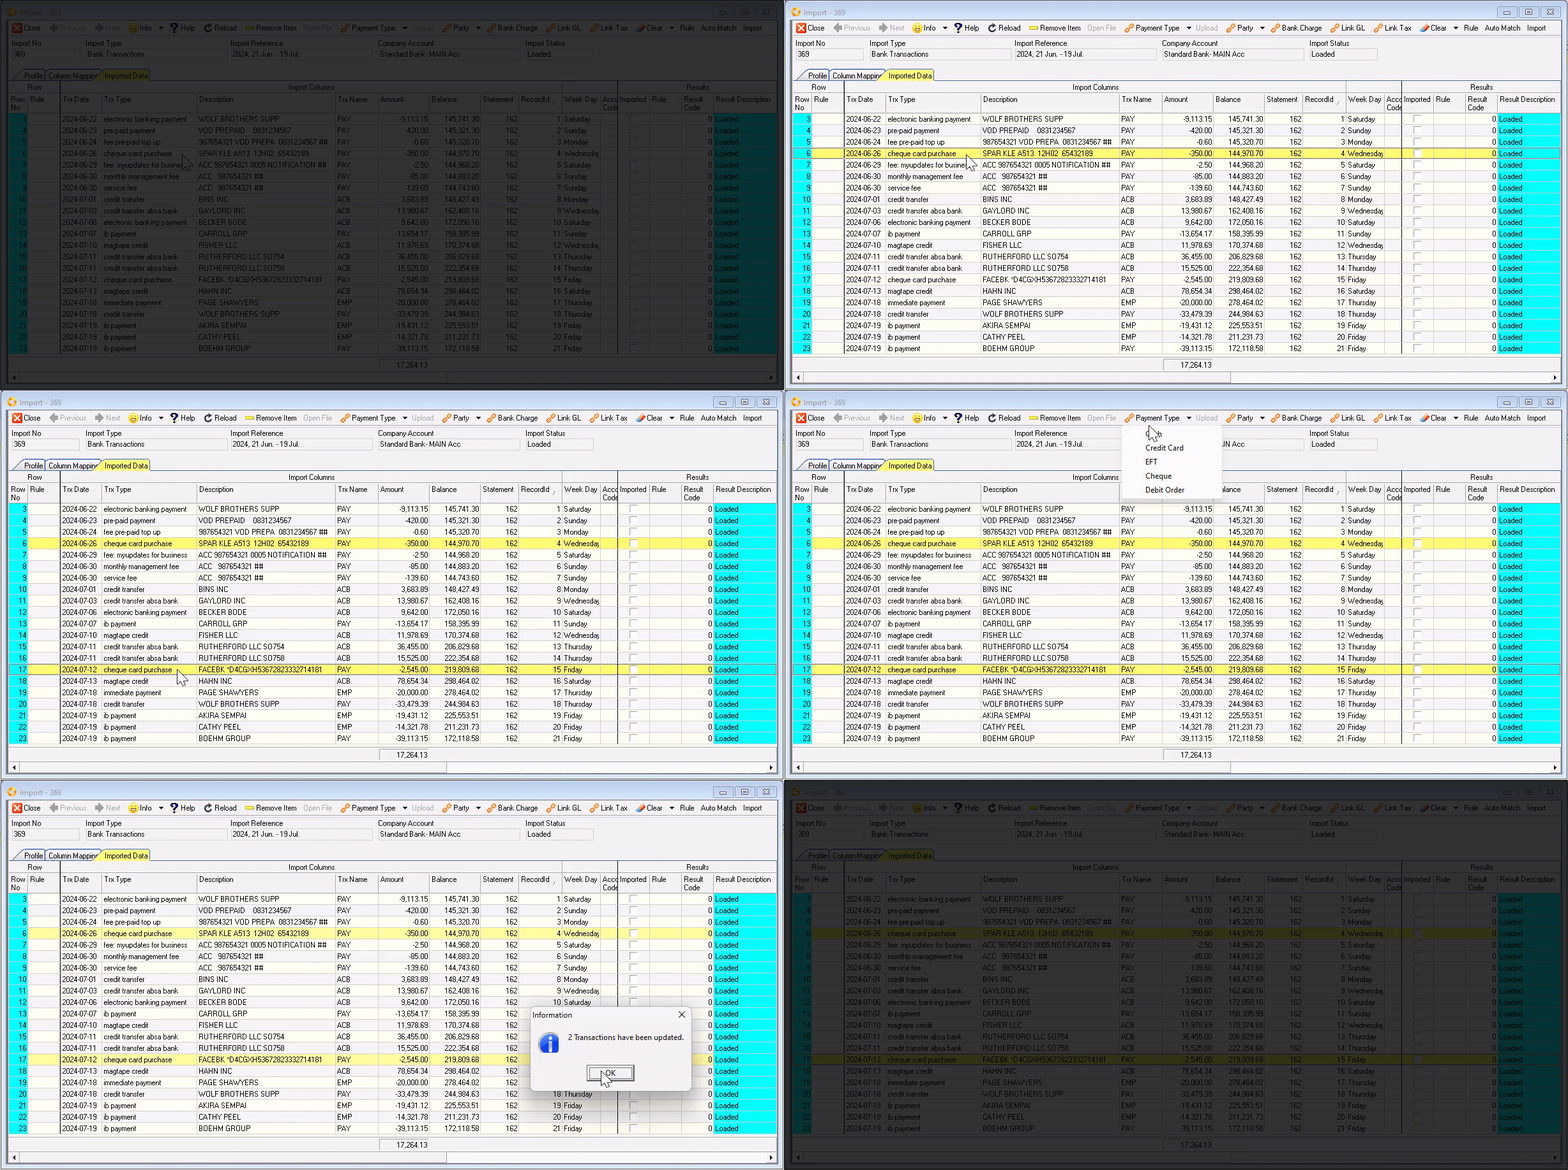
Repeat the steps above to assign Payment Type for all relevant transactions.
Assign Party
-
Click on the transaction record row you you would like to assign a Party to.
-
Click the Party button in the form Action bar.
- Select the relevant option from the drop-down list.
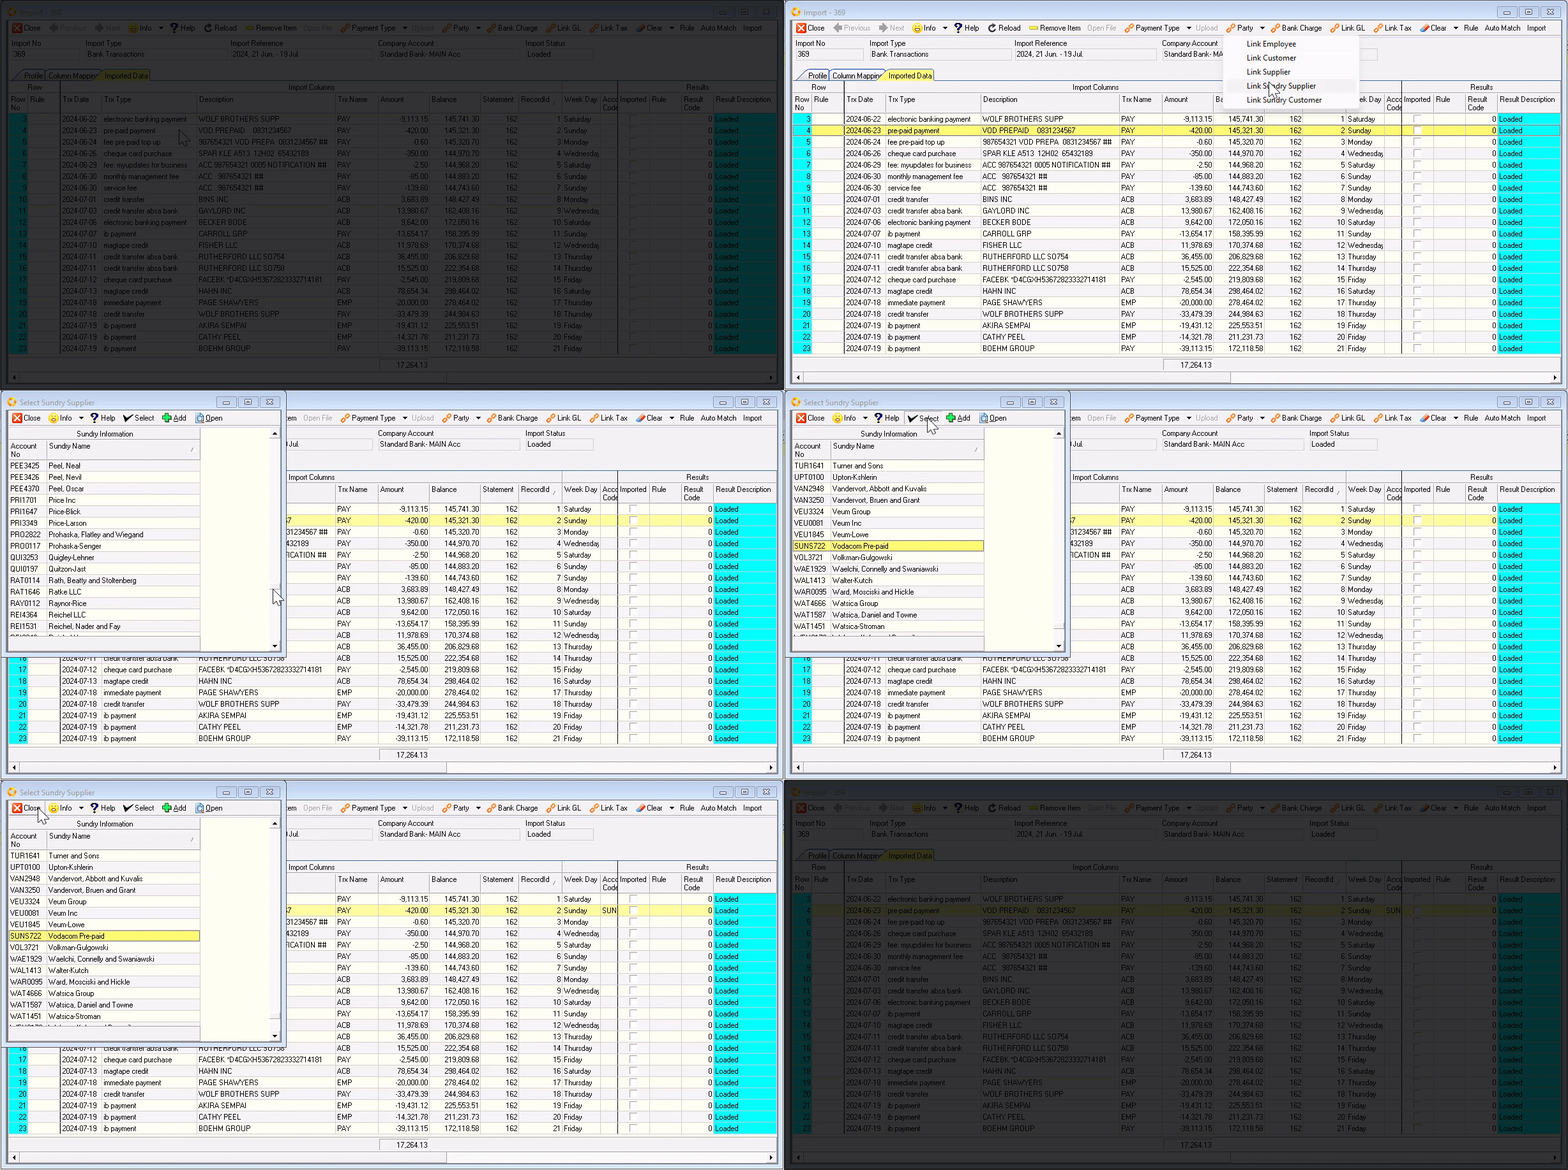
An Information Dialogue window is displayed, confirming the transaction has been updated.
- Click the OK button.
When assigning a Sundry Customer, or Sundry Supplier which is not listed:
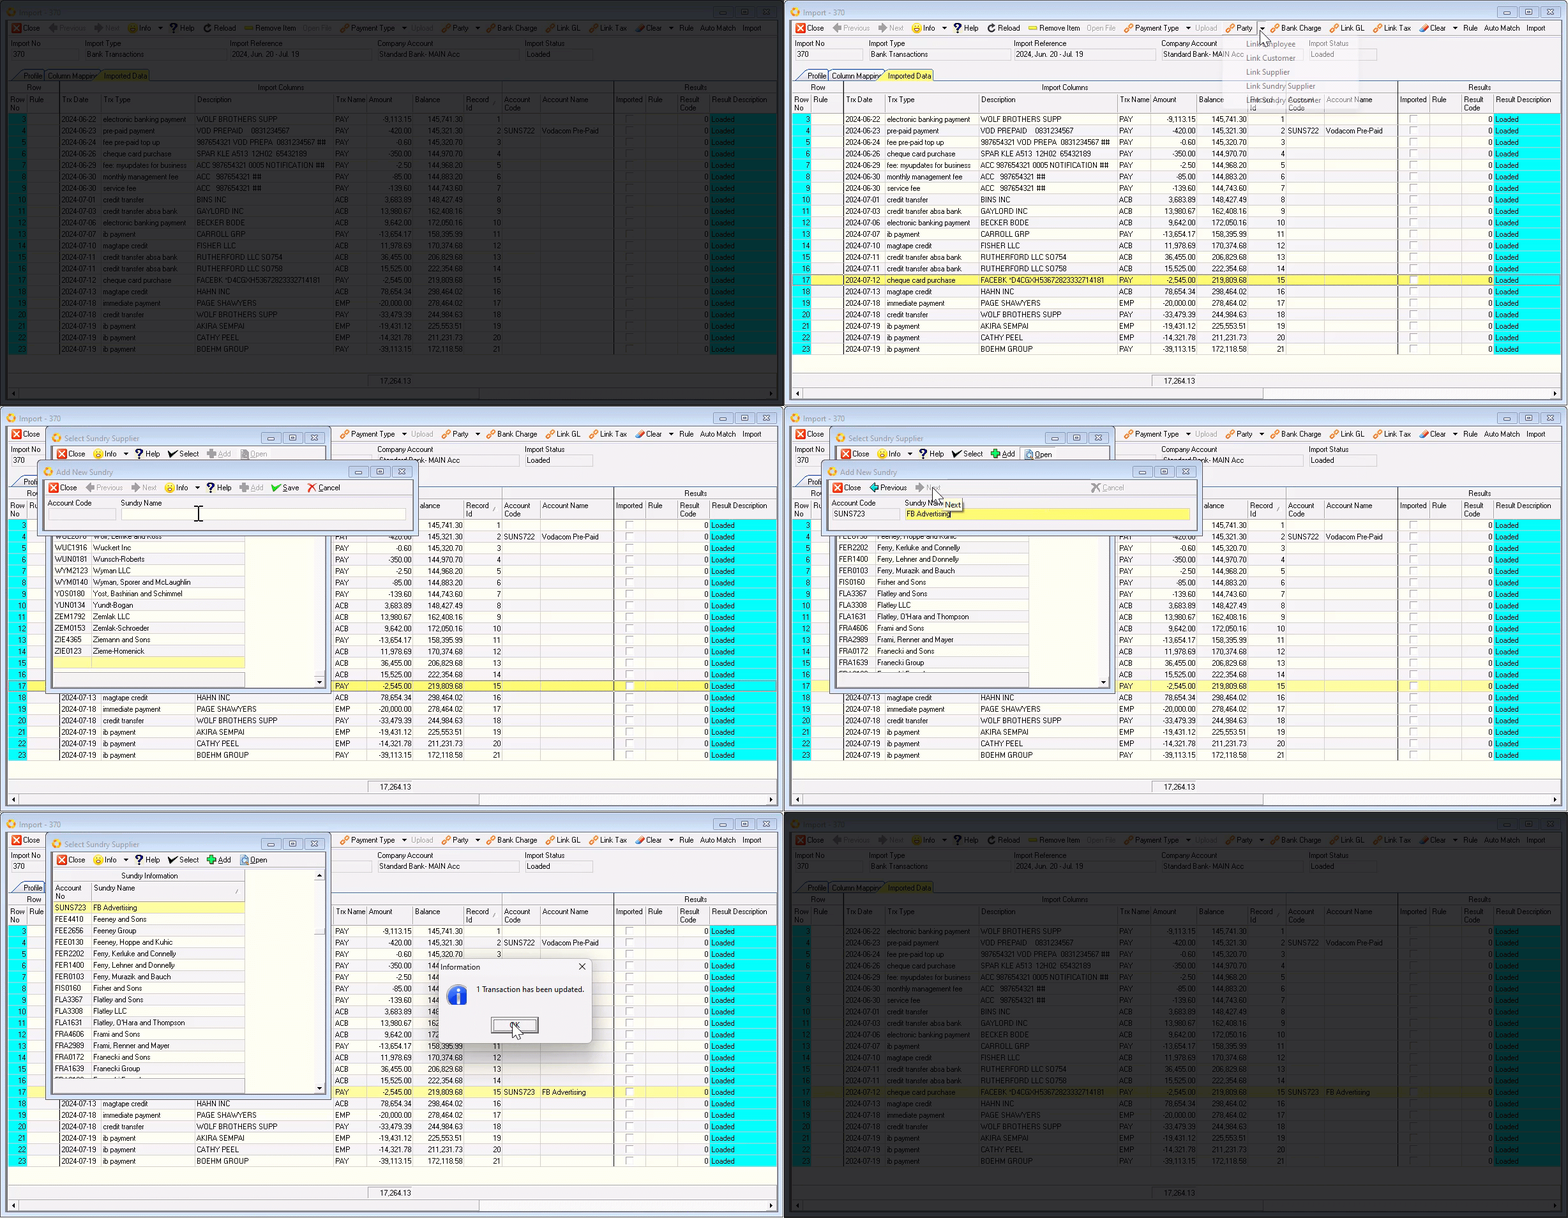
- Click the Add button in the Select Sundry Supplier (or Select Sundry Customer) form Action bar.
The Add New Sundry screen is displayed.
-
Type in the reference name in the Sundry Name field.
-
Click the Save, and then the Close buttons in the form Action bar.
-
Click on the newly created Sundry party, then click the Select button on the form Action bar.
-
Click the OK button in the Information dialogue window, then
-
Click the Close button on the Select Sundry Supplier action bar.
Select multiple record rows, [CTRL] click, to assign the same party to the applicable transactions.
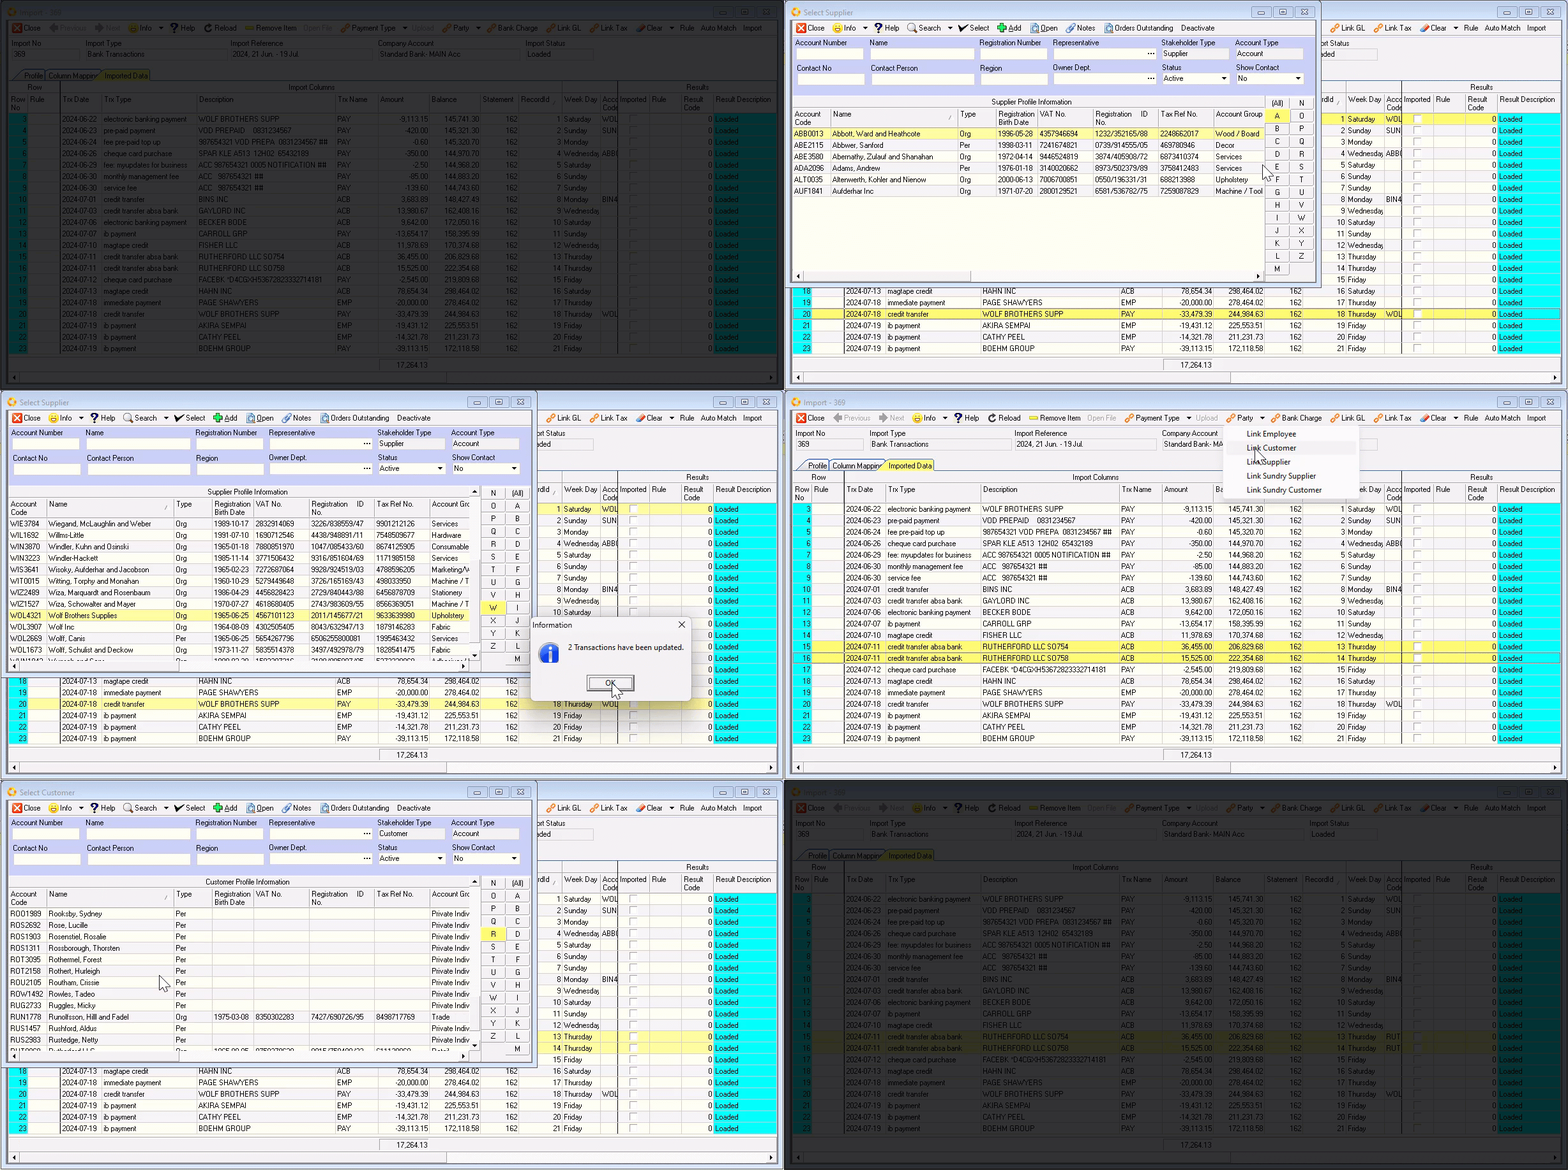
Repeat the steps above to assign Parties for all relevant transactions.
Bank Charges
-
Identify and click on the record row that needs to be allocated as a Bank Charge.
-
Click the Bank Charge button in the form Action bar.
The Bank Charge List screen is displayed.
-
Click on the relevant record row in the list, then
-
Click the Select button in the form Action bar.
An Information Dialogue window is displayed, confirming the transaction has been updated.
-
Click the OK button.
-
Click the Close button to close the Bank Charge List screen.
Select multiple record rows, [CTRL] click, to allocate Bank Charges to the applicable transactions.
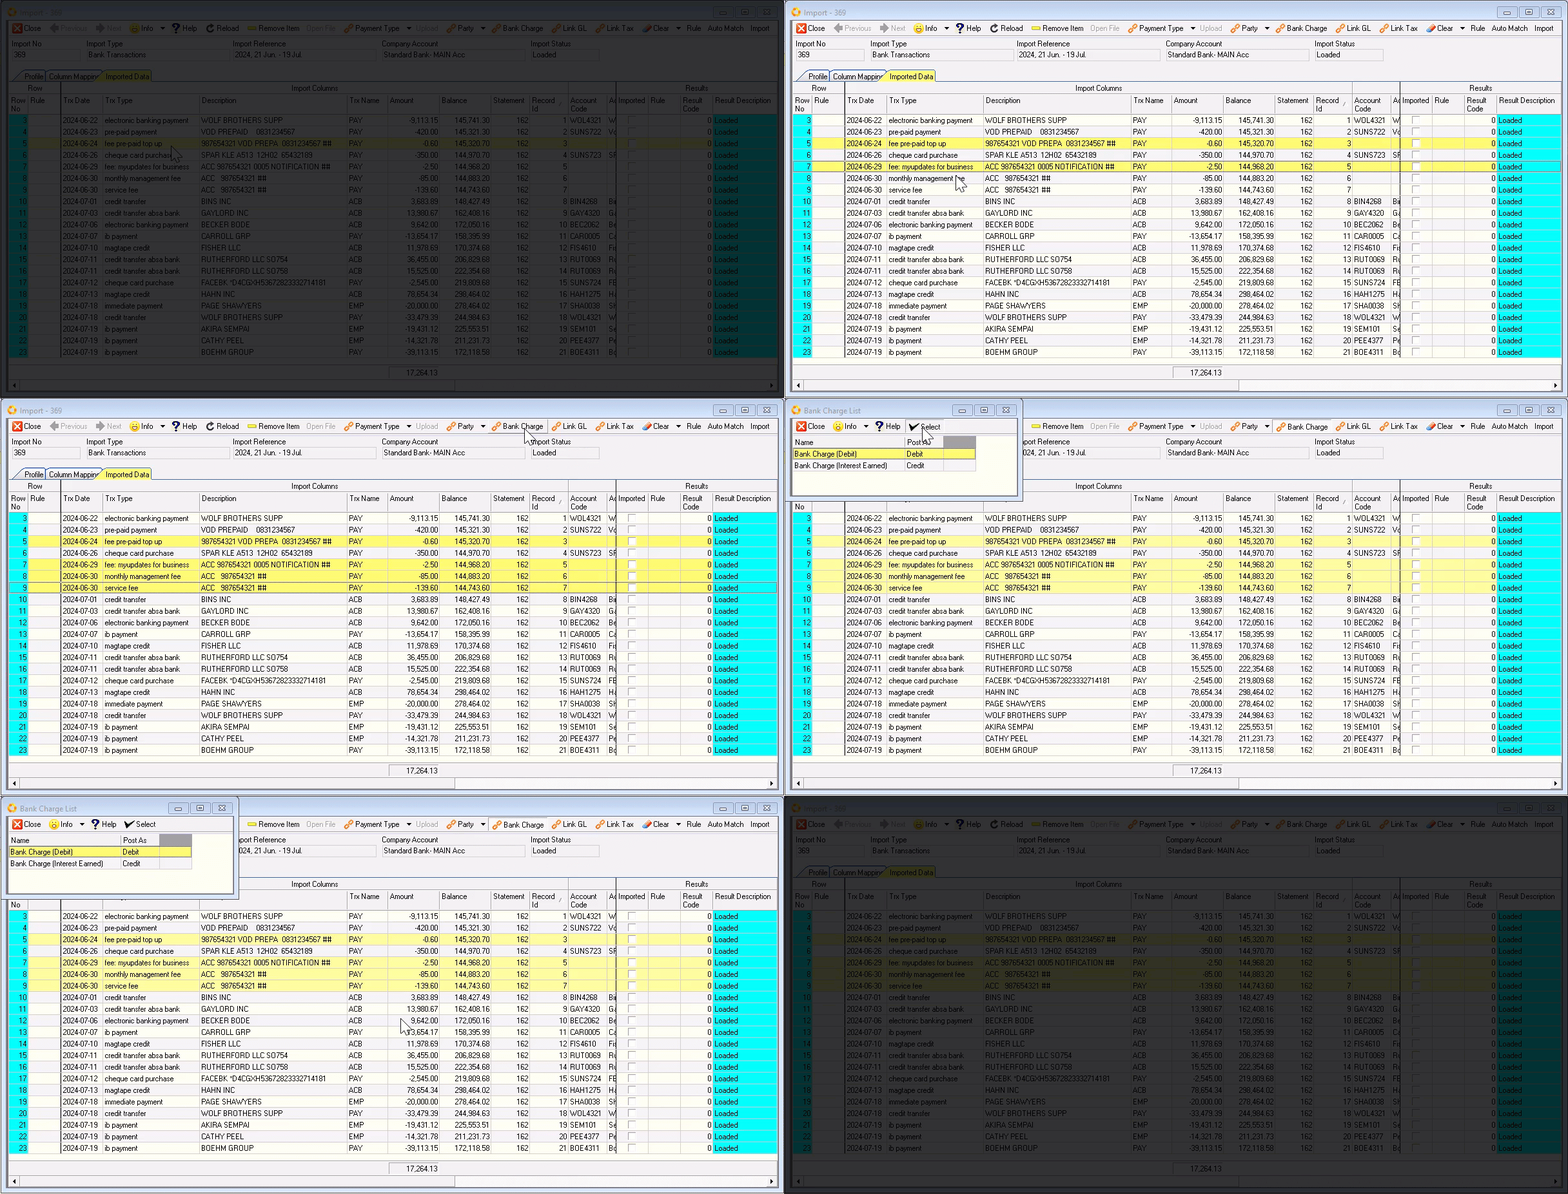
Repeat the steps above to allocate the relevant records as Bank Charges.
Link General Ledger
General ledger account should ONLY be linked to Sundry parties, i.e. Sundry Suppliers & Sundry Customers.
-
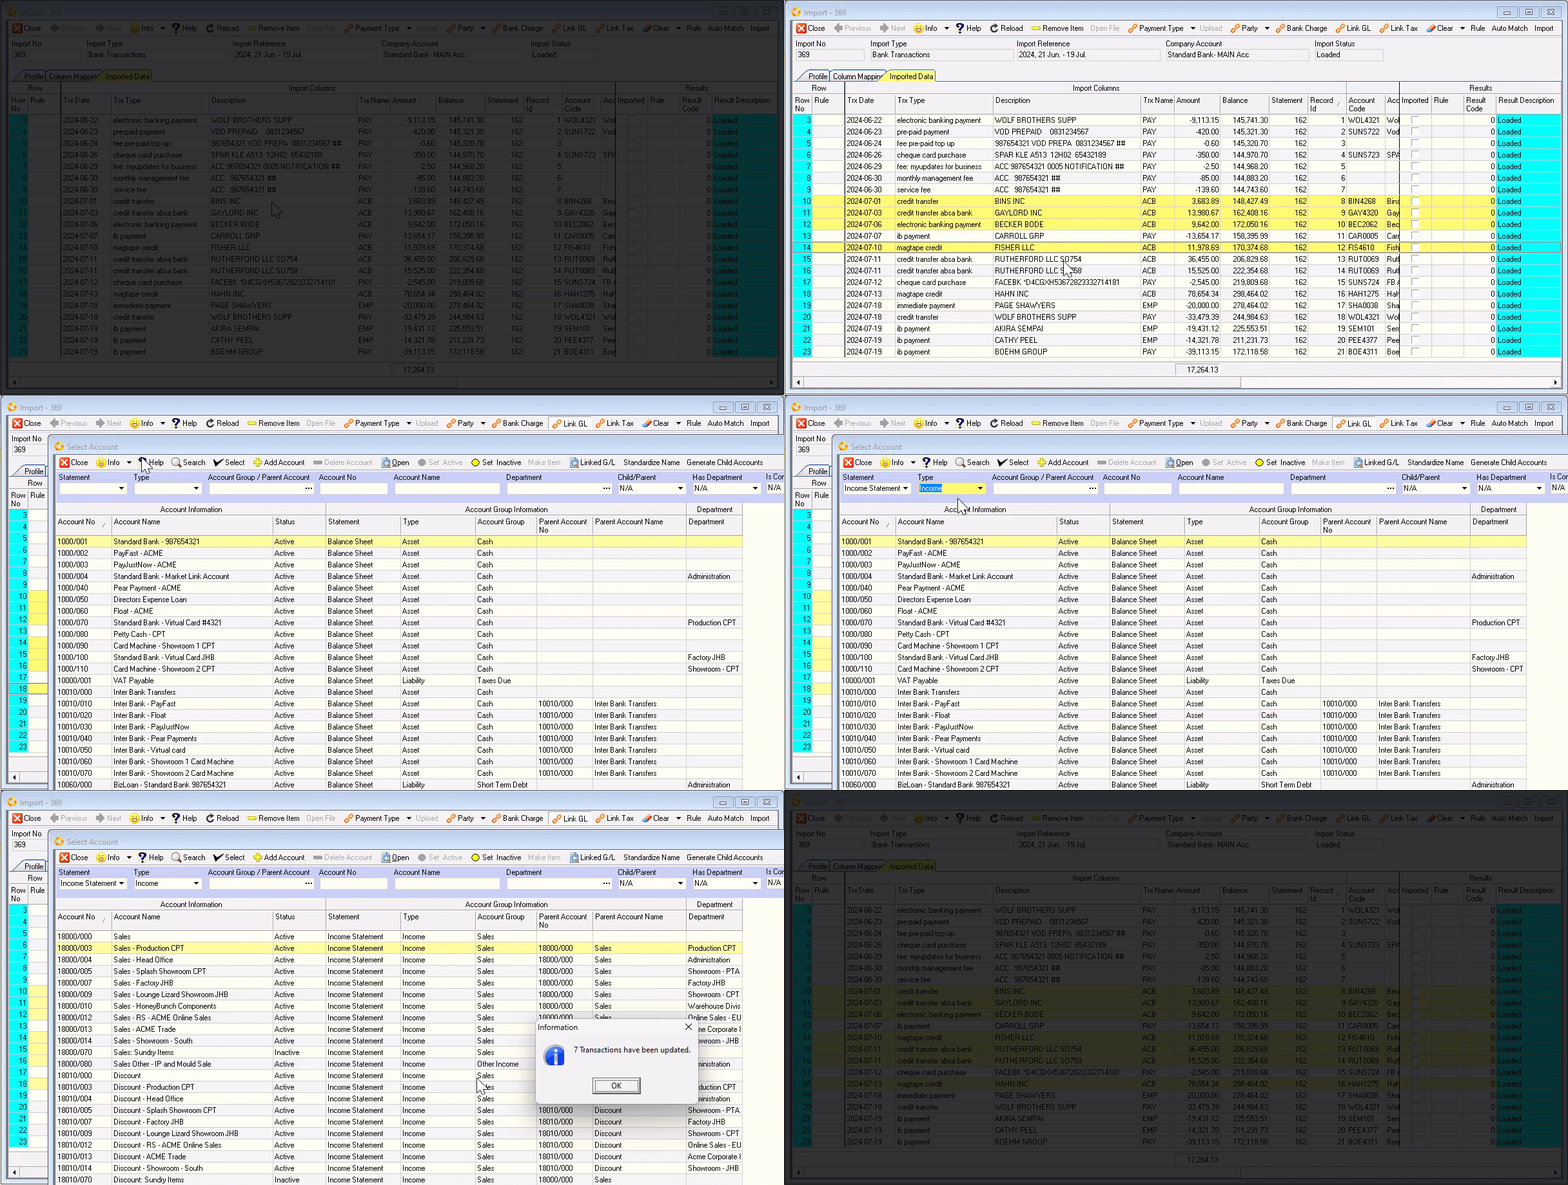
Click on the record row you would like to link to a General Ledger account.
-
Click the Link GL button in the form Action bar.
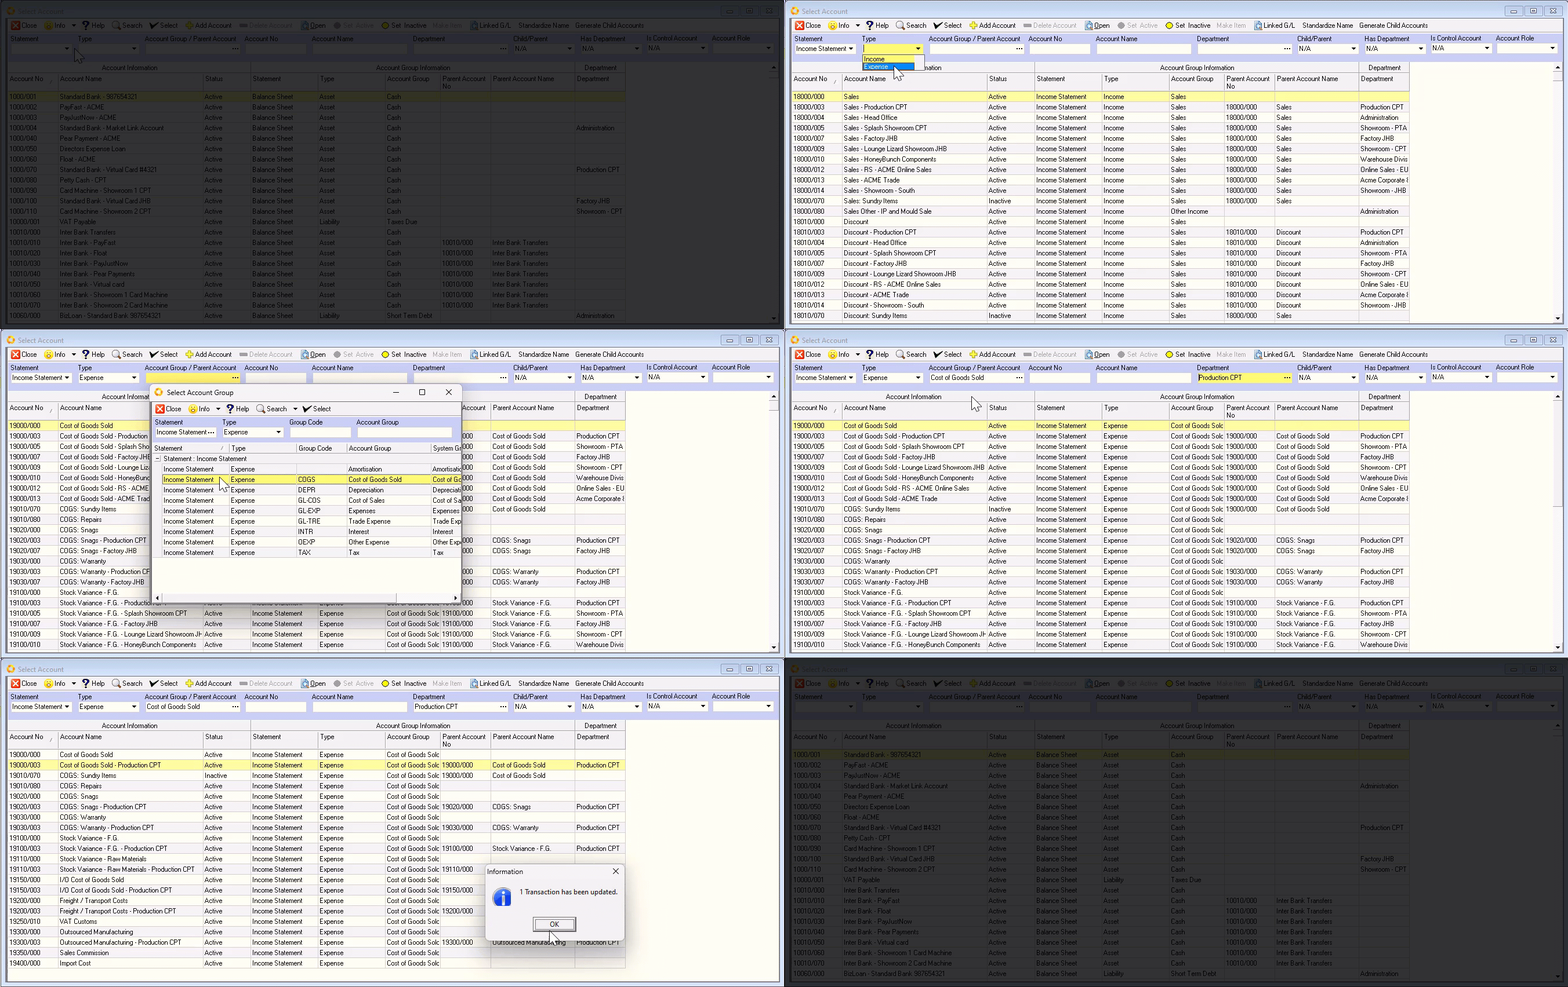
The Select (GL) Account list screen is displayed.
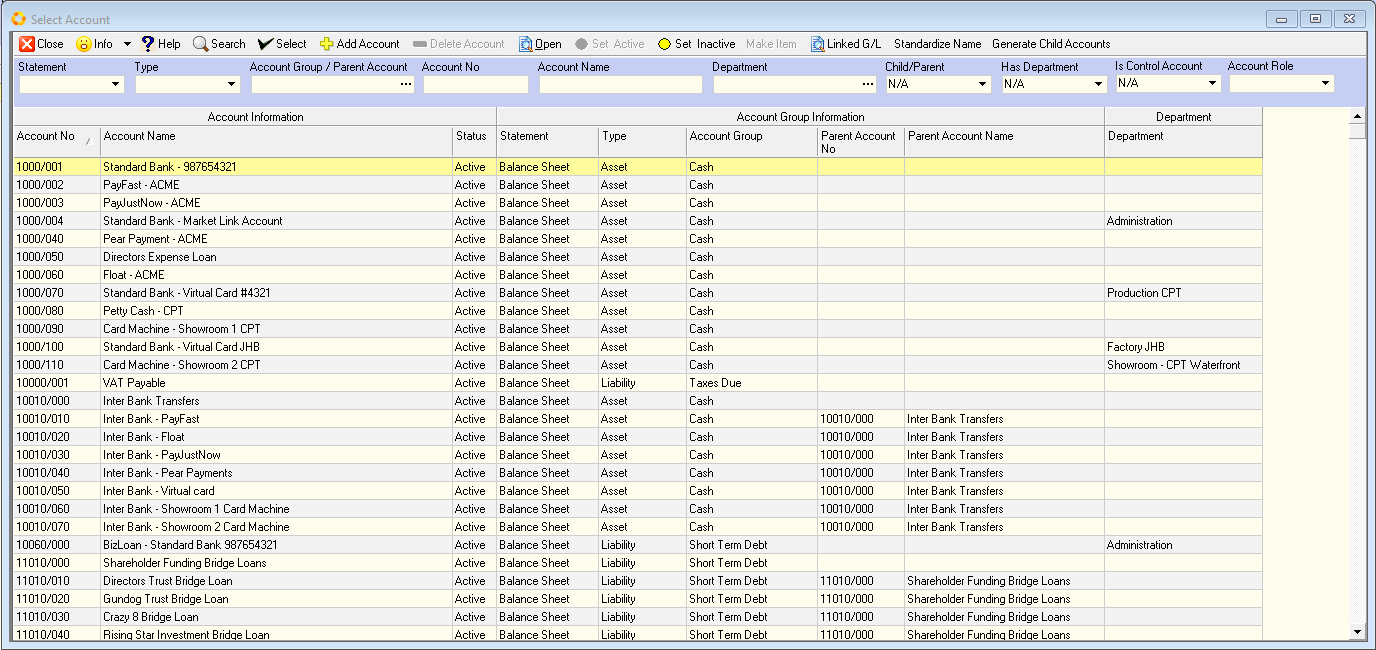
The Select Account screen may well list an extensive number of General Ledger accounts.
- Use the fields in the Search Panel and/or Column Heading filter options to narrow down the list accordingly.
-
Click on the relevant record row in the list, then
-
Click the Select button in the form Action bar.
An Information Dialogue window is displayed, confirming the transaction has been updated.
-
Click the OK button.
-
Click the Close button to close the Select Account list screen.
Select multiple record rows, [CTRL] click, to link General Ledger accounts to the applicable transactions.
Link Tax
Tax should ONLY be linked to Sundry parties, i.e. Sundry Suppliers & Sundry Customers.
-
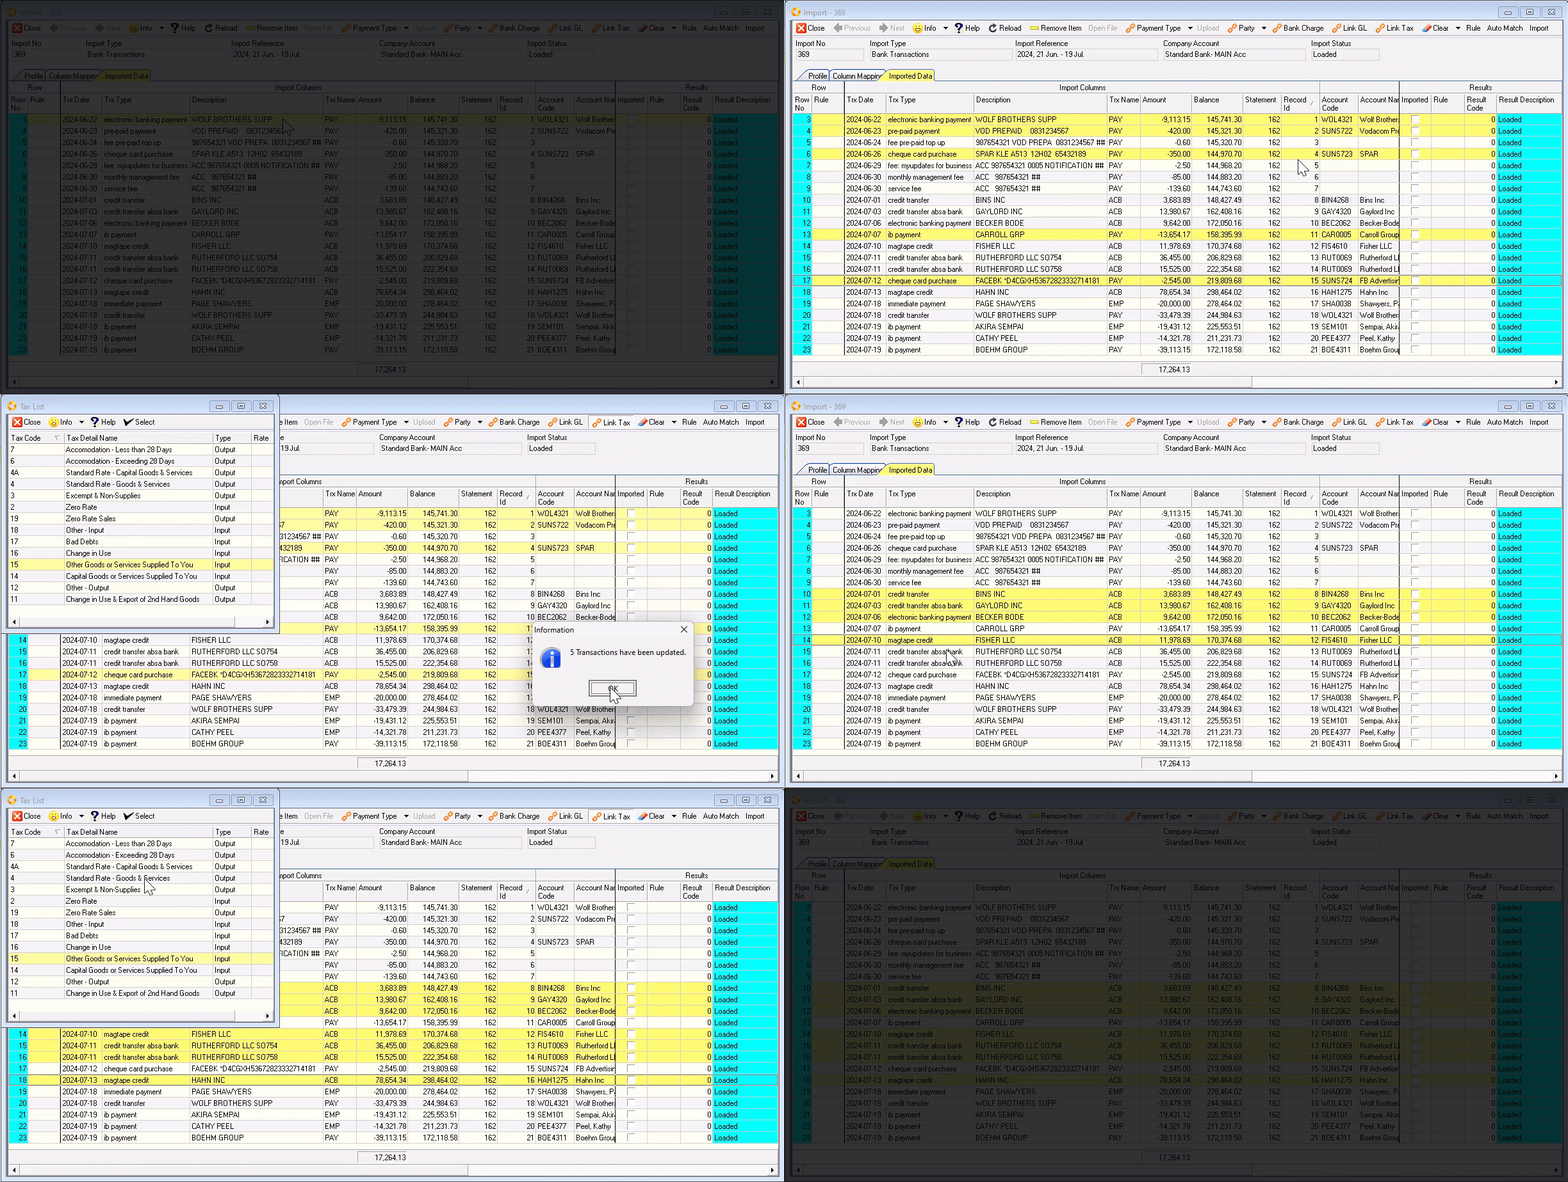
Click on the record row that you want to link Tax type to.
-
Click the Link Tax button in the form Action bar.
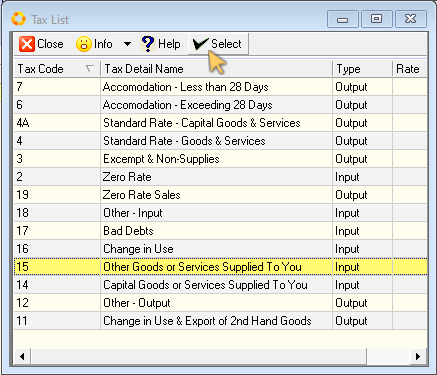
The Tax List screen is displayed.
-
Click on the relevant record row in the list, then
-
Click the Select button in the form Action bar.
An Information Dialogue window is displayed, confirming the transaction has been updated.
-
Click the OK button.
-
Click the Close button to close the Tax List screen.
Select multiple record rows, [CTRL] click, to link Tax to the applicable transactions.
Repeat the steps above to link Tax to the relevant records.
Check Transaction, GL and Tax Information
Once the above attributes have been assigned to all bank transactions, you can check the Transaction Information, General Ledger Information & Tax Information for accuracy and completeness.
Drag the slider bar(s) to view all the columns and record rows under Transaction Information, Tax Information & GL Information.
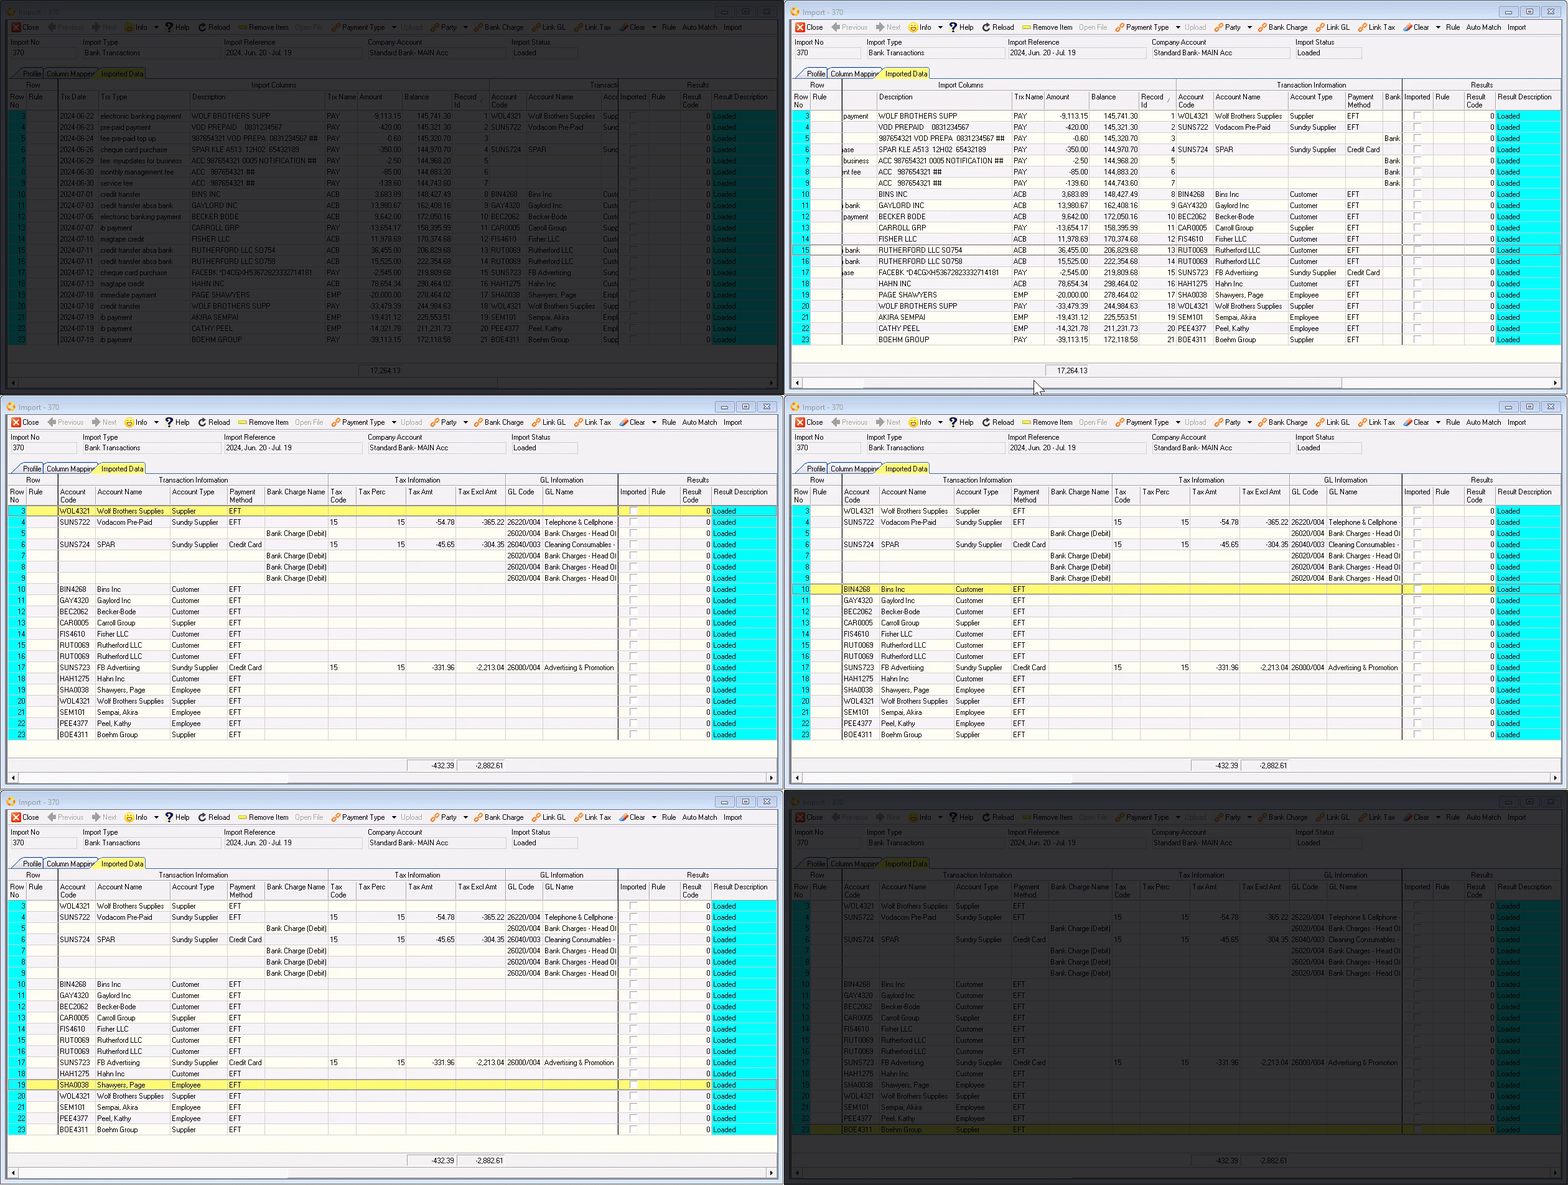
If you come across a transaction that is incorrectly assigned, use the Clear function to remove the attribute(s).
To do this:
- Click the Clear button on the form Action bar, then
-
Click on the relevant option in the drop-down menu.
-
Rectify and/or assign new attributes to individual transactions as neccessary.
Import Bank Transactions to Database
Once all the attributes have been assigned to the bank transactions, the next step is to Import the transactions to the database.
- Click the Import button in the form Action bar.
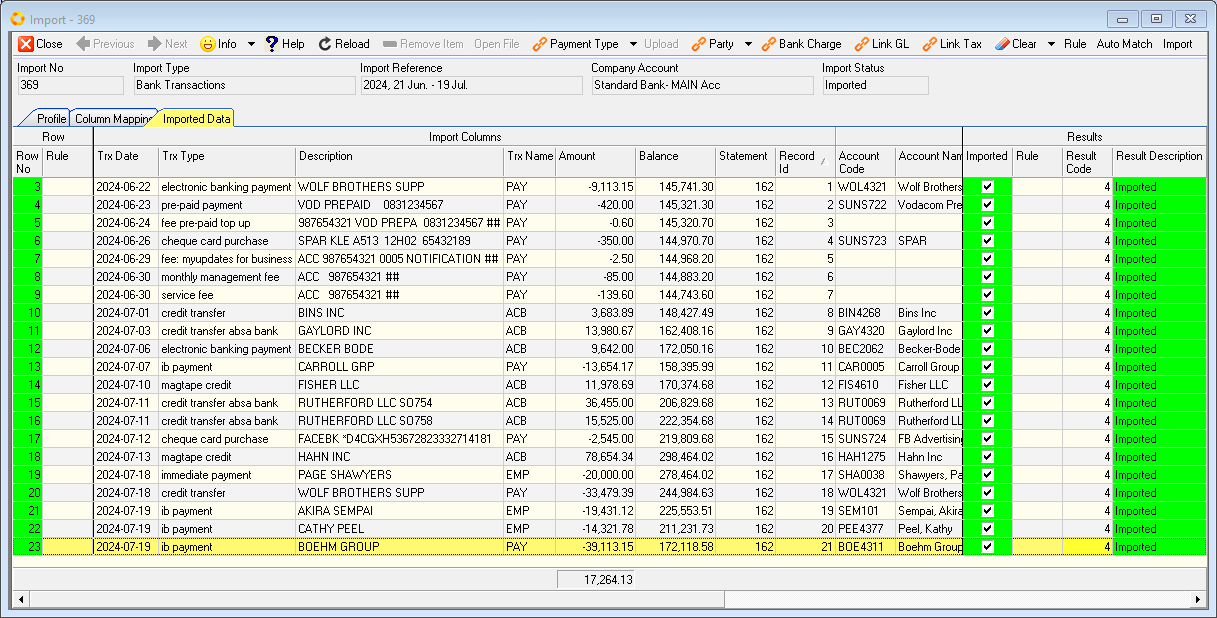
The updated Import-### screen is displayed.
The Import Status changes from Loaded to Imported.
The Imported column (under the Results information band) displays check-boxes for each transaction that was successfully imported, as does the Results Description column. Transaction records that have been successfully imported are colour-coded green.
Transactions that have not been successfully imported are colour-coded yellow.
The Results Description column displays the reason why the transaction could not be imported.
To rectify the import errors:
-
Click on the transaction record row, then
-
Assign the correct transaction attribute, using the Result Description information as a guide.
Repeat the steps above for each transaction as required.
Once all transaction attributes have been assigned / rectified;
- Click the Import button on the form Action bar.
The updated Import-### screen is displayed.
In the next document, we will describe and demonstrate how to define Rules that can be applied to subsequent & recurring bank transactions.
Refer to the document titled "Define Rules to enable Auto Match".