Capture Customer Profile (SAF-1202)
Procedure Guideline
This procedure explains how to search for, select, add and change customers in the Sense-i Enterprise Management System.
-
Click Customer on the Main Navigation Menu.
-
Select the Customer option from the Drop-down Menu.
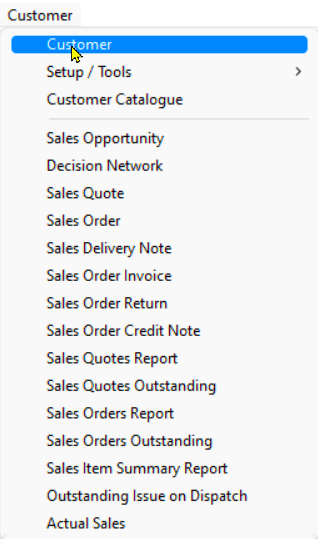
The system will display a screen titled Customer List.
This screen lists all the companies classified as Customers in the system.
At the top of this screen is a panel consisting of two rows and the bottom a grid of many rows containing customer information.
Customer Search
The top panel is called the "Search Criteria" panel and it enables you to enter partial information about a Customer and then to instruct the system to find all records that match the information you have entered.

-
To find all customers that contain the letters "Dream" in their name you can type the % symbol and then the letters "dream" in the Name fields and then...
-
Select the Search Button on the Menu Bar.

Add Customer
-
If you cannot find the Customer you wish to use, Click the Add Button on the Menu Bar.
-
The system will display a screen titled Add New Customer on top of the list of Customers already captured in the system.
This screen provides a series of blank fields that will enable you to record basic information about the Customer, such as their Name, their Registered Name, Registration Number, Tax Number and Contact details.
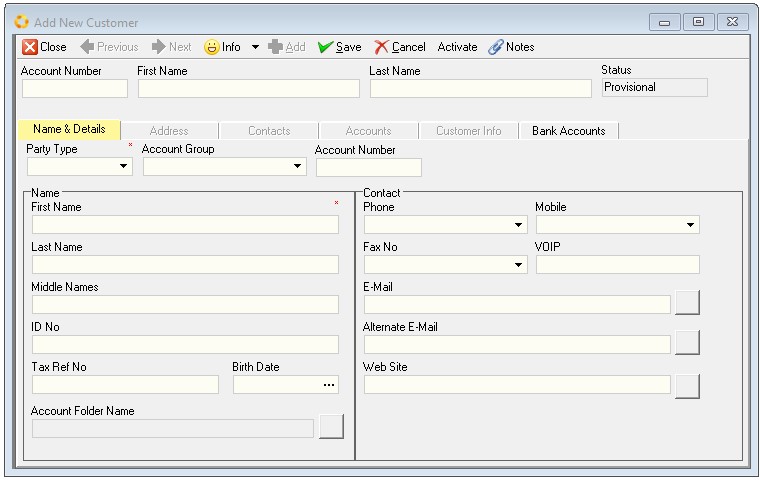
- First you will need to define whether the Customer Profile you are about to add is for a "Person" or an "Organisation."
Entering information about Customers who are Individuals use different fields from entering information about Customers who are Organisations.
Click on the drop down list in the Party Type field and then depending on whether you want to enter information about a Customer that is an Organisation or a Person select the appropriate Customer Type.
- To add a Customer it is necessary to complete the remaining fields on the screen. The more complete and accurate the information you enter into the system, the better the system will function.
-
Capture the Short / Common or Abbreviated Name in the Common Name field. This is usually the trading name.
-
Capture the Registered Name in the Registered Name field.
-
Enter the Customer's Registration Number in the Registration Number field.
-
Enter the Customer's VAT Number in the VAT Number field. This will appear on all Quotes, Orders, Delivery Notes and Invoices as required by law.
-
Capture the date on which the Customer's company was registered in the Registration Date field. For individuals, this would be their Birth Date.
- Enter a Customer specific account folder name in the Account Folder Name field. This folder will be used by the system to store communication, proposals, word documents and PDF Files such as Sales Orders, Delivery Notes and Invoices that are created for this Customer in the system.
The Customer Directory needs to be established under Party Document Folders.
This can be setup by selecting Tools / Directory Setting 📝 from the main menu.
It is advisable that this directory is created as a shared folder on your company's Local Area Network.
Primary Contact Information
-
Enter the main phone number for the Customer in the Phone No field.
-
Enter the mobile number of the primary contact for the Customer in the Mobile No field.
-
Enter the Fax Number in the Fax No field.
-
If you communicate with the customer using internet telephony then enter their Voice Over IP name in the VOIP field.
-
Enter the Primary E-mail Address. You will notice that as you enter an e-mail the system displays an icon next to the e-mail address. You can click on this icon to open an e-mail to this customer from within the system.
-
Enter any Second e-mail Address in the Alternate E-Mail field.
-
Enter the website address for the Customer in the Web Site address field.
Customer Address Information�
- Select the Address Tab on the Add New Customer screen to add Addresses for the Customer.

-
The system will display a window that lists all of the addresses that have been defined for the customer.
-
To add a new address click the Add button.
-
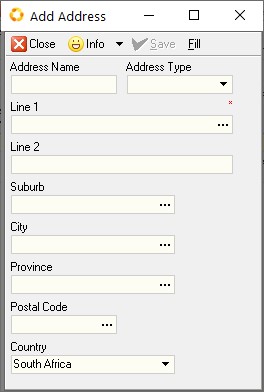
The system will display a screen titled Add Address. This screen enables you to store as many Physical, Postal and Shipping Addresses for each Customer as you need.
-
You can assign a name to each address, for example, Head Office, or Cape Town Branch, or whatever is appropriate.
-
Choose the Address Type from the Drop Down List.
-
Enter the Street / P.O. Box address. You can do this over two lines.
-
Enter the Suburb.
-
Enter the City.
-
Enter the State or Province in which the Customer is located.
-
Enter the Zip or Postal Code for the Customer.
-
Select the Country.
-
The system stores a list of all the suburbs, cities and postal or zip codes for the country in which you are based.
Provided that you have entered sufficient information for the system to find a match, the system can autofill the remaining fields. Usually, the Province and City are sufficient to be able to view a list of Suburbs in the system and clicking the fill button will find the correct postal code.
- Click the Save button once you have completely entered the address.
If you need to create additional addresses for the Customer repeat the steps above as often as you need to.
Add Contacts
-
You can add as many contacts as you wish to each customer.
-
Simply click on the Contacts tab to view a list of all of the Contacts that have been defined for the selected customer.
-
To add an additional customer contact, click the Add button.
-
The system will display a screen titled Add Contact. Simply enter as much information as you need about the contact in the fields on this screen.
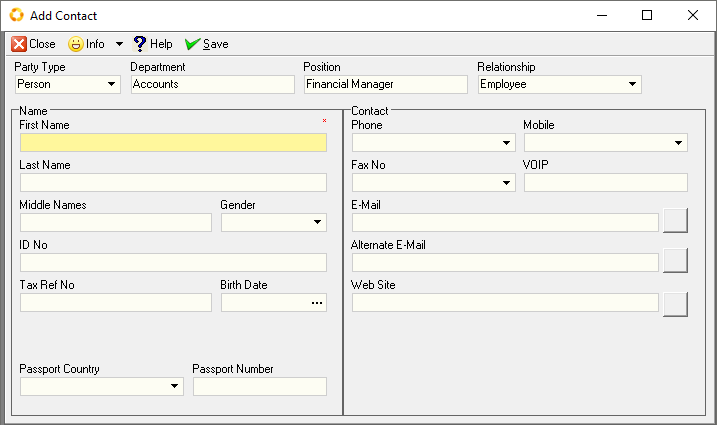
This screen enables you to enter all of the information you might need to maintain accurate and complete contact records.
-
When you have completed entering details for the contact, click the Save button.
-
You can repeat the steps above for each contact you need to add for the customer.
Accounts Information
-
To enter accounts details for the Customer, click the Accounts Tab.
-
To edit the Customer Account information, select and then double-click the specific Customer record line.
-
The Edit Account screen will be displayed.
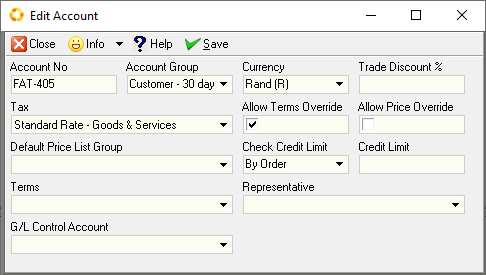
Amend the account details as required then select Save.
On completion click on the Close button.
Additional Customer Information
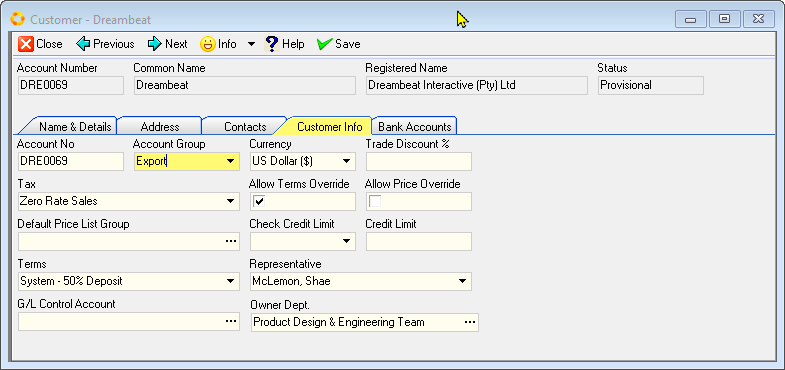
- To add details about the customers account, payment terms and so on, click the [Customer Info] tab.
-
Enter an Account Number for the Customer in the Account Number field.
-
Click on the Drop-Down Button in the Account Group field.
-
Select an Account Group from the drop-down list of Account Groups that have been defined in the system.
This field allows you to assign the specific Customer you are adding to a Grouping of companies. These groupings allow you to analyse your sales and income at a higher level than individual customers.
You could use groupings such a Corporate, Hospitality, Individuals,
Restaurants and so on to group customers...
or you could group your Customers according to the type of Industry
in which they operate.
-
Select the Currency in which your company will transact with the Customer.
-
Set any default discount given to the Customer in the Trade Discount field.
-
Select the default Tax Rate you wish to use on Orders captured for this Customer.
-
If you are going to allow the people who will be capturing Sales Orders to use different terms for this Customer when creating Sales Orders, then check the Allow Terms Over-ride box.
-
If you are going to allow the people who will be capturing Sales Orders to change the Material Cost Price of the items that appear on the Sales Order, then check the Allow Price Over-ride box.
-
Select the method by which you will check on the Credit Available to the Customer.
You can either check that the Customer has sufficient Credit Available when capturing the Order (i.e. upfront, before you start the work) or before you deliver the items to the customer (i.e. after the work has been completed.)
- Select the Payment Terms for this Customer from the drop-down list of terms available.
If you do not find the right set of terms in this list, go to the procedure titled Customer Payment Terms.
-
Once you have entered the necessary and available information, you should click on the Save button on the Add New Customer screen to save this information to the database.
-
To Activate the new Customer, select the Name & Details TAB, then click on the Activate button.
You can leave any field that does not have a "*" sign next to its
name blank.
All fields that do have a "*" sign next to the name must
be completed.
Remember also that you can change or add additional information to the database at any time, but it is always better to capture complete and accurate information the first time, if this is possible.
- Click the Close Button once you have completed adding customer information to the system.
You have now set-up the Customer's profile.
This information will appear on the Customer Transaction forms such as Sales Orders, Delivery Notes, Sales Tax Invoices and other customer related documents.
This is the end of this procedure.