Capture Materials Returned To Suppliers (SAF-150)
Procedure Guideline
Before you can process a Material Return to a Supplier, you should receive a manual request from the Stores or Production personnel explaining exactly what materials they wish to return to which suppliers.
This Material Return Request form should be signed by the person initiating a return.
It is important to understand that a Material Return Request is just that, a request. It is not an authorisation and stock may not be sent out of the company without authorisation.
In the Sales Transaction Stream, the document authorising the movement of stock is a Sales Delivery Note.
In the Materials Transaction Stream, the document authorising stock to be sent out of the company is the Purchase Order Return.
This document must be captured from the Material Return Request by a person authorised to initiate returns to suppliers, the Purchase Order Return must then be printed and sent to the store.
Only once this procedure has been followed may the goods be returned to the supplier.
Ideally, two copies of the Purchase Order Return must be printed. The first should be signed by the person receiving the returned materials on behalf of the supplier. The second must be given to the supplier as a record of the materials that have been returned and should be used to request that the supplier create a Credit Note on the company's account for the materials that were returned.
-
Select Supplier in the Main Navigation Menu.
-
Then click the Purchase Order Return option in the drop-down menu list.
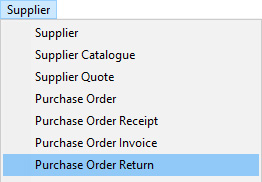
The system will display a screen titled Maintain Purchase Order Return.
This screen lists all of the Purchase Order Returns that have already
been captured in the system.
-
The default search criteria are the From Date and To Date and the system will display all Purchase Order Returns captured within the From and To Date range that has been set on this screen.
-
You can change these dates and enter any other information into the search fields to change the list of transactions that are displayed on the screen.

- To add a new Purchase Order Return to the system click on the Add button on the form bar.
The system will open a new, blank Purchase Order Return form in a screen titled Add Purchase Order Return.
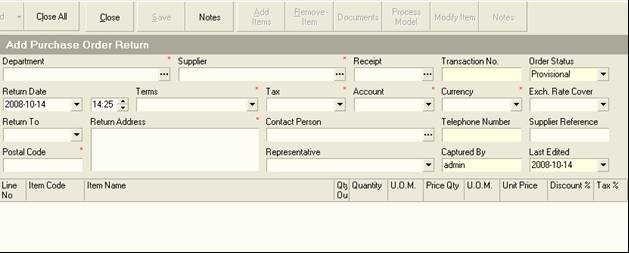
The blank Purchase Order Return form has two sections that need to be
accurately completed in order to save a Purchase Order Return.
These are the Header section and the Order Item Detail section.
The Header section stores information about the Department or OSN that is returning the materials to the Supplier, the Suppliers Name, the Return Date, Contact information, Account Terms and Tax Rate and a Reference Number.
The Order Item Detail section stores information about the items being returned, the reason for each return, the quantity being returned, the cost price and related information.
In order to complete a Purchase Order Return you must complete the Purchase Order Return Header section before entering information about the items being returned in the Order Item Detail section of the screen.
-
To add a new Purchase Order Return you first need to select the Purchase Order Receipt on which the goods being returned were recorded coming in to the company.
-
Click on the POREC (Purchase Order Receipt) field on the top left of the screen.
The system will open a screen titled Select Purchase Order Receipt.
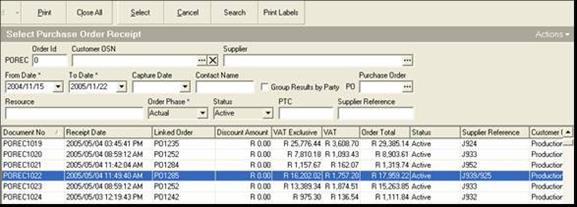
Note that this is a search screen so you can enter information in the search fields to find a specific document. You could for example, enter the Purchase Order Receipt number and click Search to find a specific document.
If you do not know the document number you could enter the Supplier's name and a date range, that is the dates between when you know the delivery was made, and then click Search.
-
Once you have entered the search criteria, click on the Search button on the form bar.
-
Once you have found the Purchase Order Receipt against which you want to return items to the supplier, click on it in the list of transactions, and then
-
Click on the Select button on the form bar.
The system will display the Add Purchase Order Return screen. The system will list all of the information about the supplier's delivery as it was captured in the system in this screen. The items and quantities of each item will be displayed in the Order Item Detail section of the screen.
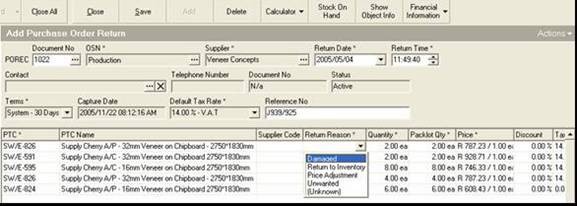
- The system will place the cursor in the Return Reason column. This is a field that you must complete for each item being returned.
Click on the right corner of the block and the system will display a set of pre-defined reasons for which you might be returning items to your supplier.
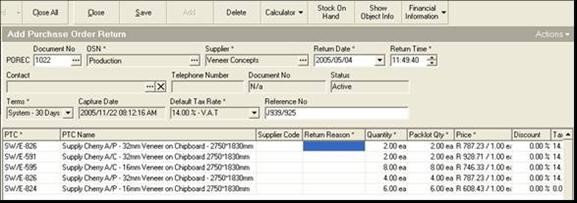
- Select the appropriate reason for which you are returning the materials to the supplier.
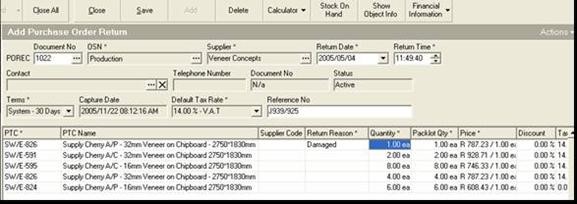
- You will need to enter the quantity of the material that is being returned. Type the quantity being returned in the Quantity column.
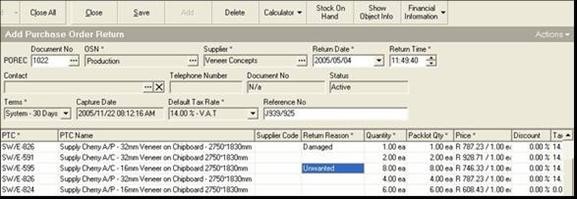
Repeat steps 12 and 13 for each item being returned.
Leave the reasons blank for any item not being returned, even though it appears in the list.
The system displays all items that were captured at the time of the Supplier's delivery to make it easier for you to process the return.
Once you have entered information about the items that are being returned, you can remove the items that appear in the list that you are not going to return.
-
Once you have entered details about all of the items being returned, click on the first row listing items that you are not going return and then
-
Click on the Remove Item button on the Form Bar.
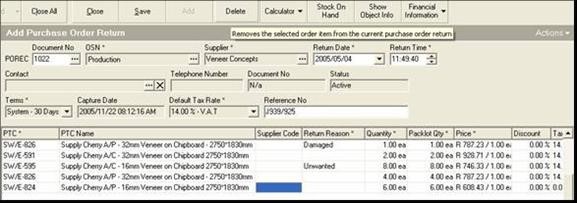
- The system will display a message asking you to confirm that you wish to delete this item from the return. If you have clicked on the correct row and you wish to remove the item from the Purchase Order Return, then click the Yes button.
If you have clicked on the wrong row and made a mistake, click "No".

Repeat steps 11 to 13 for each item you wish to remove from the Purchase Order Return.
- Once you have removed all the items that are not being returned, and the correct reasons and quantities have been recorded against each of the items that is being returned, click on the Save button on the form bar.

The system will ask you if you wish to capture a Credit Note at this point. Whether you do or not depends on your company's policy in this regard.
Some companies prefer to capture a Credit Note at this point and then resolve any discrepancies with the Supplier's Account when doing Account Reconciliations. This is a more conservative financial approach and puts the burden on the supplier to get paid for invoices they submit. It means you do not have to rely on the Supplier's accounting department to send you a Credit Note before you capture the claim.
Other companies prefer to only capture Credit Notes once these have been issued by the Supplier, as sometimes suppliers do not give credit for items returned and if this happens this means that you will have to change the Credit Note you capture now.
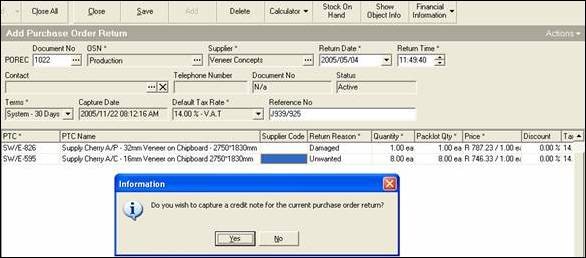
- Click Yes if you wish to capture a Credit Note now and then go the procedure for capturing Credit Notes.
Select No if you do not wish to capture a Credit Note at this point.
- The system will return you to the Maintain Purchase Order Return list screen. Click on the Search button on the form bar to see the Purchase Order Return you have just captured in the list.
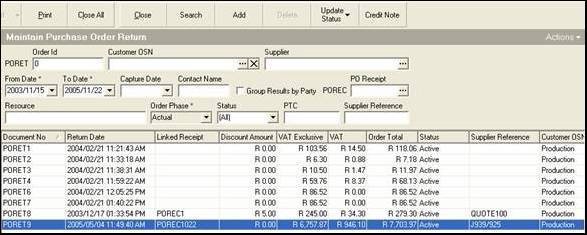
-
Select the document from the list, right click the mouse and choose Print Document.
-
Sign the document and hand it to the Material Store to process the return.
This signed Purchase Order Return then becomes the authorization for the stores manager to remove the Raw Materials from the Stores and return it to the Supplier. If your company employs a security guard then this document is the document against which the security guard needs to check the quantity of the items being returned.
This is the end of this procedure.