Supplier Payments (SAF-4014)
Procedure Guideline
This procedure describes how you can record details of payments that have been made to suppliers in the Sense-i System so that the reports displaying outstanding supplier balances and cash flow reports are accurate.
-
Click on the Finance item on the Main Menu.
-
Click on the Bank Account item on the Drop Down Menu.
The system will display the Maintain Bank Account screen.
This screen lists all of the Bank Accounts for your company that have
been saved in the system.

Select Bank Account
The first step you need to take is to select the specific bank account in which you wish to process supplier payments.
- Click on the bank account in which you wish to capture payments and then click the Transactions button on the form bar.
The system will open the Maintain Bank Transaction screen. This screen lists all of the transactions that have been captured in the selected bank account between the From Date and To Date.

Search
To search for a specific transaction you can click on the three dot drop-down button under Party Code to select a company or person to whom a payment has been made or from whom a payment has been received. You can also search for a specific transaction by its transaction number, a date range, a reference or a specific user name.
- Once you have entered the search criteria, you can click on the Search button on the form bar.
The system will display a list of all of the records that match the search criteria you have entered.
Add Payments
- To enter details for a payment to a specific supplier, click on the Add button on the form bar and select the Payment for Supplier option.
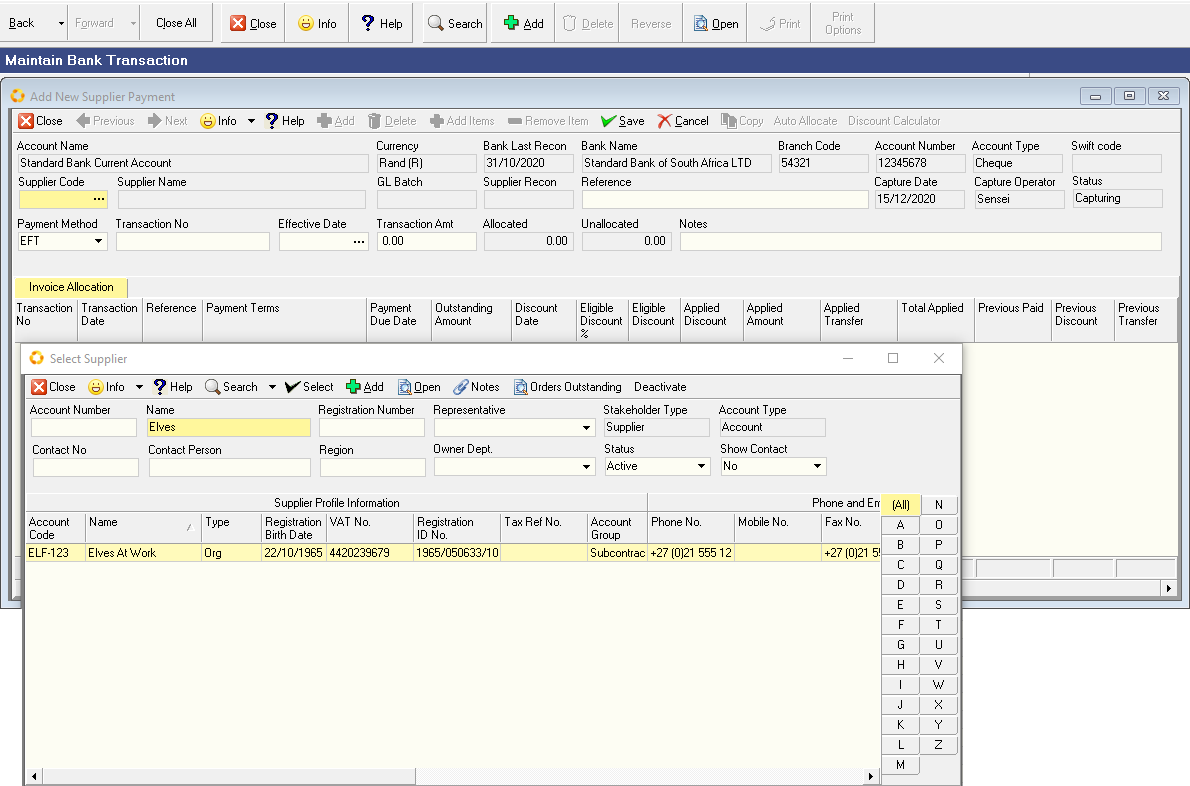
The system will open a screen titled Add New Supplier Payment in which you can record the details of the payment.
- You need to select the name of the supplier for whom you wish record a payment. To do this, click on the three dot drop-down button under the Supplier code field.

The system will display the Select Supplier List screen. This screen enables you to select the name of a specific supplier from all the suppliers who have been captured in the system.
-
You can search for the name of a specific supplier by typing in a portion of their name in the Name field and then click the Search button on the form bar.
-
Once you have found the name of the supplier for whom you wish to process a payment, click on the name of the supplier in the list and then click the Select button on the form bar.
The system will return you to the Add New Supplier Payment screen and display the Supplier Code and Supplier Name in the relevant fields.

-
You can enter a reference number in the Reference field. This could be the number or month on a supplier's statement.
-
Select the Payment Method.
-
Enter a number for the payment in the Transaction Number field. If you are processing an internet payment, enter the internet payment reference number in this field.
-
Enter the Effective Date of the payment by selecting a date from the drop down calendar in the Effective Date field.
-
Enter the amount of the payment in the Transaction Amount field.
-
You can enter a note in the Notes field.

- Once you have entered the details of the payment to the supplier, click the Save button on the form bar.
Payment Allocation
At this point you can either:
-
Allocate the saved payment to specific invoices or
-
You can enter another payment to the same or a different supplier and allocate the payments to invoices at a later point in the process.
- To process another payment, click the Next button on the form bar.
If you click the Next button the system will clear the fields and enable you to enter another payment. To do this, simply repeat the steps above.
- To allocate the entered and saved payment to specific invoices, click the Select Invoices button on the form bar.

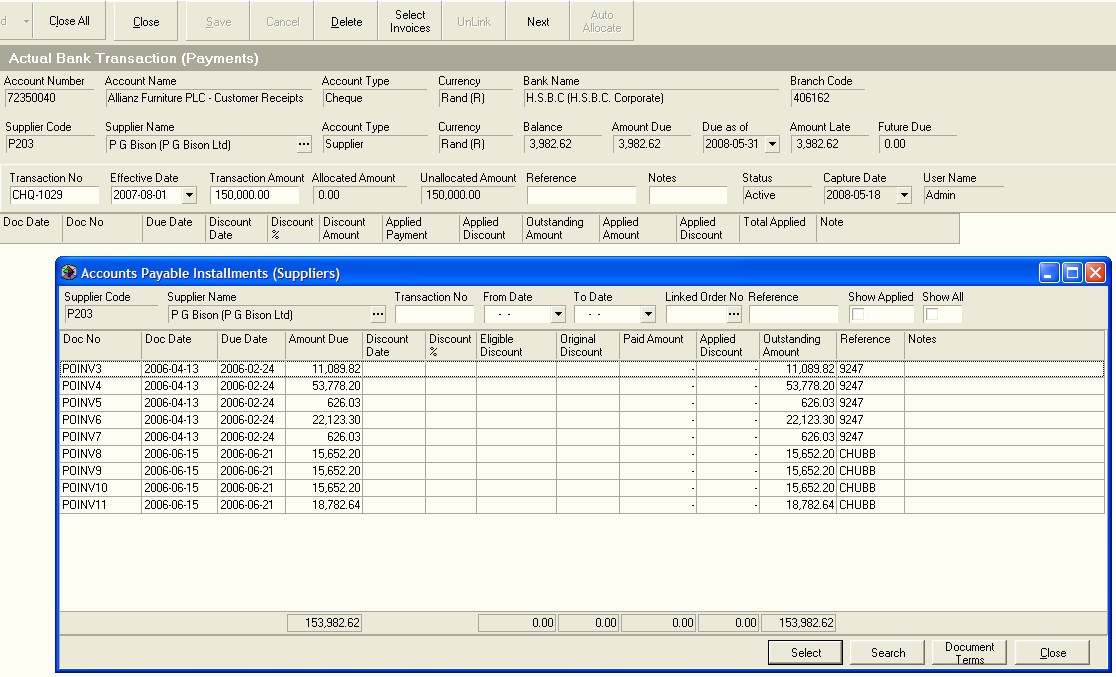
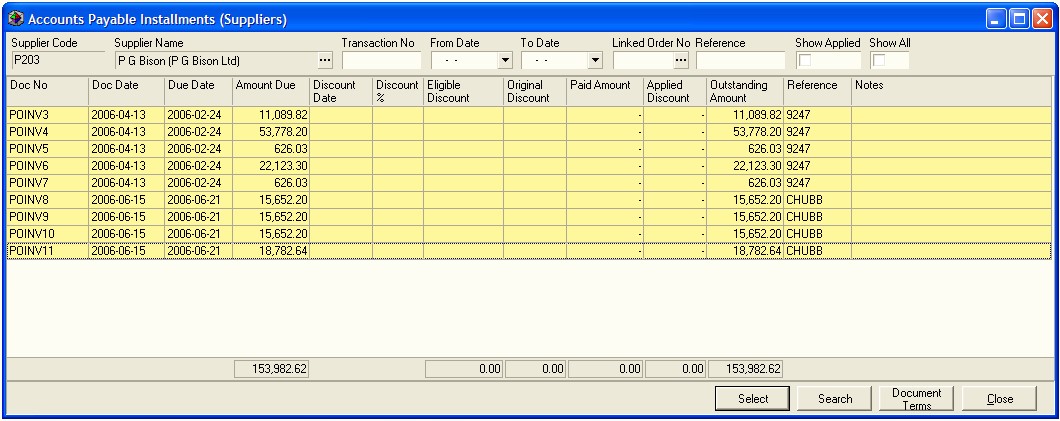
If you choose to allocate the payment you have entered to specific invoices and have clicked the Select Invoices button the system will open Accounts Payable Installment Screen. This screen lists all of the invoices that have been received from the selected supplier that are either completely or partially unpaid.

-
Click on the invoices to which you wish allocate the saved payment in the grid. To select more than one invoice, hold down the Control key on the key board and then click on the invoices you wish to select.
-
Once you have selected the invoices to which you wish to allocate the payment, click on the Select button at the bottom of the Accounts Payable Installments screen.

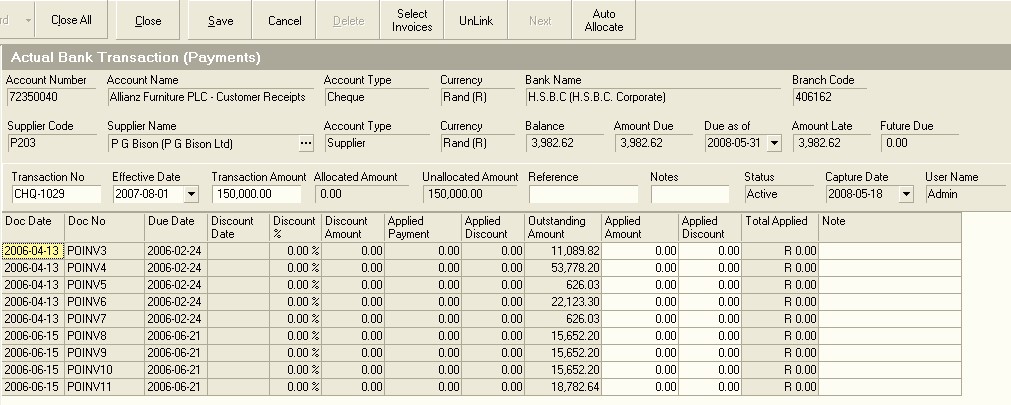
The system will return you to the Actual Bank Transaction screen and display the invoices you have selected in the grid at the bottom of the screen.

-
You can apply specific amounts from the overall payment to each invoice by typing the amount you wish to apply to each invoice in the Applied Amount field. To move the cursor to the next invoice, simply press the down arrow on the keyboard and the system will select the next invoice in the list.
-
You can also enter the amount of discount you wish to apply to each invoice by typing this amount in the Applied Discount field.
-
The system can automatically apply the amount of the payment you have saved to each invoice from the oldest invoice to the most recent. To do this, simply click the AutoAllocate button on the form bar. Note that if the terms for the supplier have been set-up correctly the system will calculate the discount on each invoice and take this into consideration when applying the payment.
-
To remove an invoice from the list click the UnLink button on the form bar.
-
Once you have completed allocating the payment to the selected invoices click the Save button.
Repeat the above steps until you have completed capturing all the necessary supplier payments.
- Click the Close button on the form bar once you are finished.
This is the end of the procedure