Reconcile Supplier Accounts (SAF-4056)
Step-by-step Guideline
The Account Reconciliation function in the Sense-i system enables you to compare the transactions captured in the system to those reflected on the statements you receive from your suppliers. Reconciling the transactions in the system to those on the statements received enables you to identify any problems with the information captured in the system and to identify and the correct any errors that have been made (either in Sense-i or by the Supplier) before you make payments to your suppliers.
To reconcile a supplier's account / bank account you need to perform the following steps...
-
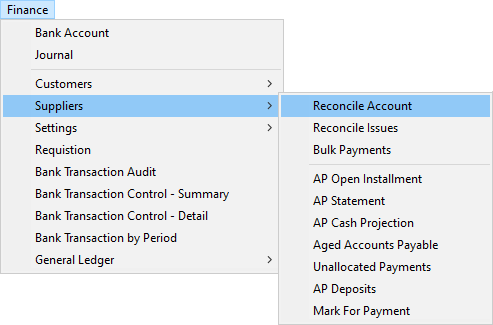
Click on the Finance option on the Main Menu.
-
Then click the Supplier menu item on the drop down menu.
-
Then select the Reconcile Account option on the side menu.
The system will open a screen titled "Maintain Supplier Reconciliation." This screen lists all of the Suppliers that have outstanding balances in the system and shows summary reconciliation information related to each Supplier's Account. In addition, the screen provides the details of the last reconciliation completed for each of these suppliers. To show all suppliers, including those with no outstanding transactions, select the All option from the Show field.

The Reconcile Suppliers' Account screen has a search panel at the top that you can use to control which Supplier's Accounts are displayed by the system and a detail grid underneath that displays the information about each Supplier, (such as their code and name) and totals related to system balances, supplier statement balances and reconciliation differences.
You can show only reconciliation for information with Suppliers who have Outstanding Balances, or Zero Balances or you can include both by selecting the appropriate option in the System Balance drop down.
-
To reconcile a Supplier's Account, click on a row that contains the name of the Supplier whose account you wish to reconcile.
-
Click the Add button on the form bar.
The system will open a screen titled "Reconcile Supplier's Account." This screen enables you to enter information from the statement received from the Supplier and compare it to the information captured in the system.
The first time you enter the Reconciliation function for a specific supplier you will notice that the system displays the Supplier Code and Name but that no information about dates and balances is displayed in the header. The Opening Date and Balances and Closing Date and Balances are blank.

To start a reconciliations you need to enter the following information in the header:
-
Enter the Opening Statement Date in the Opening Date field.
SET THIS TO THE START OF SENSE-i. -
Enter the Opening Statement Balance in the Statement O/B field. SET THIS TO 0.00
-
Enter the Statement No in the Statement No field. If the supplier does not number the statements they send for your company's account, simply enter the number 1 in this field for the first statement that you reconcile.
-
Enter the Closing Date on the first statement you are going to reconcile in the Statement Date field.
SET THIS TO THE DAY IMMEDIATELY PRIOR TO THE FIRST MONTH YOU WISH TO PROCESS. -
Enter the final closing balance on the first statement you are going to reconcile in the Statement C/B (Closing Balance) field.
-
Click the Save button on the form bar.
Once you click Save the system will retrieve the remaining information such as the System Opening and Closing Balances from the database for the dates you have entered.

- The status of the current reconciliation will show in the Status field.
The system will display a list of all open and unreconciled transactions that make up the closing balance in the reconciliation detail section of the screen.

-
The system will display the following information related to the last reconciliation in the header panel.
-
The Account Number assigned to the Supplier in the Account Number field.
-
The Name of the Supplier in the Supplier Name field.
-
The date on which this specific Supplier's Account was last reconciled in the Opening Date field. If this is the first time, this field will show a -.
-
The balance as per the supplier's statement if the account was previously reconciled in the Statement O/B (for Opening Balance) field. If this is the first time the account is being reconciled the field will show a -.
You will notice too that the system displays a panel underneath the list of all the transactions that need to be reconciled. This panel is called the Reconciliation Footer.
The Reconciliation Footer displays the sum of all transactions that have been included in the current reconciliation.

To successfully reconcile a Supplier's Account, you must focus on two running balances simultaneously.
The system calculates the difference between the System Opening Balance and the System Closing Balance and displays this in the Not Reconciled field. For every system transaction that you include in the reconciliation, the system adjusts this total. The goal is for you to reduce the Not Reconciled Amount to zero by marking each of the system transactions that are listed in the grid as either Matched and Reconciled, Reconciled in Error, Missing on Statement or linking the transaction to an open Statement record from a previous Reconciliation.
The system also calculated the difference between the Statement Opening Balance and the Statement Closing Balance and displays this amount in the Statement Variance field. The goal here is for you to ensure that the value of all the transactions you enter in the Statement Amount column matches the calculated difference. As you mark a system transaction are Matched and Reconciled, the system will automatically insert the Transaction Amount in the system in the Statement Amount column to save you the effort of having to enter each amount. If the amount is different, you can double click on the Statement Amount field and type in the amount as it appears on the Supplier's Statement. This would then be considered a Reconciled in Error transaction. You can also include transactions from the Supplier's Statement without changing the System Balance by marking a transaction as Missing on System. This would allow you to enter the Transaction Number, Date and Amount in the Supplier's Statement columns but the corresponding columns in the System Information Band would remain blank. Any transaction entered as Missing on System would be included in the Statement Variance calculation but would not be included in the value of transactions needed to reconcile the System Balance.
When both the Not Reconciled Amount and the Statement Variance Amount are 0.00, then the account is ready to marked as Reconciled.
When reconciling a Supplier's Account, there are several different ways you can reconcile the transactions in Sense-I to the Statement you receive from a Supplier. There are:
- Direct Match
- Reconciled In Error
- Missing on Sense-i
- Missing on Statement
- Linked to Open Transaction Carried Forward
- Linked to Another Transaction in the System
- Linked to Another Transaction on the Statement
To reconcile the system transactions to those appearing on the statement received from the supplier you will need to perform the following steps.
It is a good to idea to place the Supplier's Statement on your desk and place a ruler underneath the first transaction that appears on their statement.
First, check the opening balance on the statement received from the Supplier corresponds to the Opening Balance displayed in the Statement O/B field on the screen. If it does, it is safe to proceed with the reconciliation. If it does not, you will need to retrieve the statement received from the supplier for the previous month and go back to the previous reconciliation in Sense-I and ensure that the account is reconciled.
- You then proceed to reconcile each transaction in the grid in one of several ways...
To reconcile the Supplier's Account you need to match each transaction in the system to the transactions listed on the printed statement you have received. You should use the date, the transaction number (although this does not always match) and the amount to match the system transaction to those on the statement.
Identify the first transaction on the Supplier's Statement and place a ruler underneath this transaction.
Look for a matching transaction with the same or similar date and transaction number and an identical amount among the list of transactions in the system.

-
If you find a transaction on the statement where the Transaction No, Date and Amount match, then the fastest way to reconcile a record is to find the record you wish to reconcile in the reconciliation detail grid, position the cursor in the status column and
-
Right click the mouse and select Match.

-
The system will copy the transaction number, transaction value and date from the system into the Supplier Reconcile information column. This will save you from having to enter the information manually.
-
The system also places a ☑️ in the Recon column and changes the status from Not Reconciled to Reconciled.
-
The system will change the Difference amount to zero and will move the transaction you have reconciled up in the sequence and display a running balance.
The idea behind this feature is to ensure that the sequence in which transactions appear in the reconciliation match the transactions on the supplier's statement so that the running balances correspond.
This allows you easily identify at which point the reconciliation has gone out of sync with a printed statement and makes finding an error that may have occurred in the reconciliation process quick and therefore easy to resolve.
Reconciled In Error
-
If you find a transaction on the statement where the Transaction No and Date match but the Amount is different, then position the cursor in the status column and
-
Right click the mouse and select Match.

-
The system will copy the transaction number, transaction value and date from the system into the Supplier Reconcile information column.
-
Position the cursor in the Statement Amount field for the transaction you are reconciling and double click the mouse. The system will then allow you to edit the Statement Amount. Change the amount to match the amount reflected on the Supplier's Statement.

-
The system will change the status from Not Reconciled to Reconciled in Error.
-
The system will change the Difference amount to show the difference between the Transaction Amount as it appears on the System from that on the Supplier's Statement.
-
The system will again move the transaction you have reconciled up in the sequence and display a running balance.
Reconciled On Sense-i
-
If you find a transaction that appears on the Supplier's Statement but is not among the list of transactions in Sense-i,
-
Right click the mouse and select Missing on Sense-i.

The system will insert a row into the Reconciliation into which you can enter the information as it appears on the Supplier's Statement. Because this transaction is missing from the system, the System Information columns for this row will remain blank until this transaction has been resolved.

-
Enter the Transaction Number in the Statement Reference field. This will normally be either the Supplier's Invoice No, Credit Note No, a Journal No, a Payment or Discount Transaction No.
-
Enter the amount as it appears on the Statement in the Statement Amount field.
-
Enter the date for the missing transaction as it appears on the Supplier's Statement in the Statement Date field.

-
The system will change the status from Not Reconciled to Missing On Sense-i.
-
The system will change the Difference amount to show the difference between the Transaction Amount as it appears on the System from that on the Supplier's Statement.
-
The system will again move the transaction you have reconciled up in the sequence and display a running balance.
You will need to investigate the reason for the transaction not appearing in Sense-i. Either the transaction is legitimate but has not been captured in the System. If this is the case then you need to obtain a copy of the original transaction document, match it to an authorisation, (usually a Purchase Order and Purchase Order Receipt) and once you are satisfied that the transaction is legitimate and correct, capture it in the system and then reconcile it.
Or, if the transaction is not legitimate, enter a reason for this in the Notes field. This reason will then print on the Supplier's Reconciliation and you can email the Reconciliation to the Supplier so that they can correct their records.
Missing On Statement
- If you find a transaction that exists on Sense-I but does not appear on the supplier's statement, right click the mouse on the row containing this transaction and select Not on Statement.

- If you find a transaction on the statement where the Transaction No and Date match but the Amount is different, then position the cursor in the status column and

The system will insert a blank section in the Supplier's Statement columns because this transaction is missing from their Statement.
-
The system will set the Reconciliation Status to Not on Statement and will change the sort order of the records by moving this transaction up above the Not Reconciled Transactions.
-
You will notice too that by Reconciling the Transaction as Not on Statement, the system includes the amount of the Transaction in the System Balance but not on the Supplier Balance.
The system will insert a blank section in the Supplier's Statement columns because this transaction is missing from their Statement.
Linked To Open Transaction Carried Forward
If any items remain with problems from the previous reconciliation, such as transactions that were missing on either the system (such as invoices and credit notes not received) or the supplier's statement (such as payments made but not reflected) and any transactions have differences in amounts, that the system lists these in the reconciliation detail in the Carried Forward section.

The system provides a function that allows you to link transactions from the current statement that have been captured after the closing date of the previous statement or that have been created to correct errors to the open transactions from the previous statement that still need to be fully reconciled.
- Find the transaction in the current reconciliation that you wish to link to an open item carried forward from a previous reconciliation, right click the mouse and click Link.

The system will mark the transaction you have selected to link in pale green.
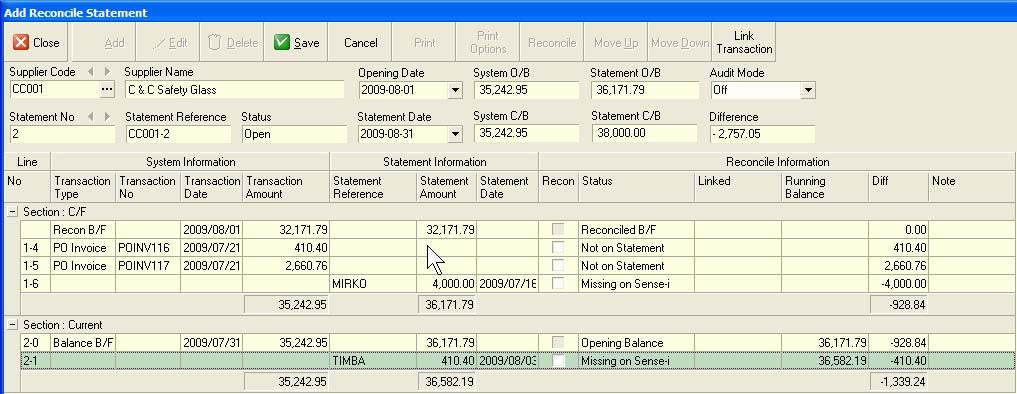
- Click the row containing the original transaction that you wish to link the new transaction to, right click the mouse and select Link.
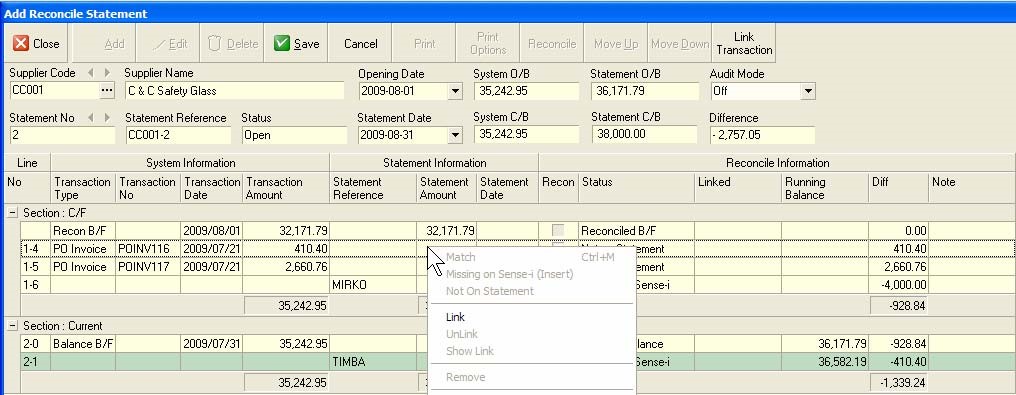
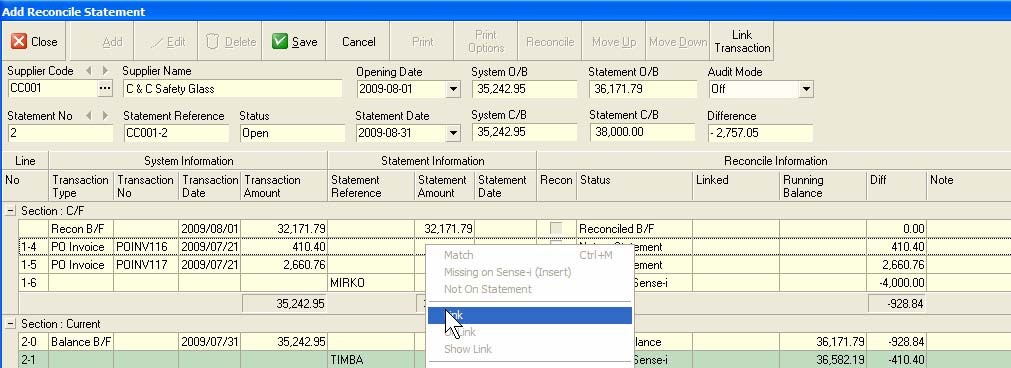
The system will display the number of the original transaction to which the new transaction has been linked in the Linked Column. You will also notice two numbers in brackets behind the Linked Transaction Number, such a 1-4. These numbers help you to easily find the linked transaction. The first number indicates the Statement Reconciliation Number and the second number the number of row containing the transaction to which the new transaction has been linked.

Linked To Another Transaction on the System / Statement
The system allows you to link many transactions on the system to many transactions on the supplier's statement. This is useful in cases where you might have an invoice on the system with a journal to correct an error that links to one or more transactions on the Supplier's Statements, also for example an invoice with adjustments or journals to correct mistakes.
The system also allows you to link transactions on one side, either the System or the Statement to other transactions on the same side. For example, you might find an Invoice on the System for R 500 but on the Statement for R 450. After doing an investigation you might find that the correct amount is R 450. Because the Supplier's Statement is correct you would not expect to find an adjustment transaction on their statement. You would need to capture a Journal in Sense-I to correct the error. Thus you would have on the System an Invoice for R 500 and a Journal for -- R 50 and on the Supplier's Statement an Invoice for R 450. You would therefore Reconcile the R 500 System Invoice to the R 450 Statement Invoice, capture a Journal and then link the -- R50 Journal to the System Invoice of R 500 using the linking steps as described above.
A similar situation in reverse could apply to a mistake made on the Supplier's Statement and you could treat this in the same way.
As part of resolving missing and error transactions you will sometimes need to capture an Invoice, Credit Note, Journal or Payment in the System.
Because these transactions will be captured after the Reconciliation was started, they will not appear in the Reconciliation Detail Grid unless you take steps to specifically include them in your reconciliation.
The system allows you to include transactions that you have captured after you have started a reconciliation in the reconciliation with which you are busy.
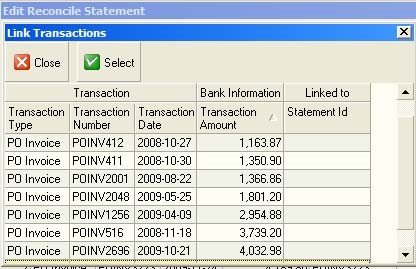
- To do this, click the Link Transaction button on the form bar.
The system will then display a list of all transactions that have been captured in the system after you started the current reconciliation in the Link Transactions screen.
-
Simply click on the row containing the transaction you wish to pull into your reconcilation and then
-
Click the select button on the form bar.
-
Once you have matched a transaction on the Supplier / Bank Account to one on the system places a tick next to the transaction in the Recon column.
Saving and closing a Reconciliation
As you proceed with reconciling transactions the system will update the Total Errors, Missing on System, Not on their Statement and Reconciled totals at the top of the screen.
You will notice that once you reconcile a transaction, whether it is a match, in error or a missing transaction, that the system moves the transaction up in the list and sorts the transactions on the screen in the order in which they were reconciled. The purpose of this is to ensure that the transactions on the screen are listed in the same sequence as they appear on the statement.
The system will recalculate the Statement Running Balance and display this in the Running Balance column. The Running Balance allows you to easily identify any transaction that is preventing you from fully reconciling the selected Supplier's Account. If, once you have completed reconciling the account the system balance still does not match the final balance on the statement, you can compare the running balance on the system to the balance on the statement. The moment you find that the running balances are not the same, you know you have found a transaction that has not been correctly reconciled or missed and you can then correct this.
You will notice that the system displayed a Not Reconciled and Statement Variance amount at the bottom of the screen, and that if these amounts are not 0.00, the system displays a colour in each of these fields to highlight the difference.

The system calculated the Not Reconciled amount as the sum of the value of all the transactions in Sense-i that have dates that occur after the Opening Date and before the Statement Date and that have not been marked as reconciled in the current Reconciliation.
Each of the transactions that have been captured in Sense-i must either be matched to a transaction on the Supplier's statement or marked as Not on Statement. And transactions on the system that have not been marked in this way will be included I the balance displayed in the Not Reconciled amount.
The system also calculates the difference between the last Running Balance in the grid and the Statement C/B and displays this in the Statement Variance field. You need to ensure that the final Running Balance in the grid matches the Statement Closing Balance you entered in step 13 above.
If you find that the Statement Variance is not 0.00, you must either continue adding transactions to the Reconciliation that appear on the Supplier's Statement but not your Reconciliation or you must remove transactions that appear on the Reconciliation that do not exist on the Supplier's statement. Right click the mouse and select Remove to remove any such entries that have been captured by mistake.
Once you have completed the Reconciliation and the Difference and Reconciled Amounts in the header match and all the items on the Statement and the System have been reconciled fully, in error or missing transactions have been captured, then the account is fully reconciled.
-
You can save the Reconciliation at any stage.
-
Click Save to save your work.
-
To mark the supplier's account as reconciled, click the Reconcile button on the form bar.
The system will ask you if you wish to mark the Supplier's Account as reconciled.
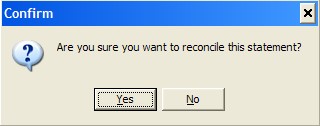
- Select Yes if the Account is fully reconciled.
If the supplier's account has not been completely and accurately reconciled, the system will present you with a warning message.

You will need to return to the reconciliation and check the transactions and balances.
Starting a New Reconciliation For the Same Supplier
- To add another reconciliation for the same supplier, click the Add button. The system will open a new reconciliation, update the Statement Number and carry forward details from the previous reconciliation (such as Opening Dates and Balances) to the new reconciliation.
You can also scroll back and forwards between each reconciled statement for the supplier with whom you are working by clicking the left and right arrows that appear above the statement number field.
- When you have completed Reconciling the selected Supplier's Account, you can then elect to Close the screen by clicking the Close button on the form bar.
The system will return you to the Maintain Supplier Reconciliations Screen and update the information in the grid with the Summary Reconciliation information.
- You can now repeat the above steps to reconcile the next supplier's account or you can exit this function.
Keeping Track of the Reconciliation Process
You can use the Quick Filter function on the Maintain Supplier Reconciliation Screen to keep track of which accounts have been reconciled and which still need to be reconciled.
- Move the cursor over the right-hand edge of the Status column to expose the black downward facing arrow. Click on this arrow.

The system will display a list of available statuses for Supplier Reconciliations.
- To show all Supplier Accounts where the reconciliation procedure has not been started, click the square that is blank. To show all Supplier Accounts where the reconciliation process has been started but is not complete, click the square next to the word Open.
As you click the quick filter, the system will automatically update the information displayed in the list to show only those Supplier Accounts that match the Status you have selected.
By showing all Supplier Accounts that have not been fully reconciled you can create a To Do List of all those records that still need to be reconciled.
The system allows you to Un-Reconcile a Supplier's Account at any point after it has been reconciled. Note that if subsequent months for the Supplier have been reconciled these will also be re-opened. The system requires that you reconcile Supplier's Accounts sequentially in month order. You cannot skip any periods not can you have Un-reconciled periods interspersed between Reconciled periods.
- To re-open a Supplier Reconciliation, click the Un-Reconcile button and then perform the steps to reconciling their account as outlined above.
- Once you have completed reconciling the Supplier's Accounts, click the Close button on the Form bar and the system will close the Reconcile Supplier's Account screen.
This is the end of the procedure.