Maintain Chart Of Accounts (SAF-1911)
Step-by-step Guideline
-
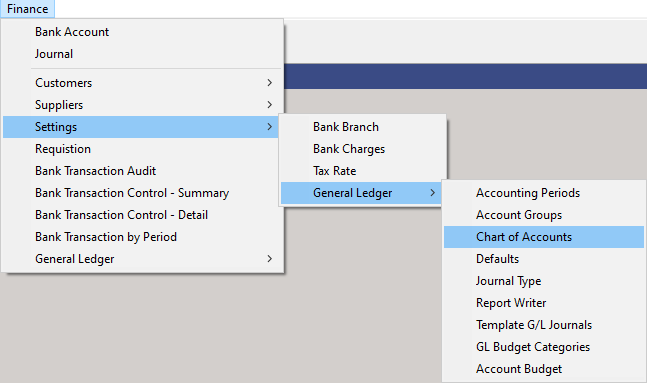
Click on the Finance option on the Main Menu.
-
Then click the Settings menu item on the drop down menu.
-
Then click General Ledger and select Chart of Accounts.
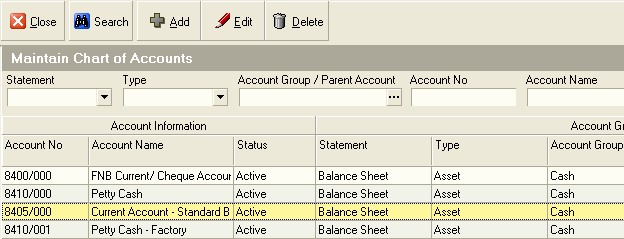
The system will open a screen titled "Maintain Chart Of Accounts."
This screen lists all of the Accounts that have been defined in the
General Ledger.

You can search for specific accounts using one or more of the fields in the Search Criteria Panel at the top of the screen.
- You could instruct the system to display all the accounts for a specific Statement by selecting a Financial Statement from those displayed in the Statement drop down list and then clicking the Search button.
Similarly, you could choose to show all accounts for a specific Account Group by selecting a specific Account Group in the Account Group field and then clicking the Search button.
You can also search for an Account by entering its Account Code in the Account Code field.
Adding Accounts To the Chart of Accounts
When you decide that you need to add an Account to the Chart of Accounts you first need to identify whether the Account you are going to add is a Parent Account (to which you cannot post entries), a Child Account (to which you can post entries) or a Normal Account (to which you also can post entries.)
Whenever you examine a Chart of Accounts you find a combination of these three account types.
A Parent Account is used to group Sub- or Child Accounts to make the Trial Balance easier to read. A Parent Account will contain sub-ordinate accounts and will often be printed in bold on a Chart of Accounts Listing or Trial Balance. A Parent Account might for example be created for "Expenses -- Vehicle / Petrol" with child accounts for different vehicles. Another example might be "Depreciation -- Machinery" with child accounts for each of the various machines used in the company. Note that you cannot post to a Parent Account and that a Parent Account will get its balance from the sum of the child accounts it contains.
A Child Account is used to provide more detail to a parent account and is an account to which you can post entries.
A Normal Account is an account created in the Chart of Accounts to which you can post entries (for example Salaries, Wages, Stationary, Audit Fees, Electricity and so on) which does not contain child accounts.
When you set-up the Chart of Accounts in Sense-i it is important to know which accounts you wish to add and to understand what the account type is for each of these accounts. This is because each account is added in a slightly different way.
If you decide to add a new normal Account (neither a Parent nor a Child) to the Chart of Accounts, follow the steps described in the section titled "Adding a Normal Account" below.
If you decide to add a new Parent Account to the Chart of Accounts, follow the steps described in the section titled "Adding a Parent Account" below.
If you decide to add a new Child Account to the Chart of Accounts, follow the steps described in the section titled "Adding a Parent Account" below.
Adding A Normal Account
- To add a new Account to your Chart of Accounts click the Add button on the Maintain Chart of Accounts screen.
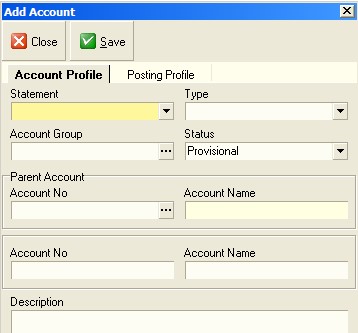
The system will open a screen titled "Add Account."
This screen enables you to enter the information you need to add an Account in the
General Ledger.
-
The first step you need to take when creating a new account is to check that you assign the account to the correct one of three financial statements. Select the appropriate Statement from the drop down list appearing the Statement field. It will be one of Balance Sheet, Income Statement or Cash Statement. It is important to ensure that you select the correct Statement for the Account you are adding.
-
The next step is to make sure that you link the account to the correct Account Type. The system will modify the list of Account Types based on the Statement Type you have chosen. Click on the appropriate Account Type.
The next step is to make sure that the account will be linked to the correct Account Group.
This is essential because the Account Groups provide a structure to the Chart of Accounts that make analysing the Financial Information much easier and more useful if this is done correctly.
For more on this you should read Maintain Account Groups, and Understanding Financial Statements in Sense-i.
- To select an Account Group, click on the three dot button in the Account Group field.
The system will open a window allows you to click on an Account Group.
You will notice that the system filters the Accounts Groups in the list to display only those that match the Financial Statement you selected in step 6 above.
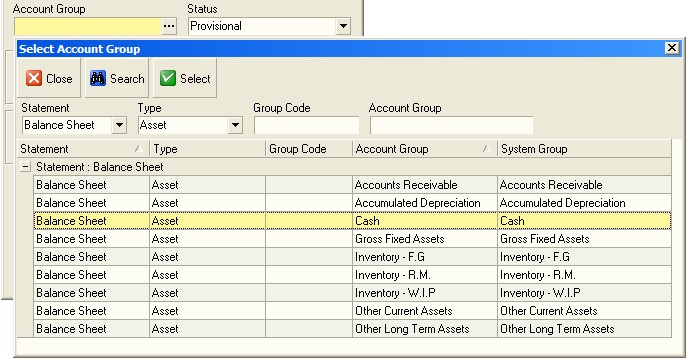
Generally, the list of Account Groups within a Statement and Account Type is not very long so you should be able to find the Account Group you wish to use by simply reviewing the items in the list. You can however use the any of the Search Fields at the top of the screen to filter the list even further.
-
Once you have found the Account Group you wish to use, click on the appropriate row.
-
Then click the Select button.
The system will return you to the Add Account window and display the name of the Account Group you have selected in the Account Group field.
- You next need to define the Status for the Account. To do this select either; Provisional, Active or Discontinued.
Provisional -- Does not allow any transactions to be posted to the account.
Active -- Allows transactions from sub-ledgers and the general ledger to be posted to the account.
Discontinued -- Is used to prevent further transactions from being posted to the account while the account is retained because transactions for the current year already exist in the General Ledger.
The status of an Account has no other impact on its Profile, its Posting Rules or its Behaviour. You can change the status back to Active from Discontinued at any time.
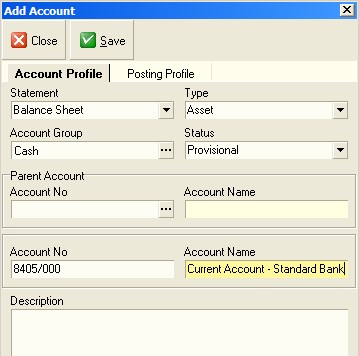
If the Account you are creating IS NOT a child account, then leave the Parent Account No and Account Name fields and go directly to the Account No and Account Name fields.
-
Enter a Code for the Account in the Account Code field.
-
Enter a Name for the Account in the Account Name field.
-
Click Save and then Close.
The system will return you to the Maintain Chart of Accounts window and displays the information about the Account you have selected in the list.

-
You can search for the Account using any of the Search fields at the top of the screen. To do this, enter information in the appropriate Search field, (for example the Account No field)
-
And then click the Search button at the top of the form.
The system will update the list to show only those Accounts that match the search criteria you have selected.
You can also use the Quick Search features that are built into the Column Headings on every list screen.
- If you click on the right hand side of most column headings on a list screen you will notice the system displays a small black arrow head. If you click on this button the system will display all of the unique values in the list screen.
This is known as the Quick Filter List.
- You can select one or more of the items in the list screen by clicking in the box to the left of each value.
The system will then hide all items in the underlying list screen that do not correspond with the values you have selected in the Quick Filter List.
- To undo the Quick Filter selection, click the (All) option at the top of the list.
Adding A Parent Account
To add a Parent Account, repeat the steps described above. You can at any stage convert a Normal Account (that is one without sub-accounts) into a Parent Account by simply selecting the Account as a Parent when you create a Sub-Account.
Adding A Child Account
To create a child account you repeat steps 5 to 14 as described above, with the exception that you need to insert the following steps between steps 11 and 12.
When creating a Sub or Child Account you need to link the Account to an Account that will act as its Parent Account.
- To select an Account to act as the Parent Account, click on the three dot button in the Parent Account No field.
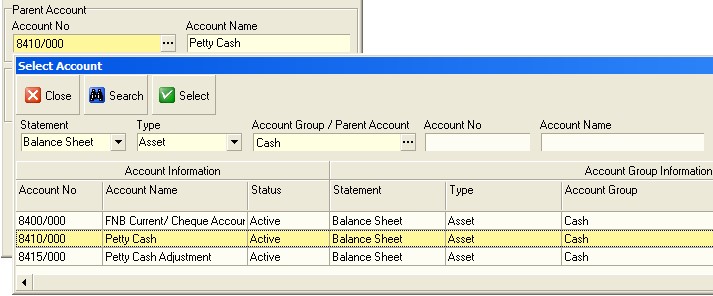
The system will open a window allows you to click on an Account from your Chart of Accounts list.
You can use the any of the Search Fields at the top of the screen and the Quick Filter List described above to filter the list if you need to do so.
-
Once you have found the Account you wish to use, click on the appropriate row.
-
Then click the Select button.
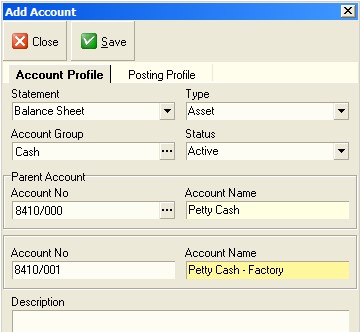
The system will return you to the Add Account window and display the Account No and Account Name of the Account you have selected in the Parent Account panel.
The system will return you to the Maintain Chart of Accounts window and display the information about the Account you have selected in the list.
You will notice that the Account No and Name is displayed in the Parent Account fields in the list.

This is the end of the procedure.