Review GL Detailed Ledger (SAF-4068)
Purpose
Helps you understand and audit the balances of accounts in the General Ledger by displaying the details of every transaction for each account in your Chart of Accounts.
Step-by-step Guideline
-
Click on the Finance option on the Main Menu.
-
Then click the General Ledger menu item on the drop down menu.
-
Then click G/L Detailed Ledger.
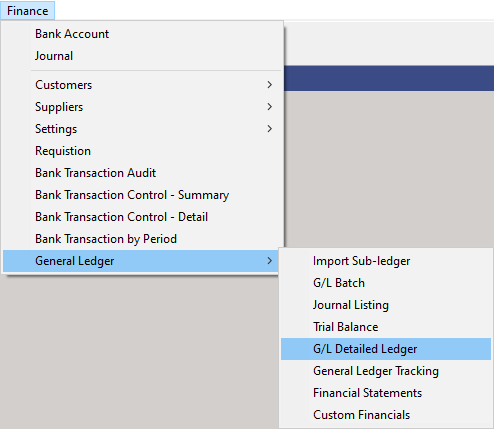
The system will open a screen titled "G/L Detailed Ledger." The G/L Detailed Ledger screen displays the detailed transaction information and a running balance for each account that has been defined in the Chart of Accounts and to which transactions have been imported.

Understanding the G/L Detailed Ledger Screen
The worksheet for the G/L Detailed Ledger screen contains the following columns to allow you to quickly and easily analyse the information for each account in the General Ledger.

ACCOUNT INFORMATION BAND
The system displays information about each account in the Account Information Band.
A. The system displays the Financial Statement to which the account is linked and will be displayed in the Statement column.
B. The system displays type of account as set in the Account Type field when creating the account in the Chart of Accounts. This would be either Asset, Liability, Owner's Equity.
C. The system displays the Account Group to which the account is linked when it was created in the Chart of Accounts. This allows you to categorize, sum and analyse financial information at a higher level than that of an account.
D. The system displays the Account Number assigned to the Account in the Chart of Accounts. This allows you to quickly find and track the transactions for a specific account.
E. The system displays the Account Name assigned to the Account in the Chart of Accounts. This name is an indication of the types of transactions that were posted to the General Ledger. So, for example, if an account name is Electricity, you know that the financial values displayed in this account is for Electricity related expenditure.
ACCOUNT PERIOD BAND
F. The system displays the YEAR and MONTH of the Accounting Period to which each transaction has been posted.

JOURNAL INFORMATION BAND
G. The system displays the Batch Entry number for each row in the General Ledger Detailed Ledger screen. The Batch Entry number is generated by the system through combining the number of the GL Batch in which the transaction was created with the Journal number of the transaction used in that batch. So the Batch Entry number 60000005 means GL Batch number 60 and Journal number 5.
H. The system displays the Date that the transaction was created in the Date column.
I. The system displays a Code for the Transaction Type (also known as a Journal Type) that was used to create the original transaction in the Description field. This helps you to quickly identify in which function the transaction was created.
You might for example decide that you want to investigate a transaction with the code POINV. This would tell you that you needed to review a Purchase Order Invoice transaction. For a complete list of all the Transaction Types and where to find them in the system, refer to the document titled "Transaction Type Guideline."
POSTING INFORMATION BAND
J. The system displays the Transaction Number for the original transaction that created the entry in the Reference field. This will sometimes have a prefix that corresponds to the Transaction Type, so SODN244 refers to Sales Order Delivery Note 244 but sometimes, as in the case of Supplier Invoices or Bank Transactions it will simply have a number. To identify the original document in this case you must refer to both the Transaction Type code in the Description column together with the Reference number displayed in the Reference number column.
K. The system displays a Description for the transaction in the Description column. If the leg of the journal that you are reviewing relates to a Customer or Supplier, then the system will display their name in the Description field. If the leg relates to a Product or Material, the system will display the item code in this column. If it relates to a Tax Item, then the system will display the Tax Item name in this field.
This enables you to quickly identify the entity to whom the transaction was related without having to drill into the original source transaction document.
L. If the posting rule and underlying transaction for this leg of the journal posts to the selected account as a Debit, then the system will display the amount in the Debit column.
M. If the posting rule and underlying transaction for this leg of the journal posts to the selected account as a Credit, then the system will display the amount in the Credit column.
N. The system will display any note that has been entered against the journal in the Notes column.
O. The system will add the amount from either the Debit or the Credit column to the balance of the account immediately before the row and display the balance after the transaction in the Balance column.
This allows you to monitor the running balance for the account after each posted transaction.
Using The Search Criteria

The G/L Detailed Ledger contains several fields that you can use to quickly search for and filter the information displayed in the worksheet.
- When working with the information in the G/L Detailed Ledger it is a good idea to filter the information in the worksheet to one or more specific accounting periods.
Click on the three-dot button in the From Period field and select a Starting Period.
- Click on the three-dot button in the To Period and select an Ending Period.
The system will then display only those transactions that occur in the Starting Period, the Ending Period and any period in between.
- If you wish to limit the accounts that are displayed in the worksheet to either the Balance Sheet, Income Statement or Cash Statement, then select the appropriate Statement Type from the Statement field.
- If you wish to limit the accounts that are displayed in the worksheet to those of a specific Account Type, then select the Account Type you wish to use from the Type field.
-
You can search for a specific Account Group using the lookup list displayed in the Account Group field and then limit the accounts displayed in the list to a specific Account Group.
-
And finally, you can limit the transactions displayed in the worksheet to those that have been posted to a specific Account by selecting an account from the Chart of Accounts using the Account lookup field.
- Once you have set the search criteria you wish to use to filter the information displayed in the worksheet, click the Search button on the form bar.
Using the Worksheet Quick Filter
You can further filter the information in the worksheet by using any of the columns to analyse, filter, group and select the information with which you wish to work.
Use the Quick Search features that are built into the Column Headings on every list screen to quickly select the rows you need.
If you click on the right hand side of most column headings on a list screen you will notice the system displays a small black arrow head. If you click on this button the system will display all of the unique values in the list screen.
This is known as the Quick Filter List.
- In the Period Information band, click the Quick Filter arrow in the Accounting Period column. Then click on the Accounting Period on which you wish to focus.
You can apply the Quick Filter to any of the columns in the G/L Detailed Ledger worksheet. You will use this functionality extensively when analyzing and matching information for a specific transaction as described below.
Using the GL Detailed Ledger
The General Ledger Detailed Ledger is a powerful report that lists all the financial information that has been posted in the company's General Ledger and that has been used to calculate the movement and balances of the accounts that appear on the company's Chart of Accounts and Financial Statements.
The General Ledger Detailed Ledger displays information across multiple Accounting Periods, Transaction Types, Accounts and Journals.
What this enables you to do is to analyse the information in the General Ledger in precise detail and determine how the balances in the accounts in the Trial Balance have been calculated. You can then use this information to identify potential problems with how transactions have been captured or posted and then either reassure yourself that the information in the financial reports is correct or decide what actions to take to improve the financial controls is use at the company.
Whereas the View Journal Screen displays the posting legs for a single journal in a detailed view...
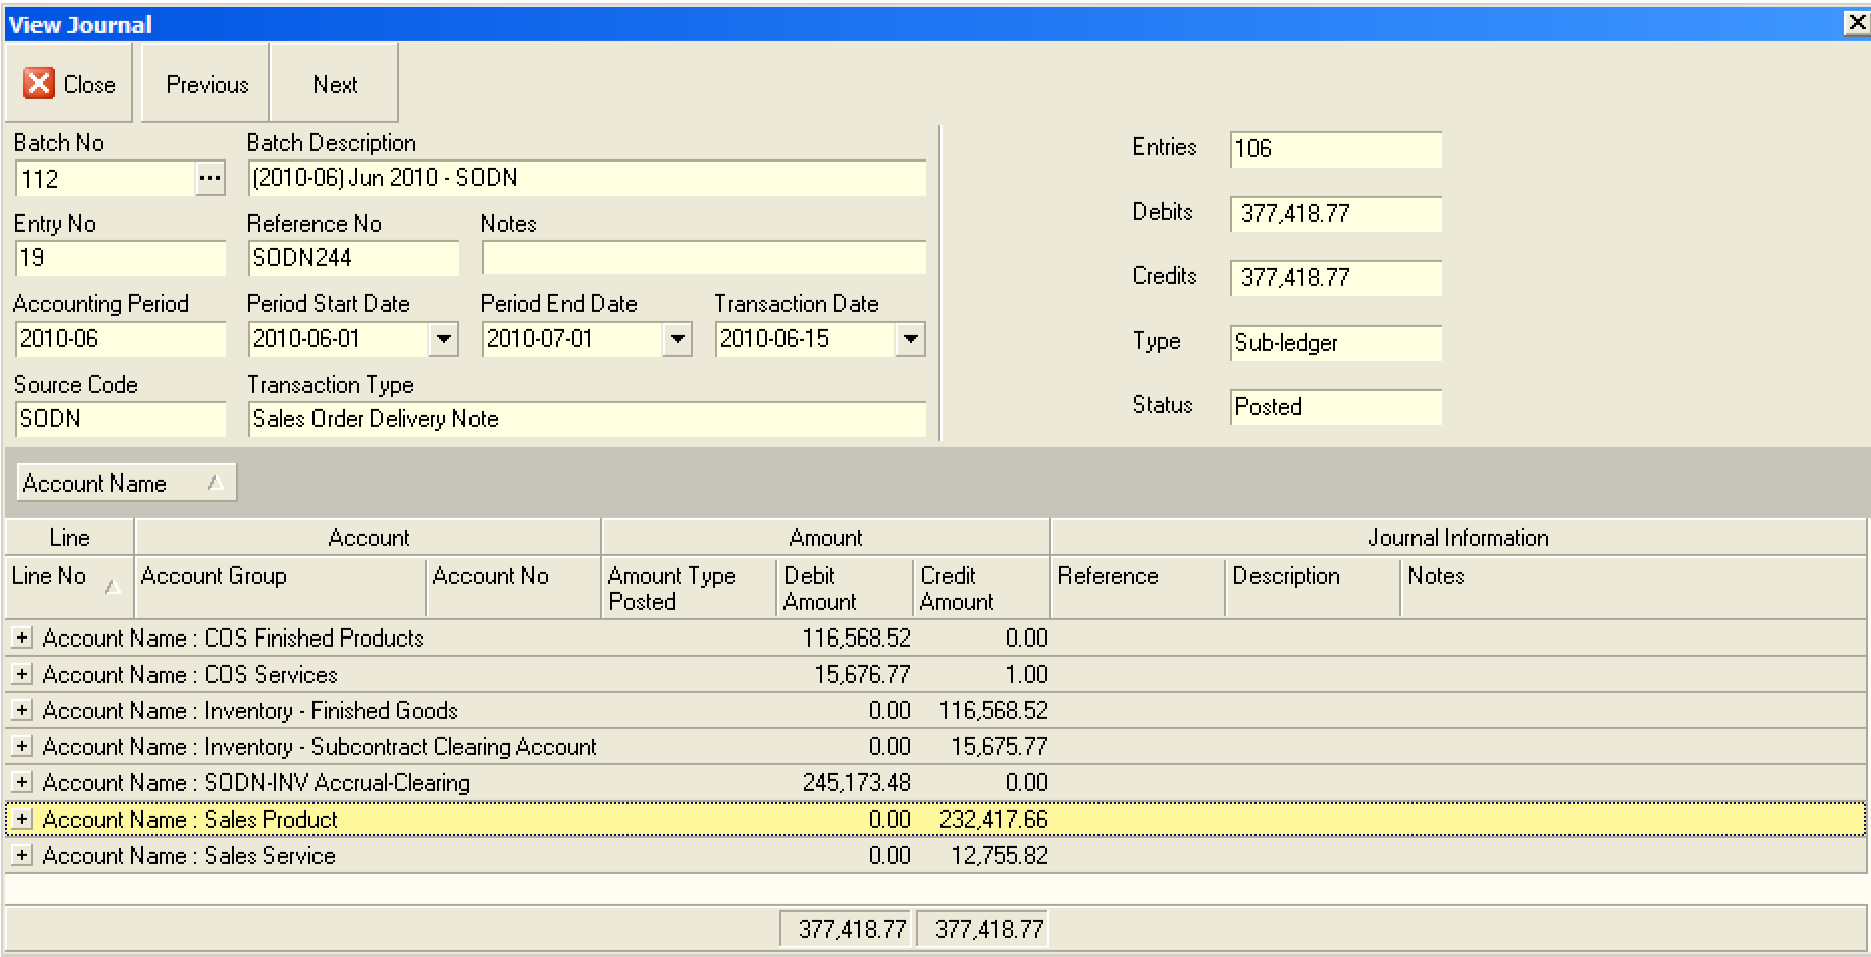
The Journal View for a specific Transaction, in this case SODN244.
The General Ledger Detailed Ledger displays exactly the same information, but instead of restricting you to a specific transaction, it allows you span the entire financial information set, view the Journal information across multiple Accounting Periods, Statements, Account Groups, Accounts and Transaction Types.
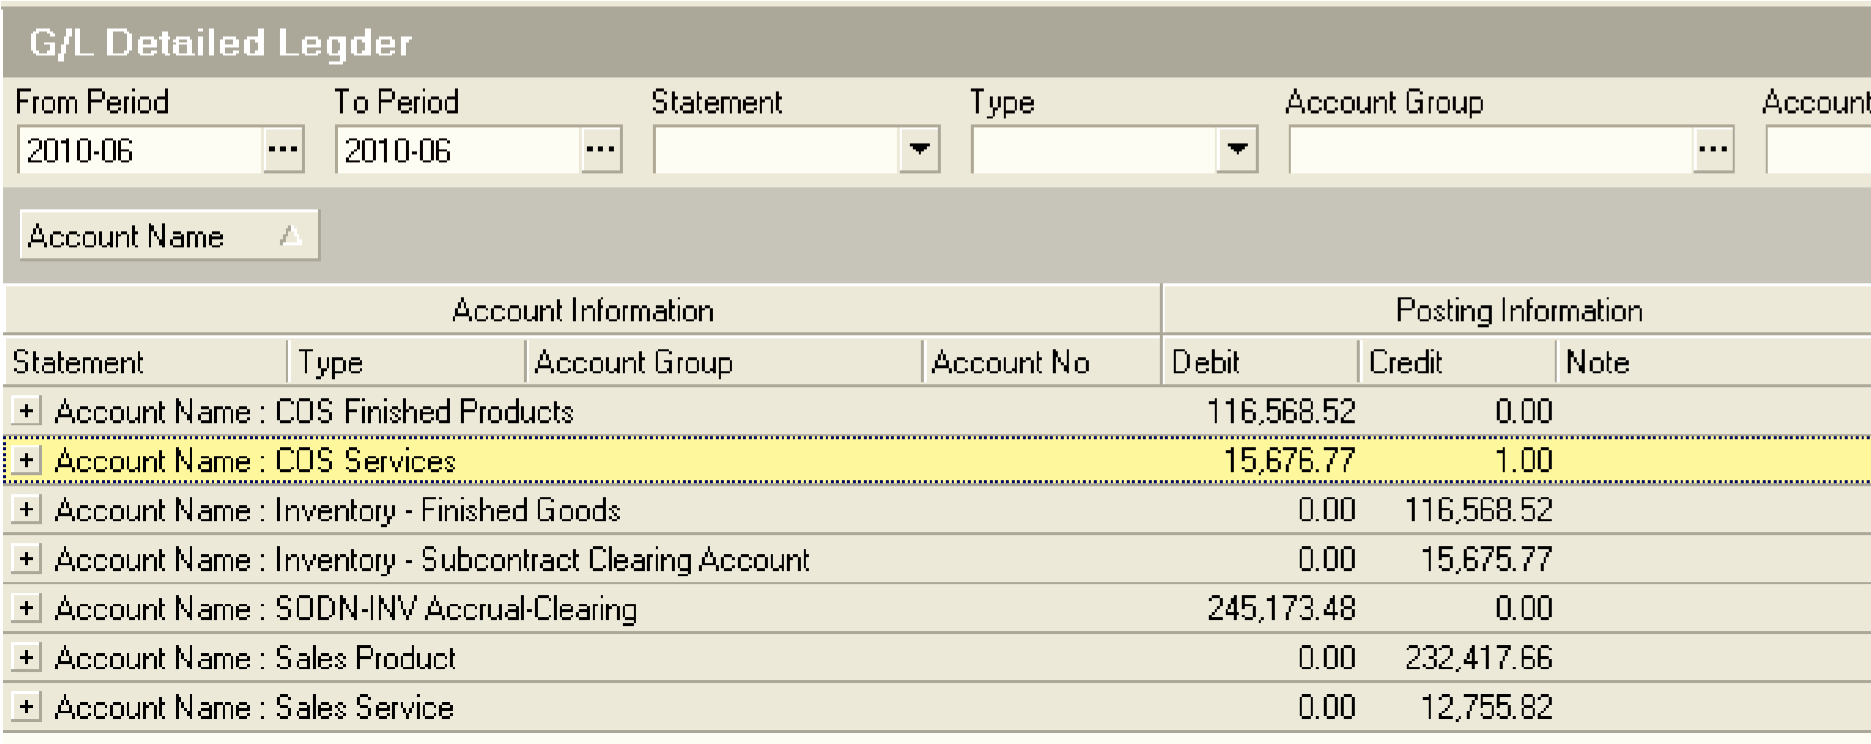
The General Ledger Detailed Ledger filtered to the same transaction, in this case SODN244.
But by removing the restrictions in the quick filter, i.e. going from a specific transaction number to showing all transactions of the same type (i.e. from SODN244 to all SODNs) you will notice that the structure of the information remains the same. In other words, the specific Accounts displayed on the screen remain the same, only the values change because they now include other transactions of the same transaction type.
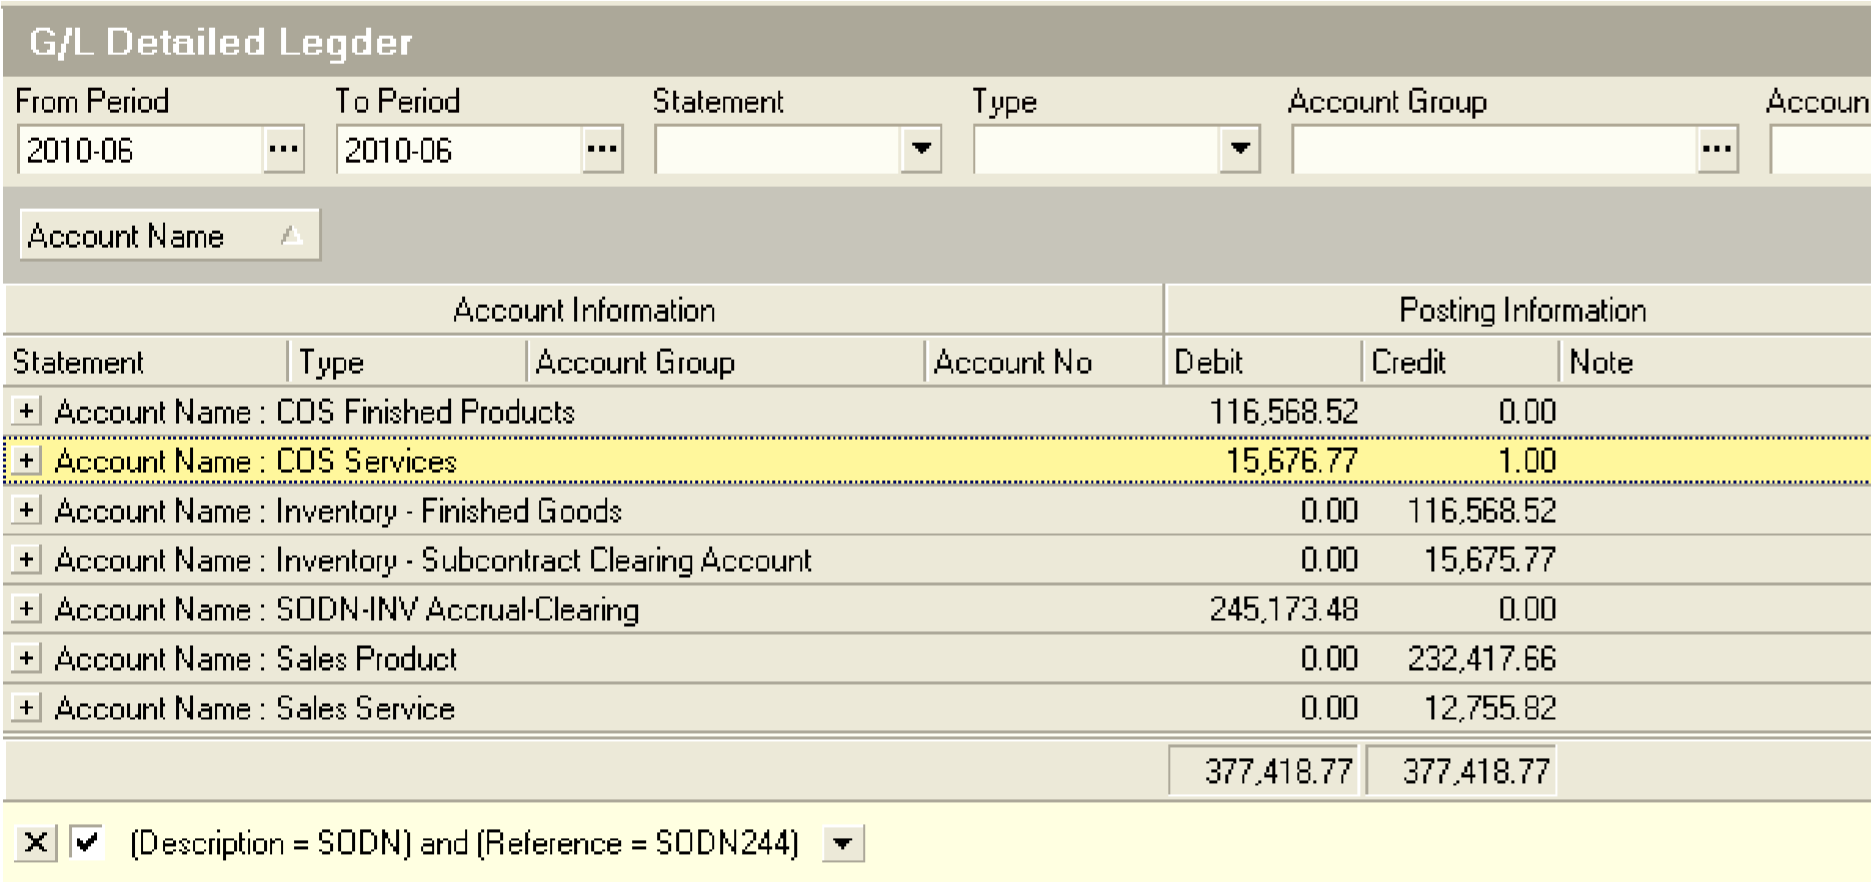
The filter conditions at the bottom of the screen as set by the Quick Filter settings selected. In this case to filter to all transaction types = SODN and to filter further to a specific transaction no = SODN244.
Then, by removing the restriction to show many different transaction types the structure of the information displayed on the screen changes because different transaction types will post to different accounts in the Chart of Accounts.
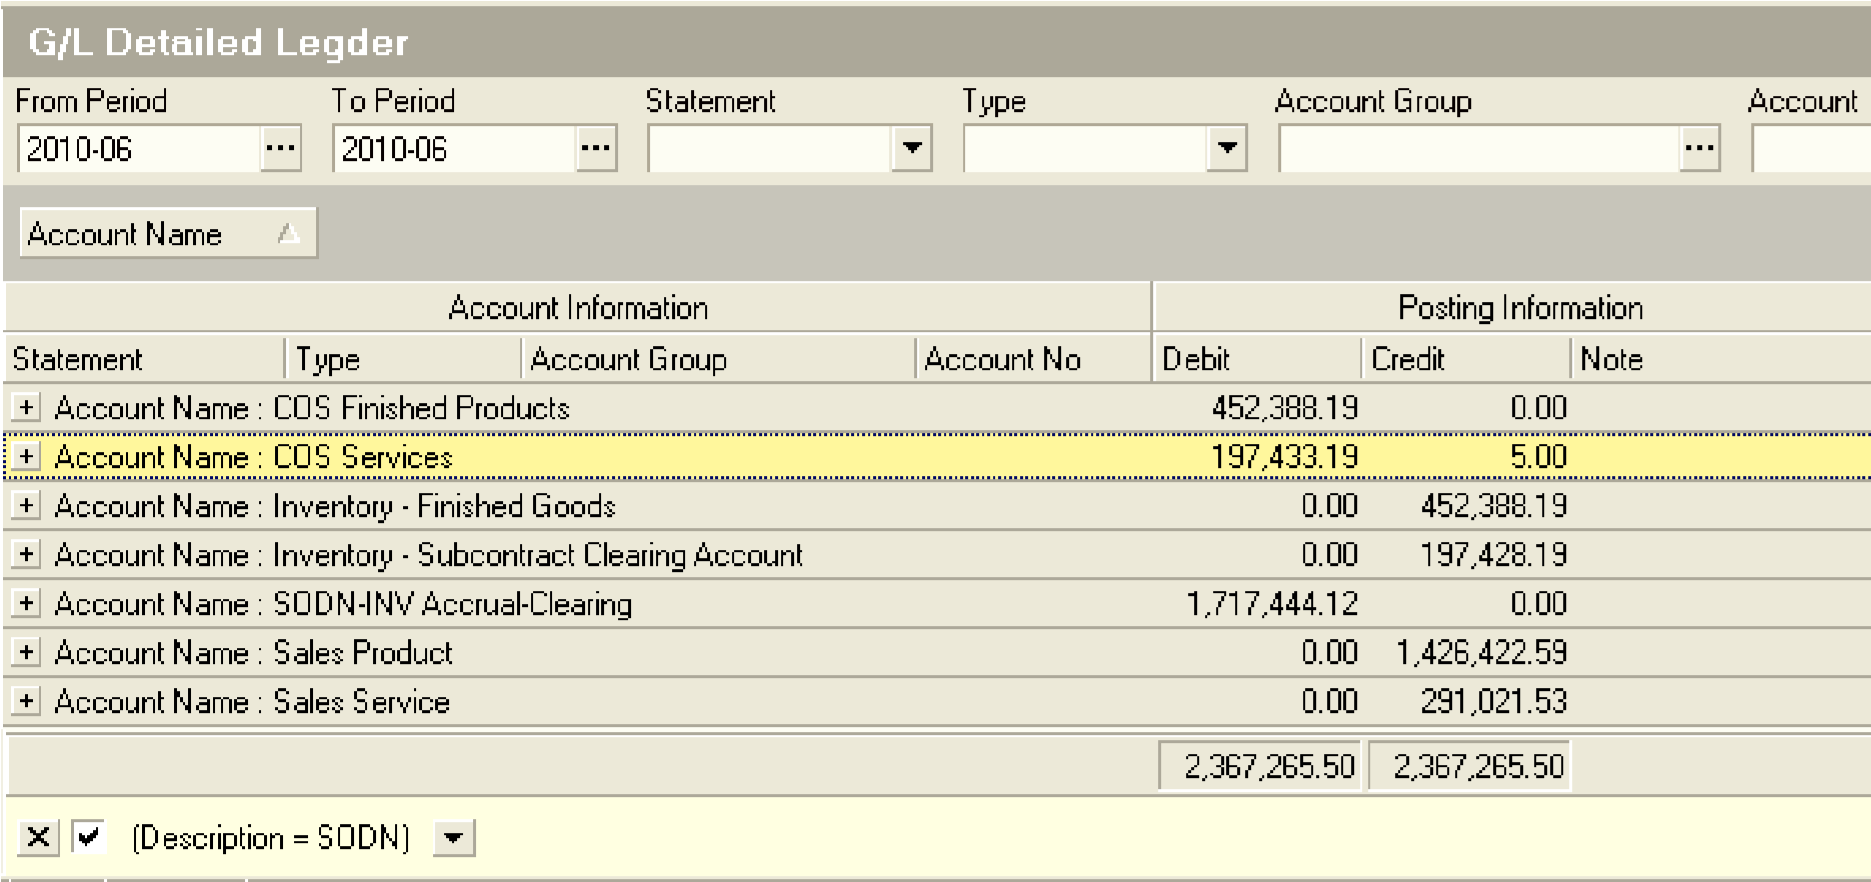
Notice how the Accounts displayed on the screen remain unchanged by how the values displayed have changed. This is because many additional transactions have been included in the information displayed on the screen. You can see at the bottom of the screen how the filter no longer restricts the information to a specific transaction no (i.e. SODN244 is removed) and now only shows all transactions for a specific type (i.e. SODN).
And then, you can remove the filter by Accounting Period to show information across different accounting periods.
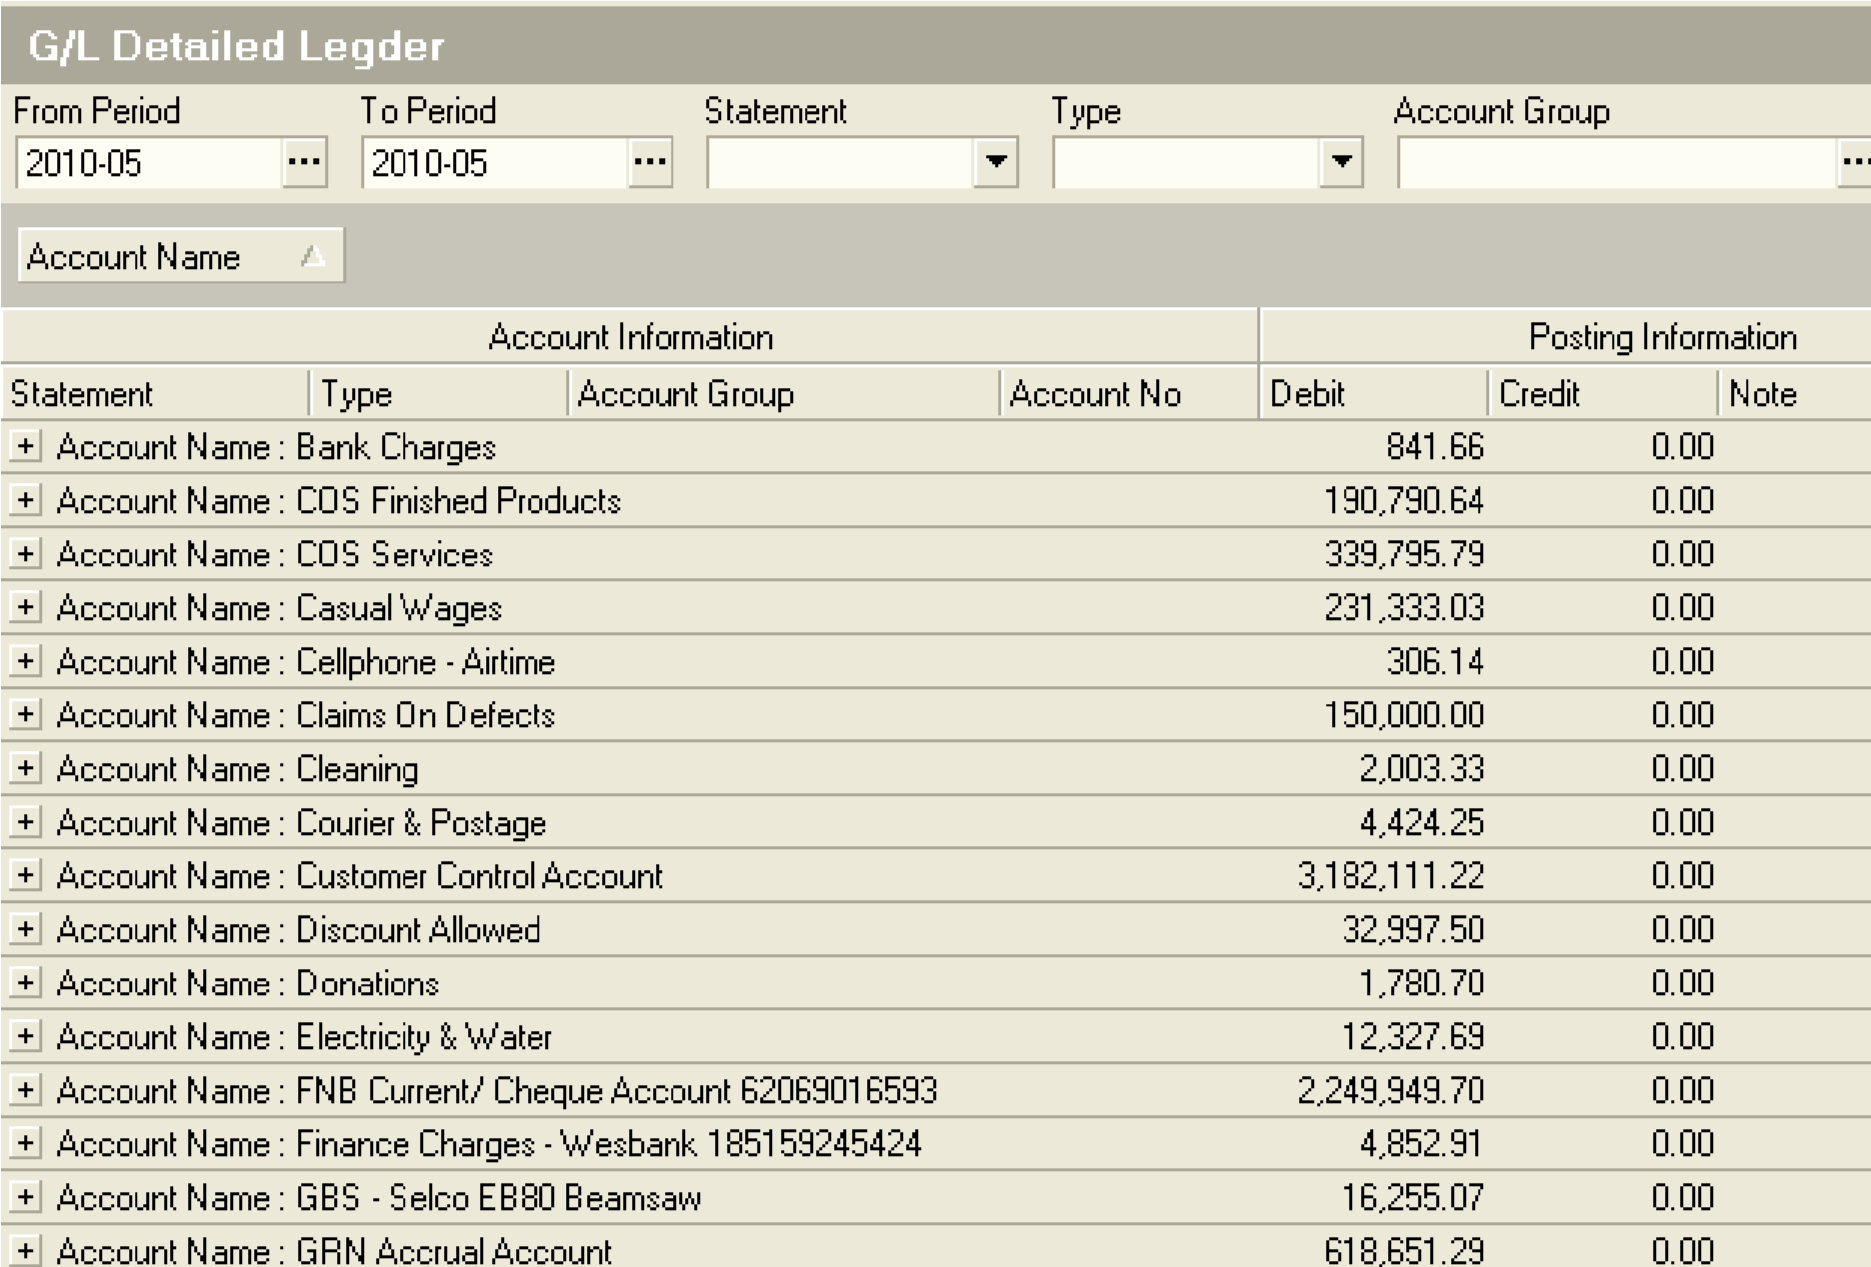
In this example of the General Ledger Detailed Ledger the filter has been set at the level of a specific Accounting Period. This will cause the system to display more accounts than in the previous two queries because the different transaction types will post to different accounts in the Chart of Accounts. (This is defined by the posting rule set for each Transaction Type.)
There are two ways to use the General Ledger Detailed Ledger effectively:
The first is to review the accuracy and the completeness of ALL the financial information for a SPECIFIC ACCOUNTING PERIOD.
The second is to analyse the transactions used to calculate the balance of a SPECIFIC ACCOUNT in your trial balance.
Review the Accuracy and Completeness for a specific Accounting Period
To review the accuracy and completeness of all financial information for a specific accounting period you should open the G/L Detailed Ledger, filter the transactions to the Accounting Period you wish to review, and then use the Quick Filter in the Journal Information Description field to work through each Transaction Type one at a time.
You can print the Journal Types from the Journal Types screen and then tick these off one after the other after you have filtered the G/L Detailed Ledger and then check 3 things.
-
Are the correct accounts being used to post the transaction?
-
Are the values displayed each of the accounts correct? Are they within range?
-
Are the accounts in correct proportion to each other? In other words, if the cost of the products you sell are usually 40% of the net selling price, you would expect to see the value of the Cost of Goods Sold -- COS Finished Products to be 40% of the value of the Sales -- Products account.
You can click the + sign next to any account name to view the list of the transactions that make up the amount.
If you identify a specific transaction that you think needs to be investigated in more detail, use the transaction number from the Reference field to open the specific transaction and compare it to the information in the G/L Detailed Ledger by filtering the G/L Detailed Ledger to the same transaction number. (Select the transaction no from the Quick Filter in the Reference field.)
Analyse Transactions Used To Calculate The Balance Of An Account
-
To analyse the transactions used to calculate the balance for a specific account you should first identify the account that you wish to analyse.
-
Then, you should filter the transactions in the G/L Detailed Ledger to that account by using either the fields in the Search Panel or, preferably, the Quick Filter on the Account No column.
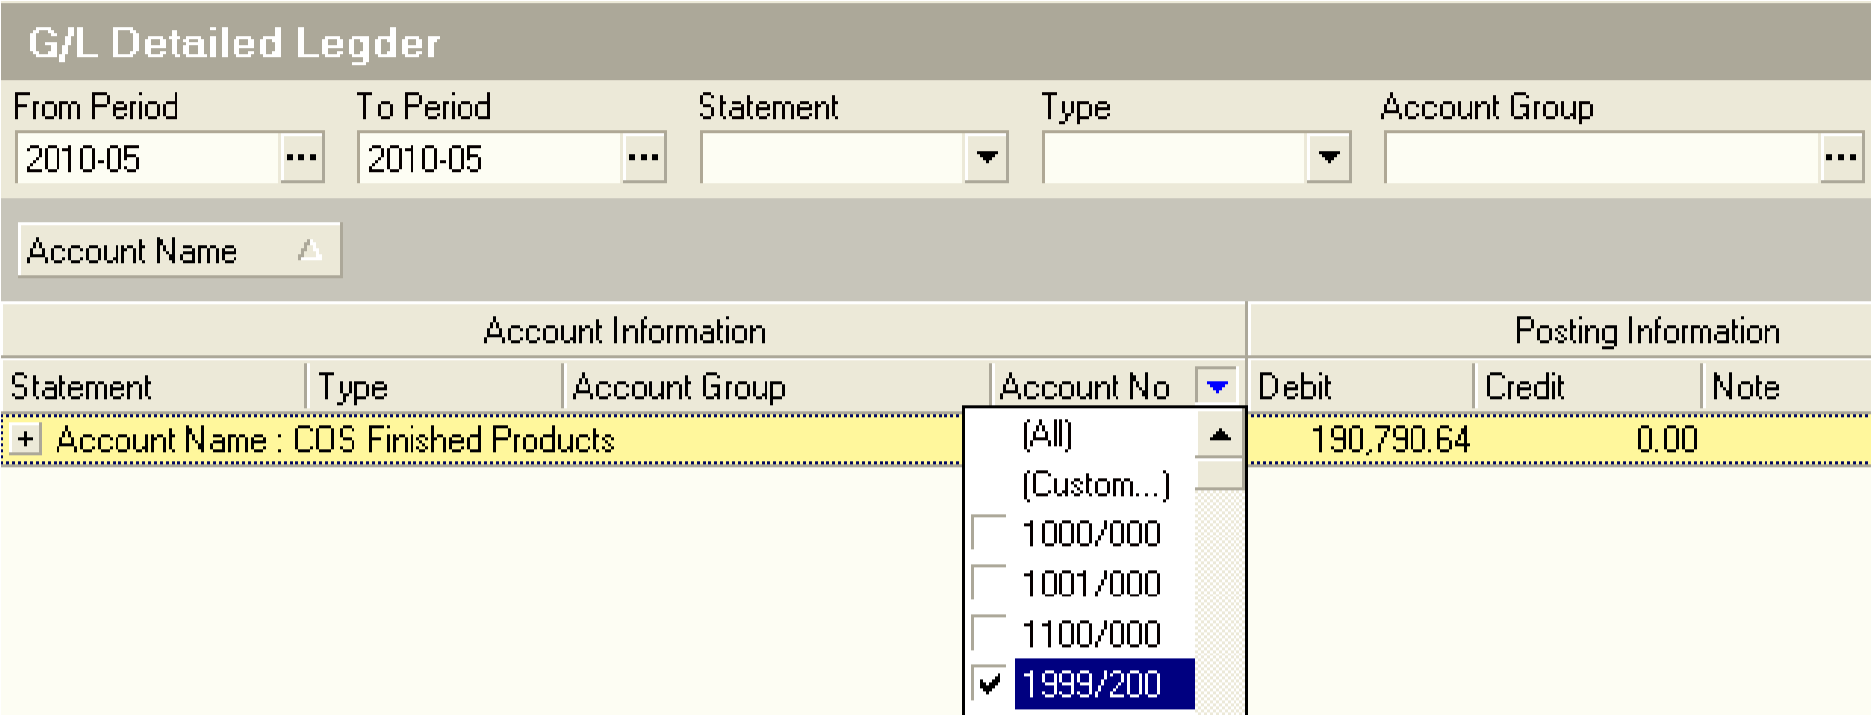
The system will remove all the rows from the worksheet that do not contain the selected Account Number.
- Click the sign next to the Account Name to view the individual transactions posted to the account.
You will notice that the system opens the worksheet to display the individual transaction information for the account you have expanded. This information includes an Opening and Closing Balance row for each Accounting Period and rows for each of the transactions that occur within the Account Period between the Opening and Closing Balances.
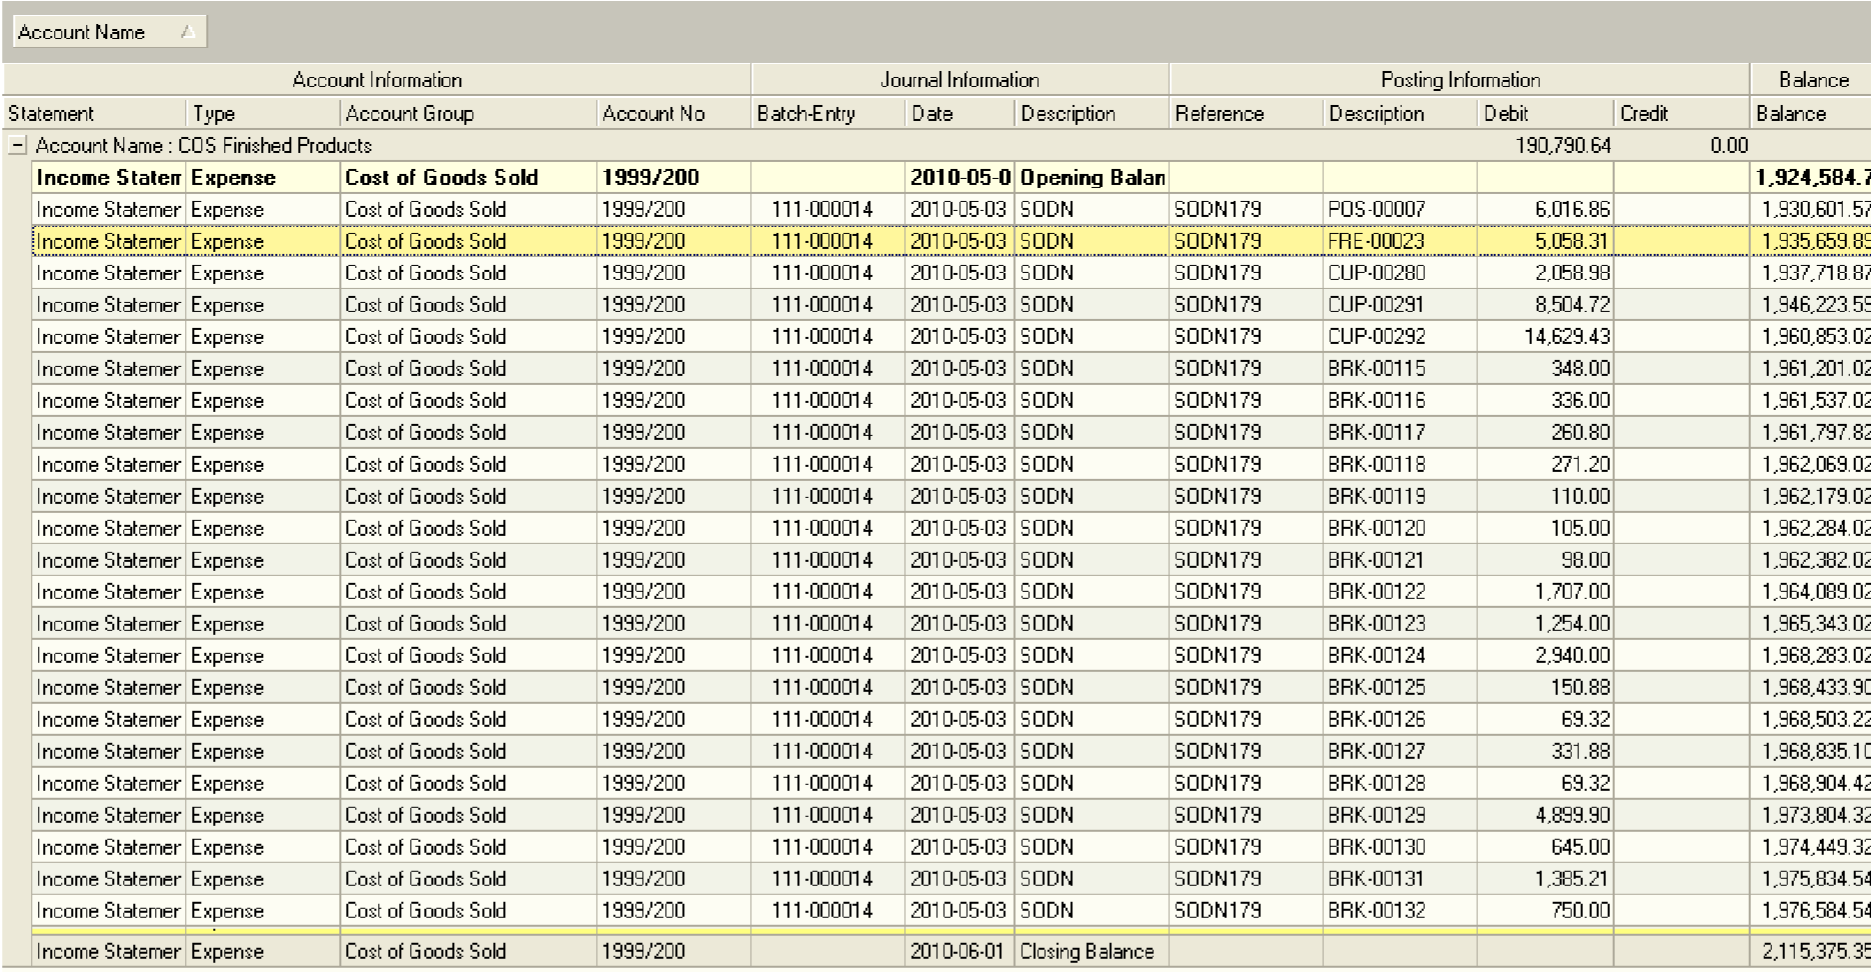
- Scroll through the Detailed Transaction Rows in the list
If you identify any row that you think looks suspicious and needs further investigation, then you can change the Quick Filter to remove the Account Number from the Account No field and select the specific Transaction Number from the Reference field.

-
Use Quick Filter on Reference Field in Posting Information column to show all information related to the specific transaction number you wish to investigate.
-
Then remove the limit on the Account No so that you can see all the legs for the selected transaction.
And the system will then display all the account numbers to which the selected transaction has been posted.

You should then review the amounts posted to the various accounts and decide if they are correct. It is a good idea to follow the steps outlined in the procedure titled "GEL-009 -- Resolve Errors With GL Batches and Journals." This procedure explains in step by step detail what you need to do to identify the causes of any problems with the information posted in your General Ledger and how to resolve such problems.
Repeat the steps described above to analyse the completeness and accuracy of the financial information in the company's General Ledger.
It is a good idea to systematically work through each of the different Transaction Types that exist in the company one by one, and then to review the Financial Statements and Account Groups.
A final step you should take when reviewing the completeness and accuracy of the General Ledger information is to check that each of the standard journals for transactions such as Salaries and Wages, Finance Agreements, Sale of Fixed Assets and Leases and Loans have been captured for the period in question.
Once you have decided that the information in the General Ledger is both Complete and Accurate you should consider marking the Accounting Period as Closed to prevent any further information from being erroneously captured to the period in question.
- To retain a record of the General Ledger listing in paper form, click the Print button on the form bar.
The system will display the General Ledger Detailed Listing in a Print Preview screen.
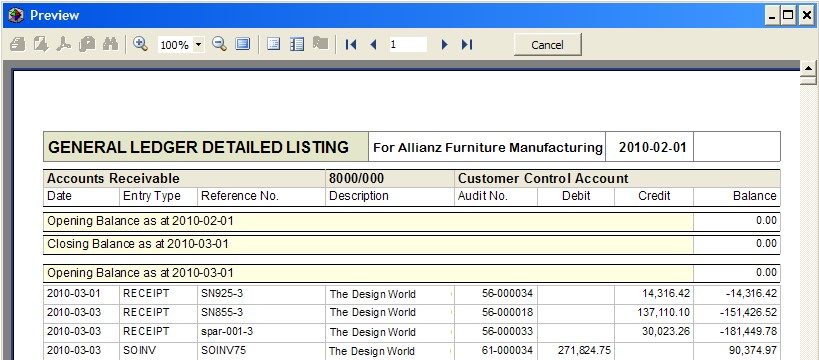
You can use the Print options dialog screen to select specific page numbers if you wish or you can simply choose to print the entire report.
-
To Print the entire report click the Print button on the Print Preview screen.
-
You can also save the report as a PDF file and email it to another party by clicking the PDF icon at the top of the Print Preview screen.
The system will then print the General Ledger Detailed Ledger report.
- Once you have completed working with the GL Detailed Ledger, click the Close button.
This is the end of the procedure.